Posted by Anita on 07.16.08 11:39 PM
 I have to say right up front, I never was a big fan of the whole brining craze. I mean, yeah, sure — you pump a turkey or chicken full of salt water, and it stays moist… but the white meat ends up with all the texture of an old sponge.
Some pundits (and yes, I’m looking squarely at you, Chris Kimball) prescribe brining as a panacea for nearly every meat, and a few types of seafood, too. But, really, why not start out with a nice piece of meat to begin with and treat it right? After a few squishy suppers, I learned my lesson: Whenever I see “brined” on a menu or in a recipe, I cross it off my list.
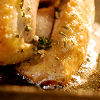
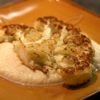
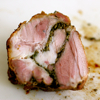
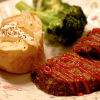
But our dinner last week at Nopa got me thinking again. I ordered the justly famous pork chop, and it was everything pork should be, but seldom is: Meaty, juicy, chewy, and flavorful. As I raved to our server, she explained that the delicious Napa-raised pork they use doesn’t need much help. But then she added that a quick 4-hour brine helps boost the flavor so that every bite is seasoned, without turning the texture to wet-paper-towel consistency.
A chop this good is enough to make a brining convert out of even a curmudgeon like me. Determined to repeat the brined chop at home, I turned to the cookbook from the last restaurant where I really remembered being wowed by a pork chop. And wouldn’t you know it: They quick-brine their pork at Boulevard, too. The original recipe calls for making a brine with hot water, then chilling it in the fridge before adding the meat. But I’m lazy and I need to keep moving on the weekends or else nothing gets done. So I cut back on some of the liquid in the dissolving step, and added it back in — in the form of the chicken-stock cubes we keep on hand for sauce-making — to cool the brine in an instant. (If you don’t keep your extra stock in ice cube form, you can always use plain old ice.)
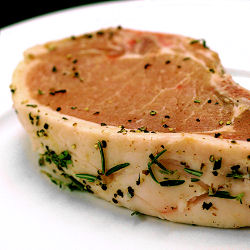
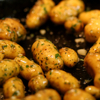
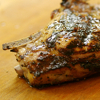
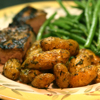
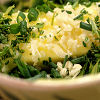
Into the briny deep went a gorgeous Marin Sun Farms chop — a good, thick one we picked up at the farmers market. After its bath and a subsequent drying-out rest in the fridge, we grilled it over medium heat, to avoid scorching the exterior. On the side, we roasted some of Mr. Little’s gorgeous fingerlings in a mix of Spring Hill butter, Sciabica olive oil, our own herbs, and a healthy scattering of gorgeous young Rocambole garlic. We made a pan of Dirty Girl haricot verts using our favorite stovetop method and enjoyed the lot with our pairing this week: Fox Barrel hard cider, the same as we used in the brine.


Quick-Brined Pork Chops
– adapted from Boulevard: The Cookbook
1 cup hot water
2T kosher salt
1/4 cup packed brown sugar
1/2 cup hard cider
1T crushed black peppercorns
1T Dijon mustard
5 sprigs thyme
2 tsp chopped fresh rosemary leaves
1/2 cup unsalted chicken stock, frozen (or crushed ice)
2 thick-cut pork chops
Combine the water, salt, and sugar in a large bowl or glass measuring cup, stirring until the salt and sugar dissolve. Add the cider, peppercorns, mustard, thyme, rosemary, and frozen stock. Stir the brine until the stock melts; if still warm, refrigerate until cool.
Put the chops in zip-top bag, and pour the cooled brine over them. Seal the bag, squeezing out as much air as possible. Put the bag in a bowl or glass pan, and arrange or prop up the chops so that they’re standing edgewise. (You want the brine to be in contact with both of the cut sides of the chop. In my small mixing bowl, I can put the chops on their edge and lean them up against the side. If this isn’t possible, just be sure to flip them midway through the brining time.)
 Refrigerate the chops for 1-1/2 hours, or up to 4 hours — no more, or you will have mush. (And if you’re using thinner chops, an hour is plenty!) About 90 minutes before cooking, remove the chops from the brine, and pat dry. place on a plate (or, ideally on a rack over a rimmed baking sheet) in the fridge to dry out the surface a bit, and to allow the brine to equalize throughout the meat. 30 minutes before cooking, bring the chops to room temperature, and preheat your grill or oven. (Heat grill to moderate-high heat, oven to 375°).
When chops are at room temperature, season lightly with salt and pepper on both sides. To grill, cook in your usual fashion to medium temperature (140° to 150° before resting time) — timing will vary widely based on the thickness of your chops and the heat of your grill. If cooking in the oven, heat a large, oven-roof skillet over medium heat. (Brining does speed up browning, go a little cooler than you may be used to for searing meat.) When hot, add olive oil just to coat the pan; when hot again, add the chops and cook for 2 to 3 minutes, until golden, Turn the chops over, and move the pan to the preheated oven for 10 to 15 minutes.
When the meat reaches temperature — either on the grill or in the oven — remove from heat and let rest for 5 to 10 minutes. (If you finished in the oven, you can make a simple pan sauce.) Serve with your favorite seasonal accompaniments.
—-
* Edited to add: We removed the link to Cook’s Illustrated in protest of their bullying tactics.
locavore, meat, One Local Summer, recipes
8 Comments »


Posted by Anita on 06.30.08 8:23 AM
 One day last week, the temperature hit a high of 87° — the kind of heat-wave that sends San Franciscans screaming from our un-air-conditioned homes straight to the nearest mall or cinema. Just two days later, the overnight low was 49°; close the windows, crank up the furnace.
Combine the wacky weather with the unsettling haze from dozens of wildfires, and you’ve got a recipe for doldrums. We cooked at home 4 nights last week, but it felt like work every time. The meal we’d planned as our One Local Summer supper — glazed lamb spareribs — turned out odd and ugly, completely unworthy of photographs, much less a post.
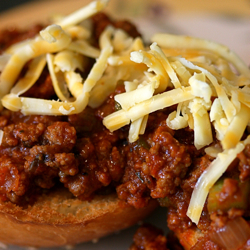
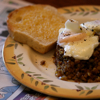
Luckily, we had an ace in the hole planned for mid-week. Our meat CSA has given us a surplus of ground beef. Throw it in a skillet with a hunk of Fatted Calf chorizo, a couple of the season’s first peppers from Happy Quail, a jar of homemade tomato sauce, and some local onions and garlic: Voilá, instant Sloppy Joes. Paired with a side of bacon-lashed coleslaw, we had ourselves a perfectly fabulous — and 100%-local — quick summer meal. Not glamorous, but definitely delicious.


San Francisco Sloppy Joes
1 pound Mexican-style chorizo
1 pound lean ground beef
1 onion, diced
3 cloves garlic, minced
2 whole Anaheim chiles, fresh or canned (or other mild green chiles)
2 cups tomato sauce
1 T ground red chile, or more to taste
salt and pepper
hamburger buns
shredded cheddar cheese and diced raw onion for garnish, if desired
If using fresh chiles, roast over an open flame or under the broiler, turning to cook all sides until black and blistered. Place charred chiles in a paper bag and roll the top tightly to steam; set aside. If using canned chiles, drain and rinse two large whole chiles and set aside.
Saute the chorizo in a large skillet over medium heat until browned. Remove the meat from the pan to a large bowl with a slotted spoon, leaving the rendered fat in the skillet. Saute the beef in the chorizo fat, breaking up large chunks. When mostly cooked, add the onion and garlic and cook a minute or two until translucent. Return the beef to the pan, and add the tomato sauce and red chile. Reduce heat to medium-low and simmer.
If using fresh chiles, peel the charred skins off the steamed chiles; do not rinse. Cut the chiles (canned or roasted) into 1/2-inch pieces, and stir into the simmering meat mixture. Cook, stirring occasionally, until sauce is reduced to a spoonable thickness.
Serve over toasted hamburger buns, garnished with shredded cheese and/or raw onions.
cooking, locavore, meat, One Local Summer
17 Comments »
Posted by Anita on 05.22.08 1:07 PM
 “A whole bird, slaughtered for the nourishment and pleasure of the entire family, is a conspicuous display — if not of serious wealth, then at least of comfort and contentment.
These days, it is also one of the few family meals that demands to be eaten at the table, rather than in front of the television. And, more important perhaps, it is one of the few dishes that is actually capable of getting disparate family members around that table without protest.”
— Hugh Fearnley-Whittingstall,
The River Cottage Meat Book
.
KJ over at A Cracking Good Egg tagged me for the Book Wisdom meme:
1. Pick up the nearest [foodie] book.
2. Open to page 123.
3. Find the fifth sentence.
4. Post the next three sentences.
5. Tag 5 other people* and acknowledge who tagged you.
(* I don’t mind being tagged, but I know other bloggers who feel it’s an imposition. So, let me know in the comments if you want to play along.)
I’m not sure why it’s taken me this long to share The River Cottage Meat Book with you. Even though I’ve had it close at hand since Christmas — it’s always either on the coffee table or my nightstand — I am still wrapping my head around this volume. It’s not that I don’t know that I love it (because I most definitely do). And it’s not that I haven’t cooked out of it enough (because I definitely have). Nor is it because I don’t know if it’s worth your $40 investment (because it definitely is). And it’s not even that I am worried you’ll be unsettled by the beautifully photographed images and descriptions of ethically raised farm animals as they make their way from field to food (because I definitely was).
But despite my unequivocal endorsement — when I win the lottery, I’ll buy a copy for every omnivore I know — I also feel like it might take me years to fully explore this 500+ page treatise of meaty pleasures. It’s not the sort of lighthearted summer cookbook that inspires you to casually toss off a post and then go back to planning next week’s menu. It’s a thinking-man’s cookbook that’s unabashedly carnal and carnivorous, with plenty of thought-provoking commentary woven into its mouthwatering menus.
Don’t get me wrong: It’s no mere meat manifesto. Fearnley-Whittingstall somehow walks an ethical omnivore’s path that’s neither preachy nor overly sentimental. He’s straightforward in that very English sort of way, unromantic and yet so obviously enthralled in what he is doing that you can’t help but wish for your own bucolic farm on the rolling hills of West Dorset (picturesque stone house included). And although the Pollan-esque prose on carnivore ethics is what sets The River Cottage Meat Book apart most directly from most any other cookbook, it’s far from the only reason for owning it.
The book is chock full of useful information about how to purchase meat, even when a supermarket is your only resource. There’s an entire summary chapter devoted to meat thrift — an idea that Fearnley-Whittingstall takes pains to explain has nothing to do with being miserly, despite the obvious frugality. In between, the author shares his vast knowledge on the cuts of meat available from each of the major species, as well as offering up weighty chapters on each sort of cooking: roasting, slow cooking, fast cooking, barbecuing (by which he means grilling), and preserving. From the humblest cottage pie to the most elaborate holiday feast, the recipes are so engaging that you’ll find yourself plotting your next meal around them before you’ve reached the bottom of the page.
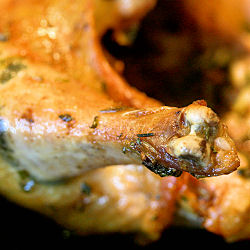
Now, you wouldn’t think that a simple roast chicken would tolerate much variation from the usual preparation: Season it, roast it, rest it, carve it. But it’s the little things that set the River Cottage method apart. First, the amount of butter used is quite frankly astounding, but once you taste the end result you’ll be happy you followed directions. The unorthodox technique — opening the body cavity wide; making multiple temperature adjustments; dousing the roasted meat in the buttery drippings — yields a moist bird with shatteringly crunchy skin, despite a relatively brief cooking time. It’s practically the antithesis of the widely lauded Zuni Cafe method, but the end result is equally eye-opening.
—
When I write about a dish I’ve made from a published source, I usually rewrite the recipe in my own words. (Listing a single recipe verbatim is almost certainly within the bounds of fair use, but as a professional writer I’m hypersensitive to issues of authorship. Call me wacky.) But this time, I’m giving you the real McCoy. Not so much because I want you to make this roast chicken — although I suspect it would make a nice change from your usual method, as it was for us — but because I want you to understand the author’s gift of turning even this simple weekend classic into an exercise in clarity, poetry, and deliciousness.


Herb Roast Chicken
– excerpted from The River Cottage Meat Book
1 small but plump roasting chicken weighing about 3 to 4 pounds
7 tablespoons soft butter
generous handfuls of fresh herbs, roughly chopped
1 garlic clove, crushed
1/2 glass of white wine
salt and freshly ground black pepper
Take off any string or elastic trussing from the chicken, place the bird in a roasting pan, and spread out its legs from the body. Enlarge the opening of the cavity with your fingers, so hot air can circulate inside the bird. It will cook quicker like that.
Put the butter in a bowl, throw in the roughly chopped herbs and the garlic, and season well with salt and pepper. Mix together with your fingers, then smear all over the chicken, inside and out. (Note from Anita: I also gently loosen the skin and spread some butter directly onto the meat. Yum.)
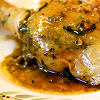
Place in the center of a hot oven (400F) and leave for 20 minutes (phase 1). Then baste the chicken [with the drippings], turn the oven down to 350F, pour the wine into the pan (not over the bird), and roast the bird for another 30 to 40 minutes (phase 2), depending on its size. Open the oven door, turn the oven off, and leave the bird for 15 to 20 minutes (phase 3). This is usually enough time to roast a small chicken through without burning the skin (the reason I prefer small chickens for roasting.) For a bigger bird, you will have to make the necessary adjustments, adding a few minutes to each phase. You may also wish to protect the bird’s skin with buttered foil for, say, the first 20 minutes of phase 2. A good test for doneness is to pierce that part of the bird where the thigh joins the breast; the juices released should run clear.
Forget about gravy. Carve the bird in the pan, as coarsely and crudely as you like (no wafer-thin breast slices, please), letting the pieces fall into the buttery pan juices and letting the fresh juices from carving mingle with the rest. Then take the pan to the table and pass it round your family or guests in the pecking order of your choosing, so they can pull out the bits they fancy. Pass it round a second time, to help redress grievances and encourage the further and fairer distribution of juices.
Accompaniments? Roast potatoes would be de trop. A green vegetable would probably go unnoticed. Some good bread to mop up the juices will be appreciated, while a leafy salad, produced only after your guests have demolished the chicken, might assuage a few guilty consciences.
The discover of the roasting pan, a day or so later in a cool larder, is a joy you may not wish to share. Plundered the jellied juices, congealed bits of skin, and crusty meat tatters that cling to the carcass before you quietly make the rest, along with the giblets, into stock.
cookbooks, cooking, meat, other blogs
22 Comments »
Posted by Anita on 05.04.08 11:30 PM
 Â A few years ago on May 5, I found myself in Puebla — the city where the historic Cinco de Mayo victory of Mexican forces over their French invaders took place. When I asked my taxi driver if there were any festivities planned to commemorate the anniversary, he looked at me like I was crazy: “It’s a military holiday, mija.”
 A few years ago on May 5, I found myself in Puebla — the city where the historic Cinco de Mayo victory of Mexican forces over their French invaders took place. When I asked my taxi driver if there were any festivities planned to commemorate the anniversary, he looked at me like I was crazy: “It’s a military holiday, mija.”
Even in Puebla, the idea of Cinco de Mayo as an event worthy of feasting and celebration seemed utterly unknown. Every Poblano who I told of the norteamericano version of the holiday — at best a celebration of Mexican-American pride, at worst an excuse to drink excessive quantities of nasty sour-mix Margaritas — expressed complete astonishment, shaking their heads as though they’d just discovered yet another reason to pity our confused country.
But no matter: I hadn’t gone to Puebla in search of patriotic parades or folklorico dancing in the city squares. I’d gone there to spend a few days relaxing before meeting friends in the bustle of Mexico City, to explore the city’s beautiful colonial architecture, and to eat Puebla’s famously delicious food.
Strolling the streets the morning of my arrival, I found a peasant woman standing in a tiny off-the-path plaza, selling tamales out of a steaming metal can. There were three choices, but I barely registered the first two: The last, the one I chose, was mole. There are many moles in Mexico of course, but the best-known — the chocolate-tinged, brick-red one most Americans think of when they think of mole — hails from Puebla. Reputedly invented by an order of nuns in honor of their bishop’s visit, mole poblano is sinfully delicious and worth every bit of the hassle it takes to make it. It also makes an excellent tamale filling, a perfect breakfast after 12 hours of travel by plane and bus and taxi.
Thus fortified, I wandered Puebla’s tidy grid of streets without much of a plan. I explored the cathedral of the angels, considered one of the country’s most stunning churches, followed by a plate of tacos árabes at a tile-bright shop called Tacos Tony. I watched the propane vendors ply their wares: Pulling their truck up to the middle of a residential block, they blared their promotional jingle — a festive snippet of dance music, punctuated by a deep bass voice crying “EL GAZ!!” — and the ladies of the house would come to the street bearing tanks to be filled. On my way to the Mercado Carranza, I stumbled across a Victorian-era shopping arcade featuring an enormous stained-glass gazebo and cobblestone footpaths. And once I reached the mercado, I discovered my favorite Puebla snack: Cemitas, at a stand called El As de Oros.
Some folks will tell you that a cemita is little more than a torta served on a Puebla-style roll rather than a more typical bolillo, but the differences run a little deeper. Like tortas, cemitas are available with the diner’s choice of meat fillings — stew-like tinga, crispy carnitas, chewy cueritos, or golden-brown milanesa. And like tortas, cemitas are essentially a taco on a bun.
Unlike a torta, though, you rarely see mayonnaise on a cemita, nor frijoles; lettuce is a definite no-no. Aside from the meat, toppings nearly always include a generous amount of avocado, a bouncy cheese like panela or queso de Oaxaca, a slather of salsa roja, and a pungent herb called papalo. Like tacos árabes, cemitas have their roots in the cuisine of Puebla’s Lebanese immigrants. The word itself means “semite”, a nod to the soft, eggy, sesame-seeded rolls borrowed from the Arabic kitchen.
Alas, unlike in Los Angeles — where a gaggle of cemita trucks are giving their taco-vending cousins a serious run for the money — you’d be hard pressed to find a cemita for sale in San Francisco. But of all the comidas tÃpicas poblanas, cemitas are the easiest to make. Even if you quake at the thought of a day-long adventure required to make authentic mole poblano, or the near-impossible task of replicating spit-grilled tacos árabes at home, cemitas are a cinch.
The ones we’re enjoying as our Cinco de Mayo treat are filled with the homemade chicken-fried-steak called milanesa, arguably the most-popular cemita filling. But if you’ve got some carnitas or tinga left over from your own festivities, I guarantee they’ll find a happy home between two halves of a sesame-seed bun.


Cemitas Poblanas de Milanesa
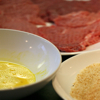
1 pound beef sirloin tips, pounded thin
1/2 cup flour, seasoned with 2tsp salt and 1tsp pepper
1 egg, well scrambled with 1T water
1/2 cup fine breadcrumbs
oil for frying
—–
4 challah rolls, preferrably sesame seeded
1 mild white or red onion, sliced thickly
8 oz panela or queso de Oaxaca, or other fresh and creamy Mexican cheese
your favorite mexican salsa roja (the cooked smooth sort, not like pico de gallo)
– or substitute a few pureed chiles chipotles en adobo thinned with water or vinegar
2 large avocados, peeled and sliced
16 sprigs of papalo (or substitute cilantro)
Pound the meat flat with a meat tenderizer, 1/4-inch or thinner, and pat dry with a paper towel. If the pieces are larger than sandwich size, you may want to cut them apart. Dredge the meat in the seasoned flour, brushing off any excess until just the thinnest layer remains. Dip quickly in the egg, again taking care to leave as little as possible on the meat, and then a light layer of breadcrumbs.
In a deep skillet, add sufficient oil to shallow-fry at a depth of 1/4 inch. (In my 10-inch skillet, I used about 3/4 cup.) Heat the pan over medium heat until oil is shimmering but not smoking. Place the breaded meat in the pan and fry until golden brown on both sides, just a few minutes total. Remove from the pan and keep warm on a cooling rack in a warm oven.
Cut the buns in half, and lightly toast under a broiler or on a griddle. While buns are toasting, coarsely smash 1/3 of the avocado in a bowl with the back of a fork. Spread the mashed avocado on the bottom of each bun, and season with salt. Pour the salsa onto a small saucer, and dip the top half of each bun into the salsa to coat; set aside. Top the bottom half of the bun with a piece of the milanesa, followed by cheese, onions, papalo or cilantro, and the remaining sliced avocados, and the salsa-smeared top.
Something to drink?
– Margaritas: Drink of the Week 9/15/06
– Michelada: Drink of the Week 11/24/06
– Sangrita: Drink of the Week 6/1/07
holidays & occasions, meat, Mexican, travel
3 Comments »
Posted by Anita on 04.06.08 12:03 PM
 Before Niman Ranch started raising their herds on Iowa feedlots, their marketing materials bragged about “happy cows with ocean views”. Last Sunday, as we popped over the crest of Pierce Point Road and saw limitless green pasture dotted with black steers overlooking the deep blue waters of the Pacific, I gasped: It was exactly the scene that I’d held in my mind’s eye all these years. Only this land and these cattle belong to Marin Sun Farms, the ranch that supplies us with most of our eggs and meat.
Even a week after our visit, I’m having a hard time expressing the depth of my awe for what David Evans is doing out on his Historic H Ranch, just 50 miles north of San Francisco. David’s family has farmed this same land since the early 1900s, although they were forced to sell it in the 1970s under the eminent domain act that created the Point Reyes National Seashore. The family leases back the land under what seems to be very tenuous circumstances: 5 year terms and government oversight of terribly minute details like the size of chicken flocks. Needless to say, it’s not the sort of sustainable permanence that makes this consumer particularly content.
Pronounced David’s way, the enterprise responsible for much of our weekly protein is properly known as “Marin Sun Farms” not “Marin Sun Farms.” Like his mentor Joel Salatin — who famously explained to Michael Pollan that he was a “grass farmer” — David takes pains to emphasize that his husbandry converts solar energy, by way of living pasture, into proteins that humans can digest. It’s half clever and half hokey, but undeniably true.
We started our tour overlooking the pasture where cows and calves ambled up and down spring-green hills, lolling in the lush grass or drinking from a large, clear pond. David talked at length about his ideology and his farming methods, explaining how herds — both chickens and cows — are moved to a different patch of land each week, preserving the pasture from over-grazing and enhancing the soil with their manure.
We peeked into a converted freight trailer turned chicken nursery, spying four gaggles of Easter-perfect chicks peeping around under heat lamps, pecking away at their feed. From there, we strolled down a wide lane to look in on David’s sister’s goat herd, busily clearing a scrubby yard where vegetables had been grown over the previous winter.
Beyond the goat yard, we saw two quonset hut-shaped structures on a distant hillside, our first glimpse of the farm’s egg-laying operation. Built of canvas-like material stretched over simple wood frames, these chicken houses open directly onto open pasture, without any physical barriers to any one of the chickens flying or wandering off. Apparently their social structure makes that unlikely; they’re much more apt to leave in the clutches of a predator, according to David. Perhaps half of the chickens roosted inside their homes, and the remainder scratched and pecked and flapped away outside in the open air. Glancing at the wide range of breeds, I suddenly understood the diversity of the colors and sizes of the eggs in our weekly dozen.
Many of us remarked with surprise that this egg-laying flock included a fairly large number of roosters, in addition to the laying hens. “I don’t do it so we can say the eggs are fertile,” said David, “But I know that I wouldn’t be happy in an environment without females, and I don’t think any of you ladies would be happy in a world without men.” Even as an unrepentant omnivore, it’s hard to wrap your brain around someone who makes his living selling meat treating his product with such humane regard.
Up the road a piece, we called on the broiler flocks, grown-up versions of the fuzzy peeps we’d seen pecking in the nursery. Penned in movable, mesh-covered yards — half in sun, half in shade — these birds were, quite frankly, the ugly ducklings of the farm. Where the laying hens are diverse and beautiful, Cornish Cross broilers look like the freaks of nature we’ve bred them to be. Sparsely feathered, dull around the eyes, and unbelievably gawky, these aren’t birds you feel too much sentiment toward. Still, they’re cared for with the same meticulous attention. They’re fed organic cracked grain, supplementing all the insects and grubs they can forage from their patch of pasture. At the end of the week, when they’ve cleared the pests and fertilized the land beneath their enclosures, their coops are canted up on a large dolly and rolled forward to a new stretch of green grass.
Sounds bucolic, and it certainly looks that way, too. Are things 100% perfect on this pastoral land? I’m sure they’re not. I would have been happier not knowing that Marin Sun Farms broiler chicks are fed imported Chinese soy until they’re old enough to digest corn and grubs. Or that David feels that heirloom birds are just too expensive (twice the cost of the already pricey hybrids he brings to market, he says) and don’t taste any better than the ugly mutants. Or that most of the calves born at his parents’ H Ranch operation are destined for life on the feedlots of the Midwest, because there simply isn’t enough demand for pasture-raised beef. But despite all of the things that I wish they were doing more-perfectly, the simple fact is that I am in awe of the 99% that Marin Sun Farms is doing exactly right.
Rounding our way back to the main barn, David stopped to talk about the on-farm ‘processing’ — that is, slaughtering — that farmers are, thankfully, still allowed to do for their own poultry. As he explained that the next part of the tour was occasionally more than some visitors had bargained for, I finally focused beyond David’s shoulder, at last noticing a critical part of the farm that had previously escaped my notice. Having read Michael Pollan’s description of the Polyface Farms “abattoir without walls,” I knew enough to recognize it: The metal cones where chickens are killed and bled out, the plucking machine with its hundred rubber ‘fingers’, the well-worn worktables, the buckets for the blood and guts that get turned into the compost pile to amend the land. No roof, no walls; everything open to the sun and the wind, nature’s original sanitizers. It was all right there… right there for anyone to see, to understand.
I knew well enough we wouldn’t see any chickens slaughtered that Sunday — it happens on Thursdays, anyway, and the oldest of this season’s broilers were still a week from market, merrily clucking away in the pasture. Nothing had been slaughtered here since the old roosters and hens had come to market last winter; the killing place smelled of nothing but the hillside around us. And yet, it had the undeniable air of purpose. I won’t insult you by saying it felt holy, but I do know that there was no nervous laughter, no chatter, no wandering off to investigate something more interesting around the corner. Every one of us on that tour, kids included, was completely present there, standing inside the boundaries of the place where animals became food: The place where each bird experiences what David calls its “one bad day” on the farm.
—-
When the tour was over, we caravaned back over the road to Route 1. David treated everyone to lunch at the Marin Sun Farms Butcher Shop, a bountiful spread of Della Fattoria bread, the farm’s own rib eye and roast goat, bowlsful of aioli and horseradish cream and salsa verde, and buckets of German-style potato salad with flecked with rich bacon.
But the best part of the lunch was the beverage: David brought out “a gift” — which he couldn’t legally sell to us — of a few gallons of raw milk “just hours out of the cow” in oversized Mason jars. I’d shied away from buying raw milk at the stores, imagining that it would taste grassy or gamey. But oh, lord, what I’d been missing! It just tasted more milk-y, like a better version of the best milk you’ve ever had. Nuances of flavor, texture, and color are apparent even to the most casual observer.
Needless to say, we bought a quart of Claravale raw milk this Saturday, and I don’t expect to go back to the sterile, flat stuff anytime soon. Nor do I expect I will soon forget the windy spring morning when I looked my supper in the eye and made peace with my place on this sustainable food chain.


Marin Sun Farms
10905 Shoreline Highway
Point Reyes Station, CA 94956
415-663-8997
Meat CSA memberships available starting at $270 for a 6-month session
Retail sales available at the Point Reyes butcher shop, Saturday Ferry Plaza Farmers Market and Sunday San Rafael Civic Center Farmers Market
Next farm tour: May 18, 2008
Adults $30, Kids $10
(Pre-registration is mandatory)
Dark Days challenge, farmers markets, farms & farmers, locavore, meat, shopping
13 Comments »
Posted by Anita on 03.20.08 11:44 PM
 If you ask Cameron what his favorite cold-weather meal is, you might be in for a surprise. It’s not Thanksgiving turkey with all the trimmings. It’s not even a big prime rib, with plenty of leftovers for his beloved beef-and-bleu sandwiches. No, the thing my Scots-Irish husband loves best when the nights are long is New England Boiled Dinner — better known as “corned beef and cabbage” — with a hearty dollop of horseradish cream and an imperial pint of stout to wash it down.
Like most folks, we’ve reserved this marvelously meaty meal for St. Patrick’s Day feasts. But given how cheap it is, and how much we enjoy it, I’m not entirely sure why we don’t trot it out regularly. Perhaps we got in the habit back when it was difficult to find corned beef during the rest of the year. But the last few winters, we’ve taken to curing our own brisket, so getting our hands on nice corned beef isn’t so much of a problem.
I know there are at least two of you who know our little secret: Home-cured corned beef only sounds impressively arcane; it’s actually about the easiest thing you can cure at home. The only thing you need is a 4-to-6 pound piece of brisket — point cut, preferrably — plus a few easy-to-find spices and a week’s forethought. And if you use a dry cure like the Cooks’ Illustrated recipe [link removed*] we often follow, rather than the typical immersion brine, you don’t even need a lot of fridge space. Honestly, we’ve got to do this more often… if only for the crave-inducing leftovers.
 This year’s brisket came to us from Marin Sun Farms, and a glorious specimen it was. For the accompaniments, we wandered the Ferry Plaza market and rounded up a Catalan Farms cabbage, two pounds of Little’s potatoes, a bunch of Star Route Farms carrots, a pile of Dirty Girl boiling onions, and a couple of rutabagas from Heirloom Organic. Imagine our surprise as we walked by the Happy Girl Kitchen pickle stand on our way back to the car and noticed they were selling prepared horseradish! (Yes, it was local — grown at Tairwa Knoll Farms and processed in Santa Cruz County — and delicious.) On the way home, we popped by our local microbrewery, 21st Amendment, and picked up a growler of their oyster stout. Ah, it was the easiest 100% local meal of the month, to be sure, and definitely one of the tastiest.
The rest of the fortnight was full of other tasty tidbits, including six meals at restaurants that wear their locavore menus on their sleeves. You’ll recognize lots of old standbys in the list below, and a pair of newcomers. Let’s just say that Conduit seems to be still working the kinks out of their kitchen; they’ve only just opened, so we’ll keep mum. On the other hand, Ubuntu is old enough to know better. I wish we had loved every bite at this nationally fawned-upon Napa newcomer, but — as our friend and dining companion Cookiecrumb detailed elsewhere — the inventive flavors and gorgeous ingredients were so oversalted as to be nearly inedible. Ah, well… they can’t all be Range, I suppose.
Mercifully, we did not return home hungry. There were plenty of other delicious things we discovered on our Napa field trip, including a to-die-for packet of pastrami (from Fatted Calf’s gorgeous new shop at the Oxbow Market) that had us happily gorging on sandwiches… even for breakfast. And we also discovered another secret ingredient that we’ll share more about in our next Dark Days installment.


Dark Days Ticker — March 1-15
– Dark Days dinners at home: 8 out of 15
– Locavore dining-out: Range, Primavera, ubuntu, O Izakaya, Two, Conduit
– New recipes: Jamie’s stuffed potatoes, Hugh’s milk-braised pork, cauliflower steaks
– Old faves: corned beef & cabbage, egg drop soup, bean salad, Waltuck‘s chicken paprikás, grilled rib-eye
– Freezer fodder: golden veggie bisque, potstickers, chili verde enchiladas, oxtail ragu, bolognese sauce
New local items in the pantry:
– Straus Creamery cream-top milk (2% and whole)
– Marin Sun Farms point-cut brisket
– Fatted Calf pastrami (available at their Napa store only, alas!) and bierwurst
– Little‘s “all blue” potatoes
– Zuckerman’s asparagus
– Happy Girl Kitchen Co. prepared horseradish
– Andante butter
– 21st Amendment Oyster Stout (brewed with Hog Island oysters!)
– Carmel S&S Syrah (thanks, Lauren!)
– Bartholomew Park Cabernet
—-
* Edited to add: We removed the link to the Cook’s Illustrated recipe in July 2008 in protest of their bullying tactics.
beer, Dark Days challenge, holidays & occasions, locavore, meat, Napa & Sonoma, restaurants
12 Comments »
Posted by Anita on 02.20.08 11:34 PM
 Even otherwise reasonable people have been known to complain about the length of the recipes in Judy Rogers’ Zuni Cafe Cookbook. Indeed, our favorite recipe for mock porchetta (which, unless you live in the Italian countryside or know someone who butchers their own hogs, is as close as you’re likely to get to the real thing) does run to many pages. But it’s anything but complicated — especially if you’re handy with a boning knife — and it’s not even all that time consuming. Once you’ve made the recipe a couple of times, you can have the roast prepped and stuffed in less than 20 minutes; once that work is done, you’re pretty much home free.
As our very patient friends will attest, the Zuni porchetta is a dish we love so much we can’t help hauling it out for dinner parties all the freakin’ time. The glistening, heavenly scented, herb-infused pork shoulder is a stunner, its vermouth-spiked pan sauce an exercise in decadence. And, oh harried host or hostess, you can even roast your side dishes right in the same pan as the porchetta — who doesn’t like rosemary-and-pork-drippings on their fennel and potatoes? (And what is their problem?)
But the dirty little secret, the real reason why we’ll use any flimsy excuse to trot out this old favorite, is that it makes the world’s best leftovers, hands down. Thinly sliced cold porchetta is brilliant on rustic bread with a schmear of ricotta and a few grinds of coarse black pepper. Larger bits, especially those doused in leftover gravy, make a stunning filling in a hollowed-out crusty roll. A handful of moist shreds add panache to a composed salad. The possibilities are, as they say, almost endless.
Despite all these lunchy luxuries, my favorite post-porchetta meal has got to be breakfast. Once you’ve had porchetta hash — especially when served with a perfectly poached pastured egg atop it and maybe some tomato-bourbon jam on the side — you may well forget about the corned-beef sort. Like the gorgeous love-child of crispy carnitas and silky rillettes, slow-cooked porchetta hash forms a golden-brown shell that hides a meltingly soft interior.
But first, you’ve got to make the porchetta.
I beg you: Don’t be daunted by the length of the recipe. Rogers has a knack for the subtle differences between a perfect outcome and a mediocre effort, and an all-too-rare talent for translating her technique into print. It’s nearly impossible for a pro to remember all the things she does by rote, the details that we amateurs need to be told explicitly, but Rogers gets this in spades.
Such a perfect recipe needs but one minor modification: Rodgers asks you to add the vegetables to pan, surrounding the roast, right at the start. I find they’re perfectly done if you add them at the one-hour mark, when you first turn the roast. (If you put your tongs on top of the veggie bowl, you won’t forget to add them.)


Mock Porchetta
— from The Zuni Cafe Cookbook
2-1/2 to 3-pound pork shoulder butt roast [Anita’s note: not the ‘picnic’ portion]
salt
1T capers, rinsed, pressed dry between towels, and barely chopped
1T lemon zest
3 garlic cloves, coarsely chopped
12 fresh sage leaves, crushed then coarsely chopped
a leafy sprig or two of fresh rosemary, leaves stripped and crushed (about 2T, packed)
2 tsp fennel seeds, barely crushed
1-1/2 tsp freshly cracked (not ground) black pepper
1 to 2 pounds prepared vegetables of your choice:
– carrot chunks, onion wedges, quartered fennel bulbs, baby potatoes, etc
a little mild-tasting olive oil
2/3 cup rich chicken stock
a few tablespoons of dry vermouth
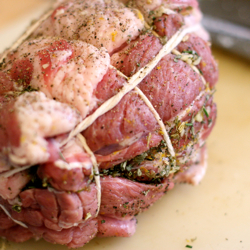
Trimming, seasoning, and tying up the pork (1 to 3 days in advance):
Trim any discoloration and all but a 1/4-inch-thick layer of superficial fat from the pork. Study the natural seams between the muscles on each side of the meat. Choose one that runs the length of the roast and close to the center of any face. Use the tip of a knife to gingerly separate the muscles along that seam, gradually exposing more seams, which you should then separate as well. The goal is to create lots of internal surfaces to cake with seasonings. If your initial foray doesn’t expose many internal seams, you can take a second stab at a different face, so long as you don’t cut the pork in two. Salt the splayed piece of pork evenly all over (approximately 1/2 tsp of sea salt per pound of meat).
Combine the capers, lemon zest, garlic, sage, rosemary, with most of the fennel seeds and black pepper. (You should get about 1/2 cup, loosely packed.) Spread and pack this mixture all over the excavated insides of the pork butt, making sure the seasoning falls deep into the crannies where you’ve separated the muscles. Re-form the pork butt into its natural shape and tie tightly into a uniform shape, tying 4 or 5 strings around the circumference and another around the length of the roast. Rub the remaining fennel and pepper on the outside of the roast. Collect and refrigerate any loose herbs and seasonings. Cover the pork loosely and refrigerate.
Roasting the porchetta (2 1/4 to 2 1/2 hours)
Preheat the oven to 350°F. Toss the vegetables in a minimum of olive oil, barely coating the surfaces. Add a few pinches of salt and toss again; set aside.
Heat a 12- or 14-inch ovenproof skillet, depending on how many vegetables you are roasting, over medium heat. Place the pork roast in the pan; it should sizzle. Place in the oven.
The roast should begin to color at 45 minutes; if not, turn the heat up to 375°F until it does, then turn the heat back down.
At 1 hour, turn the roast over and add the vegetables, rolling them in the rendered fat. Work quickly, so you don’t lose too much oven heat and the roast doesn’t cool off. Turn the roast again at 2 hours and add about 1/3 cup of the stock or water.
Add any excess herbs and seasonings to the pan juices at this point and swirl the pan so they sink into the liquid. Roast for another 15 to 30 minutes, to about 185°F. The pork should be fragrant and glistening golden caramel.
Transfer the meat to a platter, tent loosely with foil, and leave in a warm, protected spot while you make the pan sauce. Place the vegetables on a separate warm plate.
Preparing the pan sauce and serving the roast
Tilt the skillet and spoon off the fat. Add the vermouth and the remaining 1/3 cup stock or water and set over low heat. Scrape and stir to dissolve the caramelized drippings on the bottom and sides of the pan. Skim the fat as the liquid comes to a simmer. Add any juice that may have trickled from the resting roast.
Slice the pork, removing the strings as you go, and serve garnished with the vegetables and a spoonful of the rich pan sauce.
cookbooks, meat, recipes
17 Comments »
Posted by Anita on 10.31.07 7:05 AM
 Once upon a time, there was a spoiled teenager named Anita who refused to eat ribs, chicken legs, or any other meat shaped like a body part.
One year, the child’s mother took ill on Thanksgiving morning, with a gaggle of relatives due to descend upon the family home in mere hours. The mere thought of sticking her hand inside (inside!) the body of a turkey made the girl turn green around the edges, but there was nothing to it but to do it: In went the hand, out came the slimey giblet bag. In a word: Gack!
Years later, the girl grew up and got over herself. A culinary school butchery class, which involved parting out cases of chickens and breaking down sides of beef, rid her of the last vestiges of meat squeamishness. The woman became secure with her place on the food chain, an unrepentant carnivore at last.
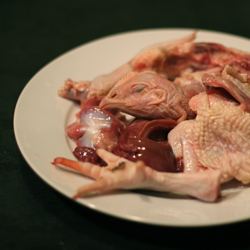
Flash forward to 2007: In a crisis over the disappearance of Hoffman Farms chickens from the local farmers market, we started buying our weekly roaster from Marin Sun Farms. We’d blithely strolled past their stand for months, seeing the signs for chickens, never venturing in to price them; our Hoffman loyalties were that strong. But the disappearance of their main competition emboldened these farmers, and they began putting their wares on more prominent display: First in bins by the edge of their stall, then moving to a large, copiously iced display — complete with protruding chicken feet — right out in the pathway. (Just the other day, I saw a group of tourists laughing nervously and taking pictures; it’s quite the sight if you’re not used to such things.)
The first afternoon of our patronage, we brought our fine-footed fowl home. The idea of cutting off chicken feet didn’t faze me a bit, I smugly noted. It wouldn’t be any worse than snipping off wingtips, really. I’d seen enough dim sum to grasp the comic possibilities of disembodied chicken feet, and I knew their gelatinous cartilage would add body to our next batch of stock.
I plopped the bagged bird in the sink and turned on the water. Cutting through the rubber band that held the bag shut, I accidentally grazed my arm on a stray claw. (Note to self: Chickens — at least the ones that aren’t factory-gorged on corn — scratch for their supper.) But the sting of avian revenge was no match for the shock I got when I pulled Henny Penny out of the bag: Her frickin’ head was still attached!
Or, well, mostly attached. The neck had been slashed (quite tidily) and her noggin wobbled around on the impossibly long neck in a rather ghastly fashion. Her tiny eyes were mercifully shut, but you could quite clearly make out what her features must have looked like, mere days ago. A tiny comb was clearly visible at the crown of her egg-sized skull. Oh, my…
Snapping out of my guilt-laden reverie, I laughed aloud, amused at how a small, dead hen could rattle me so. Would I have bought her, had I know she came fully equipped? Probably. But coming upon an unexpected beaky face in the bottom of the bag was more than I was expecting. I wondered whether the farmers enjoyed imagining the shock they inflicted on unsuspecting city slickers, but most likely they never gave it a moment’s thought. It’s a chicken, to them. Their livelihood, our supper.
It gets easier, week by week, staring my dinner in the face on a Sunday afternoon. I’ve even come to see the gallows humor in the macabre ritual of removing heads, necks, and feet. I’m not sure I could ever kill a chicken, maybe not even gut a dead one (I’m still not all that happy about innards, truth be told). But if I’m going to be an ethical carnivore, I figure that looking my meat in the eye is the least I can do. And so I do, with silent thanks to the farmer and the chicken.
And then I cackle like a fiend as I throw the dismembered bits in the stockpot. Muuu-huuu-huuu-ahhh!


Chicken Stock, Simplified
4 to 5 pounds raw or frozen chicken bits (wings, backs, necks, and feet)
6 quarts filtered water
1 pound mirepoix, very large dice (1 inch or so)
– 1 large onion
– 2 medium carrots
– 2 large celery stalks, trimmed
Bouquet garni
– 2 cloves garlic
– 8 peppercorns
– 3 whole cloves
– 2 fresh thyme sprigs
– 6 parsley stems
…tied with twine in a cheesecloth bundle
In your largest pot, bring water and chicken parts to a simmer; reduce to a lazy bubble and cook for 3 hours. Add the mirepoix and bouquet garni and cook for an additional hour. Strain through cheesecloth or a very fine mesh sieve into a large bowl (or a cool stockpot). Cool to room temperature using an ice-water bath or immersible stock chiller, then chill completely overnight.
The next day, skim the fat and measure stock in 2-cup portions into quart-size freezer bags. Holding the bag upright, squeeze to remove excess air, then seal. Freeze bags flat on a rimmed cookie sheet until completely solid; they can then be stored in your freezer’s pull-out bins, filed like flip-cards along with pasta sauce and other flat-packed liquids. Any odd measures of stock can be frozen in ice-cube trays for quick use in pan sauces and other recipes requiring small amounts of liquid. Store frozen stock for up to 6 months.
cooking, farmers markets, locavore, meat, recipes
16 Comments »
Posted by Anita on 10.16.07 12:02 PM
 You learn the darndest things when you blog.
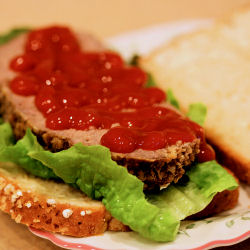
Here’s just one example: Until a few days ago, I never knew that one of my all-time favorite foods was so widely appreciated. I mean, I knew meatloaf sandwiches were something other people ate, but I had no idea they loved them as much as I do.
That is, until the day I posted this photo on Flickr and the comments started rolling in:
“One of the best uses of leftovers of all time.”
“Nothing better [than a meatloaf sandwich].”
I’m right there with them. I may love meatloaf sandwiches even more than I like the original meatloaf dinner. Which is impressive, considering my adoration for baked potatoes knows no bounds.
For those of us in the meatloaf-sandwich-lovers clique, there’s no need to wait for a special occasion to celebrate. But in case you’re seeking an excuse, Serious Eats declared this Thursday National Meatloaf Appreciation Day, and we’re all invited to play along.
Don’t tell me that you don’t have a prized family recipe to bring to the party? Oh, you poor thing. Here… pull yourself together. Sit down and let me give you a copy of ours.
But first, a few caveats:
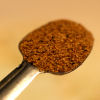
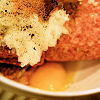
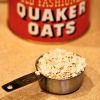
Our family meatloaf is a bit of an anomaly. It doesn’t come topped with pan gravy, or even a tomatoey glaze. (Although Heinz ketchup is a mandatory condiment, as far as I’m concerned, it’s absent from the cooked dish.) This recipe also eschews breadcrumbs as a binder; Quaker Oats serves that purpose. An unorthodox choice, to be sure, but the end result is less bizarre than you might expect.
In place of the usual middle-American seasonings, our meatloaf features some strange-sounding spices. Happily for any purists among us, they fly under the radar, adding their warmth without making anyone think of an oatmeal cookie. Perhaps the biggest heresy of all: This meatloaf isn’t baked, or even shaped, in a loaf pan. Sporting the freeform curves of a football (make that ‘rugby ball’ outside the US), our odd-shaped loaf maximizes the crusty edges our family covets.
And because the resulting slices are just a teeny bit wider than the average piece of bread, the elliptical shape yields some delicious trimmings — perfect nibbles during the next day’s sandwich-making activities. Lucky you.
Mom’s Meatloaf
1-1/2 pounds ground chuck
1/2 pound pork breakfast sausage
1 onion, grated
1 egg
1 cup uncooked oatmeal (not instant)
1/4 cup milk
1 tsp salt
1/4 tsp ground black pepper
1/2 tsp nutmeg
1/2 tsp allspice
Preheat oven to 350°F. Combine all ingredients in a large bowl until well mixed. Pat into a football shape and place in a wide baking dish or a small roasting pan. Bake for 75 minutes, or until juices run clear when the center is pierced with a knife.
family, meat, other blogs, recipes
12 Comments »
Posted by Cameron on 10.15.07 7:02 AM
 A big shout out to Natalie over at The Liquid Muse for choosing food/cocktail pairings as the Mixology Monday topic for October. My proposal for a decadent lunch (or bachelor’s dinner) is a steak and bleu cheese sandwich paired with an ice-cold Martini — one of my all-time favorite combinations.
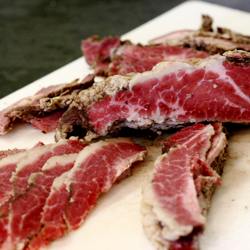
This is no tame, civilized snack. The sandwich should be rough and ready. You’ll need slices of cold beef left over from the loud debauchery at the grill Saturday night; a good, chewy roll; a wedge of bleu; plus a spreading knife and the guts to use it.
No lettuce. No mayonnaise. No mustard.
This particular Martini you want to be rippingly cold and (to borrow a winning concept from The Art of the Bar) made with Atomic Age proportions of gin and vermouth. Skip the orange bitters; you’ve already got a lot of flavors coming together.
Consume while watching a sporting match, taking in an action flick, or plotting your next corporate takeover.

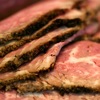


Steak and Bleu Sandwich
Cold sliced steak
Bleu cheese at room temperature
Chewy sandwich roll
Slice open roll. Spread several healthy swipes of bleu cheese on both halves. Layer bottom half with steak slices, and top with the other half. Eat.
 Atomic-Age Martini
2 oz gin
1/2 oz (or less) dry vermouth
Combine ingredients in an ice-filled mixing glass. Stir until icy cold. Strain into a chilled cocktail glass, and garnish with an olive or two.
drinks, meat, Mixology Monday, other blogs, recipes
6 Comments »
