Posted by Anita on 01.04.10 7:41 AM
2010 AEC *Alll Rights Reserved*") One of my other new year’s resolutions is to make time — and space in my budget — to improve my blogging chops. Education isn’t cheap, especially when you’re learning from the pros, but the classes I took in 2009 were some of the highlights of my year. I met cool groups of like-minded folks, had a great excuse to travel, and enjoyed delicious food along the way.
One of my other new year’s resolutions is to make time — and space in my budget — to improve my blogging chops. Education isn’t cheap, especially when you’re learning from the pros, but the classes I took in 2009 were some of the highlights of my year. I met cool groups of like-minded folks, had a great excuse to travel, and enjoyed delicious food along the way.
Hands down my favorite learning experience of 2009 was the Food Styling and Photography class taught by the Food Fanatics — Cindie Flannigan and Denise Vivaldo — and Matt Armendariz. Happily for those of us in the Bay Area, the Food Fanatics are headed our way this month, teaching a hands-on, full weekend class at The Art Institute San Francisco on January 16 & 17.
Denise tells me there are a couple of spots left, so head on over to their site and check out the details. If you’re a food blogger, it’s probably even a tax write-off. And it’s sure to be a blast.
classes
2 Comments »


Posted by Anita on 11.19.09 8:53 AM
 I’m pretty proud of most of the photography on our blog. I’ve won an award or two, and I’ve even taught people how to shoot better cocktail photos. But even though I’d gotten pretty handy behind the lens, for the life of me I could not shoot a beautiful sandwich. (If you don’t believe me, check out some of my older posts.)
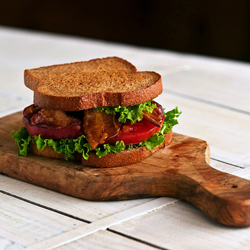
This competence gap of mine had gotten so bad, I’d basically scratched sandwiches off the blog to-do list. I even participated in Michael Ruhlman’s Grow-Your-Own BLT Challenge this summer, but the end result was so photographically uninspiring — so utterly unworthy of all the effort we put into growing, butchering, curing, smoking, kneading, and whisking every last ingredient we used — that I never wrote about it here. (Though I did recap, briefly, here.)
All that changed last weekend, when I took the class that will forever change the way I think about photographing food in a studio setting.
For years, I’d drooled over other blogger‘s accounts of the food-styling workshops led by Food Fanatics Denise Vivaldo and Cindie Flannigan, but had never taken the plunge and signed up myself. But when I heard they’d teamed up with food photographer (and MattBites blogger extraordinaire) Matt Armendariz to host a special two-day workshop just for food bloggers, I knew the time had come.
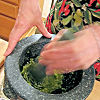
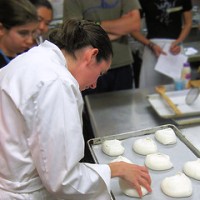
During Saturday’s session, Denise and Cindie walked our small group through a number of food-styling tasks, first demonstrating techniques, then setting up stations in Matt’s studio kitchen for us to practice ourselves. Although Cindie demonstrated a handful of non-edible styling tricks (like using petroleum jelly to add a juicy glow, or propping up a stack of pancakes with makeup sponges) she always demonstrated edible alternatives (like freezing syrup to keep it viscous, or using a kitchen torch to get a hamburger deliciously browned). All through the class, Denise kept us laughing with snippets of industry gossip and a rolling patter of hilarious quips to illustrate key lessons. (My favorite: “The longer you cook a piece of meat, the more it looks like George Hamilton!” So true.)
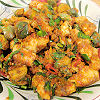
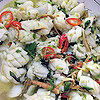
On Sunday, each student chose a project to put real-world skills to the test. As we prepped our dishes for their moment in the spotlight, Cindie and Denise stepped in to offer suggestions and share tricks. The kitchen hummed with a gaggle of bloggers hand-arranging strands of pasta in a bowl, selecting only the reddest pomegranate arils to garnish a salad (and then arranging them with tweezers!), melting pizza cheese with a heat gun, and bulking up the bottom of a bowl of curry to keep the prettier ingredients from sinking to the bottom.
For my own project, I knew I was in a safe place to tackle my sandwich fears. Denise showed me three different ways to cook bacon so that the edges stayed curly and appetizing, taught me to cook toast to a perfect golden-brown glow, and stood by as I sorted through a pile of lettuce to find the freshest, prettiest leaves. After stacking and restacking the ingredients in various combinations, I was able to create a BLT that actually looked as good as I knew it would taste.
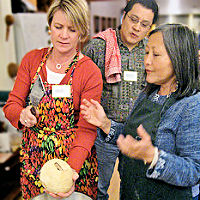
I chose a relatively simple setting for my “hero” sandwich, and waited for my turn at one of the two shooting stations Matt had positioned in the abundant natural light of the studio’s roll-up doors. One of the most enjoyable parts of the day was watching my classmates set up their projects, place their props, adjust their tripod positions, and fiddle with the details. Blogging is such a solitary activity; it was a real treat to watch other people’s creative processes up close. Matt worked with each of us to find the best angle for our shots, adjust lighting, suggest changes to props, and generally hold hands and help us feel confident about our own abilities.
The class wasn’t cheap — $695 for two days of combined demos and hands-on workshop — but even as an experienced photographer, I felt it was worth the expense. There are precious few opportunities to learn food styling from reputable stylists at the top of their game, fewer still to work one-on-one with one of the country’s top food photographers. Having all three of these experts together in a single, collaborative workshop was invaluable, and getting to play in a professional food-photography studio was the icing on the cake.
The biggest and most pleasant surprise of the weekend was just how much everyone in the class collaborated, helping each other choose our project subjects, select appropriate props from Matt’s amazing inventory, set up our cameras to capture the best shots, and make adjustments to food on the set. Though we all were working at different levels — some were more experienced at styling but needed help with their cameras, and vice-versa — we all helped each other get great results.
At the moment, Food Fanatics doesn’t have any additional styling-plus-photography classes like this one scheduled, but that’s due to change soon: A repeat of the blogger-specific class is slated for late spring/early summer 2010. (Watch the Food Fanatics blog for details.) If you’re just interested in the styling aspect, Denise and Cindie will be teaching two classes in January: a 3-day food-styling workshop in Long Beach, and a 2-day hands-on food styling class in San Francisco at the The Art Institute.
2009 AEC - All Rights Reserved")
2009 AEC - All Rights Reserved")
2009 AEC - All Rights Reserved")
2009 AEC - All Rights Reserved")
2009 AEC - All Rights Reserved")
Food Fanatics
Professional site: Food Fanatics
Food styling classes: Culinary Entrepreneurship
Blog: Food Fanatics Unwashed
Twitter: @FoodFanatics
Matt Armendariz
Professional site: Matt Armendariz Photography
Food & photo blog: MattBites
Twitter: @MattArmendariz
classes, other blogs
12 Comments »
Posted by Anita on 04.22.08 5:01 PM
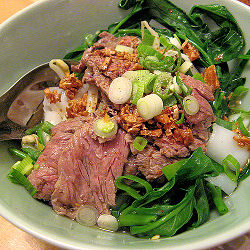 At this very moment, I’m on my way to Oakland for the last session in my third series of advanced classes with Thai cooking expert Kasma Loha-unchit, the award-winning author of It Rains Fishes and Dancing Shrimp. Since it takes a year or more to complete the prerequisite classes — and chances are good you’ve heard me rave about Kasma before — I won’t torture you with the details of the truly delicious food we’re making …although you’re welcome to peek at the photos on Flickr, or check out my last class recap of Series B.
But… if you’re interested in starting down your own path to culinary liberation (and really, who doesn’t want to be able to cook better Thai food at home than you can buy at any restaurant outside of Thailand?) you’re finally in luck. Kasma’s just this morning opened up three new Beginning Thai Cooking series for fall 2008:
September – Mondays, Sept. 8, 15, 22 & 29
– Tuesdays, Sept. 9, 16, 23 & 30
October – Mondays, Oct. 6, 13, 20 & 27
(There’s also a single Intermediate series and a single Advanced set, but I’m presuming that anyone who’s met the prerequisites for these has already gotten word of them.)
Each 4-session series costs $175, which includes 16 hours of hands-on instruction and full meals. More details about the classes — including menus — can be found on Kasma’s site, Thai Food and Travel.
But do hurry: The beginning classes, especially, fill up faster than you can say “bpoo pad pritkai dâm pkap kreuang tehd” (or even “Black-Peppered Crab with Roasted Spices”… ) Send a request to hold your space to kasma[at]earthlink[dot]net, and be sure to send along second- and third-choice dates to avoid disappointment.


classes, East Bay, Thai
8 Comments »
Posted by Anita on 04.18.08 11:15 PM
 H. Joseph Ehrmann is a busy guy. He runs a full-service cocktail catering company, maintains a successful spirits consultancy, serves as a brand ambassador for Square One organic vodka, and promotes Green & Tonic to help bar owners adopt environmental improvements.
As if he weren’t busy enough, H. is also one of the panelists this year at Tales of the Cocktail, co-presenting a session about green bars and seasonal cocktails — hence my interest in tracking him down. But first and foremost, he’s the proprietor of Mission District stalwart Elixir, San Francisco’s second-oldest saloon.
If you’ve walked by Elixir’s vintage facade on the corner of Guerrero and 16th streets, you might have mistaken it for just another neighborhood bar. And you wouldn’t be wrong, really: The local crew are all there, complete with a gaggle of beer-and-a-shot mooks shooting darts, and docile dog welcoming patrons at the door. But scratch the surface of this time-worn tavern and you’ll find a few surprises.
First, that beer: As likely as not, it’s local, organic, or at least sustainably produced. There’s always at least one all-organic cocktail on the Elixir menu, and often a fruit-based seasonal special as well. And the bar itself was actually the first watering hole certified as a green business by the City of San Francisco, which monitors Elixir’s energy usage, recycling and composting efforts, and a host of other sustainability criteria.
I caught up with H. — nobody’s called him Harold since high school — at one of the Mixology 101 classes he leads at a chain of Peninsula-area athletic clubs. (They’re offered as a membership perk, although civilians are quite welcome.) Along with an enthusiastic gaggle of newbie bar-enthusiasts, I stirred up a space-age martini, muddled a mojito, shook up an all-organic Margarita, and learned how to flame an orange peel to garnish a classic Manhattan.
The last drink of the night, the punnily named Country Thyme, introduced our budding mixologists to fresh-produce cocktails. Amusingly, I’d actually attempted to order this very drink the previous night on a trip to Elixir, only to find there were no berries on the premises. (H. laughingly explained he’d hijacked the bar’s stash for a catering gig, and absentmindedly forgot to replace them.) The drink’s vibrant hue and patio-perfect looks make it a crowd pleaser; H says as soon as the first one makes its way across the room, everyone’s bellying up to the bar asking for their own.
If all this talk of sustainable, market-fresh ingredients is making you thirsty, a trip to Elixir might be in order. And there’s no time like the present: Next week, H. plans to roll out his newest seasonal cocktail list, full of plenty of mid-spring treats from the farmers market.


It’s a little early yet for blueberries, but if you’re looking for a 100%-organic cocktail to celebrate Earth Day, there aren’t a ton of fresh-fruit options at this time of year. My preference here would be frozen Northwest blueberries, a better option than the flavorless South American imports. In places where organic strawberries are already available, consider that substitution; you’ll lose the magenta color, unfortunately.
Country Thyme
– courtesy H. Joseph Ehrmann, Elixir
1/3 cup organic blueberries
1 organic lemon
1/2 oz organic agave syrup (or 3/4 oz simple syrup)
1.5 oz Square One vodka
2 sprigs organic thyme
Muddle the blueberries in the bottom of a mixing glass. Cut the lemon into chunks — about 8 pieces — and muddle in the glass with the berries. Add the agave syrup and the vodka, and shake vigorously.
Spank one sprig of thyme, place it upright in a highball glass, and fill the glass to the rim with ice. Strain the shaken mixture into the glass, and garnish with the remaining sprig of thyme and a straw.
—
PS: Stay tuned to the Tales Blog for my preview of H.’s session, The Green Seasonal Bar.
bar culture, classes, Drink of the Week, drinks, locavore, Tales of the Cocktail
7 Comments »
Posted by Anita on 04.18.08 8:09 PM
 When I read that Shuna Lydon was teaching her legendary pastry tutorial — a class that, by her own admission, she’s taught so many times she’s lost count — I leapt at the chance to sign up. The last time I had the pleasure to learn at her elbow, I picked up countless little tricks for making outrageously tasty seasonal fruit desserts.
This time out, I finally learned why my usual pie-dough recipe is fine for savory applications like quiche, but not so hot for desserts. I got to see and feel where I’d been going wrong in my previous pie-making expeditions. As a side benefit, I got to hole up inside a breezy commercial kitchen on one of the hottest days of the year, relaxing into the busy charm of a kitchen full of women. Perhaps best of all, though, I got to come home with one seriously gorgeous pie crust for my troubles.
As I carefully ferried my flaky cargo across the bay in an insulated bag, visions of oozy pastry goodness danced before my eyes. But as bountiful as our spring produce is here already, we’re in that awkward in-between stage, fruit wise. It’s too late for apples, way too early for blackberries. Strawberries are coming into season, but I don’t really like them cooked. I’d hoped to have enough lemons off of our tree by now to attempt a lemon meringue, but you can’t rush Mother Nature. So I dusted off the cookbooks and went looking for options.
There it was, smack in the middle of my 1961 edition of The Joy of Cooking. A long-forgotten childhood favorite, that humble all-American dessert known as black-bottom pie. Line a simple pastry crust with chocolate custard (or ganache, if you’re feeling modern and fancy), cover with a rum-kissed custard, and top with whipped cream. Even with the cheapest ingredients, it’s indisputably delicious, even if a bit homely. When made with top-drawer bittersweet chocolate, pastured eggs, and the best dairy you can find, this simple combination turns into a dessert worthy of a pastry chef’s crust.
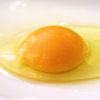
I separated four Marin Sun Farms eggs, and right away I could tell I was in for a treat. These eggs are always delicious, but some weeks — especially in the winter — they’re not especially gorgeous. These were a sure sign of spring: Yolks so yellow they were almost-orange standing proudly atop solid whites. Separating them felt almost cruel, as each half clung tenaciously to the other.
Cooking the custard until it was thick enough to coat the back of a spoon took mere moments — not the 20 minutes that Mrs. Rombauer instructed. Whipping the whites (to fold back into the custard) was equally swift: Even using a wimpy hand-held mixer, they flew right past soft peaks and into firmness in a matter of seconds. When yolks and whites were reunited, the resulting rum chiffon stood high in the bowl without the usual gelatin stiffener.
And the taste? Oh, my… so decadent. I can’t give away all of Shuna’s pie-crust secrets — though they’re there for the taking if you know where to look.


Black-Bottom Pie
1 pie shell, blind baked and cooled to room temperature
1/2 T (approx. 1/2 packet) gelatin*
2 cups whole milk
1/2 cup sugar
4 tsp cornstarch
4 eggs, separated, with 1 white discarded
1-1/2 oz unsweetened chocolate, grated or shaved
1/2 tsp vanilla
2 T white rum
1/4 tsp cream of tartar
1/4 cup sugar
1 cup whipping cream
2 T confectioners sugar
1/2 oz bittersweet chocolate, for shaving
If using gelatin, soak in 1/4 cup cold water and set aside. Scald the milk. In a small bowl, add the sugar and cornstarch, and whisk gently to combine; set aside. In a medium metal bowl, whisk the egg yolks until light in color. Slowly stir the hot milk into the eggs with a wooden spoon or heatproof spatula, then add the sugar mixture.
Bring a cup or two of water to a simmer in a medium saucepan. When you’ve reached a stable, steady simmer, place the metal bowl over the steam to cook the custard. Make sure that the water is not touching the bottom of the bowl; you’re cooking with the steam, not by direct water contact. Stir constantly with the spoon or spatula, making sure no hot spots develop. The custard is ready when it thickly coats the back of the spoon; this can take anywhere from 5 to 20 minutes, depending on the freshness of your eggs, the thickness of the bowl, and the speed of your simmer.
Place the grated unsweetened chocolate in a medium bowl. When the custard is done, immediately measure out 1 cup of the cooked custard into the bowl of chocolate, and stir until the chocolate melts and combines with the custard. Add the vanilla and a pinch of salt, and stir to combine. Pour the chocolate into the prepared pie shell, spreading evenly around the bottom.
If using gelatin, add it to the remaining custard while still warm, then add the rum; stir all until combined and the gelatin completely dissolves.
Using a stand mixer or electric hand mixer, beat the egg whites until stiff but not dry. Continue to mix while gradually adding the granulated sugar, a teaspoon at a time to keep from deflating your eggs.
Fold the whipped egg whites into the custard. Add the rum custard to the pie shell atop the chocolate layer, and chill the entire pie until set (about an hour).
When ready to serve, whip the cream to stiff peaks, then add the confectioners sugar. Cover the custard layer with whipped cream, and garnish with chocolate shavings or chocolate curls.
Pie will keep, in the fridge, for a couple of days.
—–
* Note: Most recipes call for a full packet of gelatin, which I find makes for a very firm, almost artificial-feeling chiffon. You can reduce it to half that amount, as noted here, to keep the texture less spongy. If you want the pie to be strictly vegetarian, the gelatin is optional providing that you’re using very fresh eggs, that you don’t stint on fully whipping them to stiff peaks, and that you don’t mind your custard layer being a little loose. (I actually prefer it this way myself.)
Also, the egg whites are essentially raw here, so the usual food-safety caveats apply.
—–
This little slice of yolk-yellow love also happens to be our entry for A Taste of Yellow, a blog event now entering its second year. Hosted by Barbara of Winos and Foodies, A Taste of Yellow features entries from food bloggers around the world — last year’s inaugural edition boasted 149 entries! — in support of LiveSTRONG Day, the Lance Armstrong Foundation‘s initiative to raise awareness and funds for the cancer fight.
 We dedicate our Taste of Yellow post both to our hostess Barbara, in her ongoing efforts to remain cancer-free, and to our friend Briana. Many of you know her blog, Figs with Bri, where she posted Wednesday about her recent setback: breast cancer has metastasized to her lungs. Since then, her site’s gone dark and her email account is offline. We’re keeping Bri and her husband Marc in our thoughts and prayers, and hoping for the very best.
baking, classes, dessert, East Bay, other blogs, recipes
10 Comments »
Posted by Anita on 09.19.07 11:58 AM
 Back in May, I talked about the Thai cooking classes offered by Kasma Loha-unchit in her Oakland home, and mentioned that “Kasma’s classes, especially the beginning series, are perennially booked”. But if you get a wiggle on, you might be able to score a place in her 2008 classes, which were announced today.
Seven sets of the four-class Beginning series, which costs $170, will be offered next spring:
March: Mondays, March 3, 10, 17 & 24
Tuesdays, March 4, 11, 18 & 25
Wednesdays, March 5, 12, 19 & 26
April: Mondays, March 31 & April 7, 14 & 21
May: Tuesdays, May 6, 13, 20 & 27
Thursdays May 8, 15, 22 & 29
June: Mondays, June 2, 9, 16 & 23
There’s more information, including menus, online at Kasma’s site, although the 2008 dates are not yet listed. You can send a request to hold your space to kasma[at]earthlink[dot]net; Kasma’s husband Michael recommends that you send along second- and third-choice series the first time around, as classes really do fill up quickly.
Good luck!


classes, East Bay, Thai
4 Comments »
Posted by Anita on 05.31.07 2:04 PM
 I teased you last week with a glimpse into my Tuesday-night classes with Thai cooking maven Kasma Loha-unchit. This most-recent set of classes was the fourth 4-week series I’ve attended; I started with the beginning series nearly 10 years ago, followed up with the intermediate course a few years later, and then — after travelling with Kasma through central and northern Thailand in January 2006 — picked up again with the advanced series last spring.
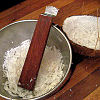
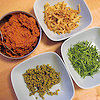
In the beginning series, you master popular curries, simple stir-fries, spicy soups and salads, and authentic (ketchup-free!) pad thai noodles. Even if you think you know a lot about Thai food, you’re sure to learn a lot: You’ll taste-test multiple brands of coconut milk, learn about the best places to buy ingredients, hear the lowdown on the top brands, and get plenty of practice balancing sweet, salty, sour, and hot flavors under Kasma’s watchful eye.
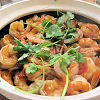
Intermediate classes move on to more labor-intensive preparations, and a larger assortment of ingredients. By the time you reach this level, you’ll have a thorough understanding of flavors and techniques — pounding curry pastes, balancing flavors, frying ingredients in coconut cream — that will put you in good stead for the advanced courses. A total of six advanced series walk students through regional specialties, intricate preparations, and adventurous foodstuffs. Many students work their way through the entire curriculum and then start again — it’s just that much fun to cook alongside other students who are experienced and passionate about Thai food.
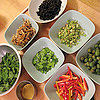
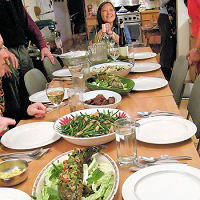 The real joy of learning to cook Thai with Kasma is that she makes Thai cooking accessible without dumbing it down. I hope you won’t think I’m immodest when I say that — even after just the basic courses — I could make Thai food better than what we find at local restaurants. The setup of Kasma’s classes allows for plenty of hands-on work, and lots of time to talk, taste, and learn. Each session starts with a snack while Kasma explains the four to six dishes of the day. Students team up for prep, then gather round as each dish is completed. When the cooking is done, you sit down with Kasma and her charming husband Michael to enjoy the feast you’ve prepared. I promise: You won’t leave hungry.
Kasma also sells specialized tools and hard-to-find items to her students. Years ago, when I first took the beginning series, her dining-room table was one of the few places to find Thai coffee filters and decent papaya graters. Her offerings have blossomed into a veritable general store of favorite brands and equipment, a useful one-stop-shop when stocking your Asian pantry. Students can also buy from a dwindling stock of Kasma’s award-winning (but out-of-print) cookbooks — Dancing Shrimp and It Rains Fishes — at their original retail price … a big savings over the $40-plus prices you’ll see on Amazon for used copies.
And speaking of bargains: You won’t find a better deal on cooking classes anywhere. Each four-class series costs $160 — just $40 per class, less than you’d probably spend for dinner at your favorite Thai restaurant. Kasma’s house is located close to Oakland’s MacArthur BART station (a quick bus ride or a leisurely half-hour stroll gets you the rest of the way there), making it easy for visitors and bridge-averse City-dwellers to attend. If you live outside the Bay Area, you’re not completely out of luck: Kasma offers week-long intensive sessions each summer for a stunning price: $550. You spend five full days covering territory similar to the beginning and intermediate series, or an assortment of advanced recipes in the later intensives.
Now that I have you salivating, let me disappoint you: You’ll have to be patient. All of Kasma’s classes, especially the beginning series, are perennially booked — and the mention she got in this month’s San Francisco Magazine (alongside Shuna Lydon and June Taylor, among others) will only make matters worse. To finagle a spot, join Kasma’s announcement-only Yahoo group, and be the first to hear about next spring’s offerings.


The Art of Thai Cooking
near Piedmont and Grand Avenues
Oakland, CA
510 655-8900
thaifoodandtravel.com
classes, cookbooks, cooking, East Bay, Thai
8 Comments »
Posted by Anita on 04.23.07 9:14 PM
 I have to brag: I spent a lovely Sunday afternoon learning the tricks of seasonal fruit desserts at the elbow of Shuna Fish Lydon, the Edible San Francisco regular who sings songs in the key of sweet (and sometimes bittersweet) over at the award-winning eggbeater. But don’t be jealous: You can play, too.
Shuna’s enthusiasm for this subject matter is infectious, and the class style is so intimate and inclusive that — even if you choose a topic that’s all demonstration, as I did — Shuna shows you all the tricks and gives everyone enough hands-on time with the ingredients along the way that you’re ready to fly solo in your own kitchen. The classes are liberally peppered with tales from Shuna’s restaurant career at The French Laundry, Citizen Cake, and Gramercy Tavern, among other places you’ve certainly also heard of.
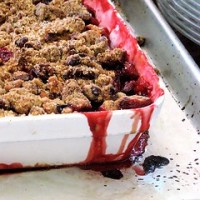
 Even if you think you know it all, you’re sure to find some hidden gems. One example: I make fruit crumbles almost weekly once summer strikes, but I learned a great trick for keeping the oven clean from bubble-over messes and discovered a new secret ingredient to add to my topping.
And as someone who thought she hated rhubarb, I’m here to tell you that if you learn to make it Shuna’s way, you may become a convert, too. (No stringy nursery sludge here, nope.) And, talk about eating locally: The flavorings for the Meyer lemon and lemon verbena ice cream — which we ate with our vanilla-bean roasted strawberries — were sourced right in Shuna’s neighborhood!
The new Eggbeater class schedule‘s just been posted. Check it out:
Sunday May 6, 2007: Pie & Galette Dough
Sunday May 20, 2007: Ice Cream & Sorbet
Sunday June 3, 2007: TBA
Sunday June 10, 2007: TBA
End of June: A Knife Skills Class and a Baking Class in NYC!
Mid July: A Knife Skills Class and possibly a Baking Class in Portland, Oregon!
Yep, you East Coast and Pac Northwest kids can get in on the fun, too.
Still on the fence? Take a peek at the sort of gorgeous desserts you’ll learn to make (and get to eat!) and see if your willpower holds out.
baking, classes, dessert, other blogs
6 Comments »
Posted by Anita on 08.02.06 8:23 AM
 In addition to selling her luscious marmalades, conserves and fruit butters at the San Francisco Ferry Plaza Farmers Market on Saturday mornings, June Taylor now also opens her warehouse/kitchen for retail sales on Fridays, and on select weekend days for classes.
I took a class back in late winter that featured three-fruit marmalade, which I loved. Last weekend, I followed up with June’s summer preserves class, which focused on peaches and nectarines; we made a preserve with “Summer Sweet” white peaches. Was it good? Let’s just say the jar I brought home is already gone — it was the most gorgeous rose color.
The classes are pricey ($125) but you go home with a good understanding of how to create your own preserves, plus a jar of the goodies that you and your classmates make in class under June’s direction. And you’ll never balk at paying $9 a jar again after you see what goes into it.
June Taylor Company/The Still-Room
2207 4th Street
Berkeley, CA 94710
510.548.2236
Update 08.14.06: June’s classes got an endorsement today from Shuna at eggbeater.
classes, East Bay, farmers markets, preserving & infusing, shopping
2 Comments »

