Posted by Anita on 04.04.10 9:43 AM
2010 AEC *All Rights Reserved*") Spring has come to the blog: We made it to the end of the Dark Days Challenge! We’re excited to share some spring recipes with you soon. But before we head off into the sunshine, I’m sending a round of applause to all the other Dark Days bloggers who stuck it out to the end, especially our hostess, Laura at (not so) Urban Hennery.
Spring has come to the blog: We made it to the end of the Dark Days Challenge! We’re excited to share some spring recipes with you soon. But before we head off into the sunshine, I’m sending a round of applause to all the other Dark Days bloggers who stuck it out to the end, especially our hostess, Laura at (not so) Urban Hennery.
It’s been funny, pretending it was still Dark Days when the weather — and the market — make it clear that spring is upon us. Despite last week’s avocado orgy, we’ve tried to stick with the spirit of the challenge (and not torture participants in colder climates), using pantry goods and foraging in the freezer.
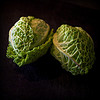
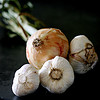
The weather has been obligingly wintery here in San Francisco this past week, so for our final Dark Days meal, we turned to a cool-weather dish I’ve been wanting to try for months. I came across this recipe in the River Cottage Cookbook, and was captivated: Why on earth had I never heard of pot-roast chicken before? We make pot roast with beef, and pork, and even lamb, but apparently the Brits (or at least Hugh F-W) know something we don’t. Dead simple, this one: Just chunk up whatever hardy vegetables you have on hand — vary the list below with the seasons, so long as there’s a starch and some onions — pop them in a big pot with a chicken in the middle, and Bob’s your uncle.
We made a few tweaks to the River Cottage recipe: Even once it was fully cooked, we found the chicken a little flabby and the pan juices a little thin for our taste. We solved both problems by popping the chicken back in the oven on its own for a few minutes to crisp the skin while reducing the pan juices a bit on the stove top. (Even if you don’t take this extra step, everything tastes delicious.) Cooked in this novel method, even the breast meat stays moist — a perfect ingredient for, say, chicken salad the next day. And should you have any leftover vegetables, they make a fine soup pureed with chicken stock and garnished with a bit of cream and a sprig of herbs.
2010AEC *All Rights Reserved*")
2010AEC *All Rights Reserved*")
2010 AEC *All Rights Reserved*")
2010 AEC *All Rights Reserved*")
2010 AEC *All Rights Reserved*")
Pot-Roast Chicken and Vegetables
– adapted from The River Cottage Cookbook
1 chicken, 4 to 6 pounds
2T butter
2 tsp salt
freshly ground black pepper
2 onions
3 large carrots
3 stalks of celery
2 leeks
3 potatoes
2 bay leaves
1 cup white wine
1 cup unsalted chicken stock (or water)
3 sprigs of thyme
Preheat the oven to 375°F. Cut up the vegetables into large chunks. Smear butter over the top of the chicken, and season with salt and pepper. Place the buttered chicken in a large casserole or a deep lidded roasting pan, and surround with the chunked vegetables. Pour in the wine and stock, add the thyme, cover, and place in the preheated oven.
After an hour, remove the lid; stir the vegetables and baste the chicken with the fat on the top of the pan juices. Return to the oven, uncovered, for another 30 minutes or until the breast is browned and the juices run clear at the thigh.
Carve the chicken into individual portions and place in an oven-safe plate or pan; return it to the oven to get a little more brown and crispy while you finish the pan juices. Remove the vegetables to a serving bowl, and cover to keep warm. On the stove, simmer the juices in the roasting pan, reducing to a medium consistency (or as you like).
Farmers and food artisans who created the ingredients for this week’s meal:
Soul Food Farm, Vacaville: chicken
Catalán Family Farm, Hollister: onion, leeks, celery
Dirty Girl Produce, Santa Cruz: carrots
Little Organic Farm, Marin: potatoes
Spring Hill Cheese Company, Petaluma: Jersey butter
Souverain, Geyserville: white wine
Guisto’s Vita-Grain, South San Francisco: sea salt
…and our own homegrown bay leaves and thyme, and home-canned chicken stock
exemptions: black pepper
Dark Days challenge, locavore, meat, recipes
Comments Off on Dark Days, spring chicken


Posted by Anita on 03.29.10 8:19 AM
2010 AEC *All Rights Reserved*") The first glimmers of spring are showing up at the farmers market, just as we’re on the home stretch of the Dark Days Challenge, and boy are we excited. Not so much for the strawberries; they’re still white in the center, and I’ll happily wait until they’re fully ripe. But we’re gorging ourselves on the new, tender asparagus, and we’re definitely making up for lost time in the avocado department.
The first glimmers of spring are showing up at the farmers market, just as we’re on the home stretch of the Dark Days Challenge, and boy are we excited. Not so much for the strawberries; they’re still white in the center, and I’ll happily wait until they’re fully ripe. But we’re gorging ourselves on the new, tender asparagus, and we’re definitely making up for lost time in the avocado department.
We put up jars of salsa last summer to help get us through the bleak winter months — without tomatillos, tomatoes, or chile peppers, Mexican food becomes downright impossible. But avocados defy preserving, and even on those rare occasions when we break down and buy an out-of-season avocado or two (sometimes it’s a guacamole emergency, I tell ya!) we always remember why it pays to wait. The watery, wan specimens that make their way here from Mexico or Chile just can’t compare with Will’s buttery, nutty avocados. So we wait. And wait. And wait. Rather impatiently, I might add. It’s one of the few winter deprivations that actually makes me cranky.
And so this week, we celebrated the avocado’s return to our kitchen with a big mess of tacos. It’s another one of those shopping-not-cooking recipes: Once you’ve got all the ingredients on hand, it’s a little bit of chopping, and a whole lot of gobbling. And should you have any leftovers, I can vouch that this filling, along with perhaps a little cheese and a soft-scrambled egg or two, makes an exceptional breakfast taco.
2010 AEC *All Rights Reserved*")

2010 AEC *All Rights Reserved*")
2010 AEC *All Rights Reserved*")
2010 AEC *All Rights Reserved*")
Chorizo-Potato-Mushroom Tacos
– adapted from Mexico One Plate at a Time
2 medium waxy potatoes (about 1/2 pound)
1/2 pound Mexican chorizo
1/4 to 1/2 pound mushrooms, any variety, sliced
1 small white onion, diced
1/2 cup or more tomatillo salsa (homemade or store-bought)
1 ripe avocado
6 to 8 fresh tortillas
Cube the potatoes and simmer in a pot of salted water until tender; drain and set aside in a medium bowl.
Saute the chorizo and onion in a wide skillet over medium heat until the sausage is cooked through. Using a slotted spoon, remove the sausage and onions to the bowl with the potatoes, leaving the rendered fat in the pan. Add the mushrooms to the pan and saute until softened and beginning to brown. Return the potatoes and chorizo-onion mixture to the pan and cook until the potatoes begin to brown.
Meanwhile, thoroughly mash the avocado in a bowl, then add the tomatillo salsa. Add more salsa until the mixture is like a sauce. Season with salt as needed.
Warm the tortillas in a skillet or griddle, or by running them over an open flame. Wrap them in a towel as you go, to keep them warm for the table. When tortillas are all warmed, move the taco filling to a serving bowl, and bring to the table with the avocado salsa and the warm tortillas. Let each person build their own tacos at the table with a scoop of the filling and a drizzle of the salsa in the middle of each tortilla.
Farmers and food artisans who created the ingredients for this week’s meal:
Little Organic Farm, Marin: potatoes
Fatted Calf, Napa: chorizo
Far West Fungi, Moss Landing: mushrooms
Catalán Family Farm, Hollister: onion
Will’s Avocados, Soledad: Avocados
La Palma Mexicatessen, San Francisco: fresh tortillas
…and our own home-preserved tomatillo salsa
Dark Days challenge, locavore, meat, Mexican, recipes
6 Comments »
Posted by Anita on 03.17.10 9:46 AM
2010 AEC *All Rights Reserved*") Every St. Patrick’s day we wonder: How did we let another year go by without making corned beef with all the trimmings? It’s simple, affordable, and delicious — too good to save for the holiday celebrations.
Every St. Patrick’s day we wonder: How did we let another year go by without making corned beef with all the trimmings? It’s simple, affordable, and delicious — too good to save for the holiday celebrations.
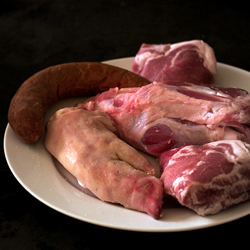
Sure, you can buy your corned beef at the market, but if you’d rather make your own using local meat and ingredients you can trust, it’s not difficult to brine it yourself. All it takes is a few minutes of measuring, a week of waiting, and a bit of refrigerator space.
We’ve made a number of recipes over the years, but the one we keep coming back to is the simplest. Hugh Fearnley-Whittingstall’s corned beef recipe serves 10 in its original ratios, so we’ve scaled it down to a more manageable size. If you do end up with extra meat, you’re in luck: In my book, corned-beef hash and Reubens are right up in leftovers heaven alongside the meatloaf sandwich.
Many recipes call for curing salt, but its only purpose is to maintain the pink-red color of the meat; it doesn’t serve any preservative purpose in corned beef, so we usually leave it out. (In charcuterie, it’s a necessary ingredient, but here it’s just for looks.) If you prefer the traditional blush, add 2 tsp of pink curing salt — also known as sodium nitrite or Insta Cure #1 — to the brine.
2010 AEC *All Rights Reserved*")
2010 AEC *All Rights Reserved*")
2010 AEC *All Rights Reserved*")
2010 AEC *All Rights Reserved*")
2010 AEC *All Rights Reserved*")
Corned Beef and Cabbage
– adapted from The River Cottage Meat Book
3 to 3-1/2 pounds well-marbled brisket
—
* for the brine:
2-1/2 quarts water
8oz demarara or light brown sugar
1-1/2 pounds coarse sea salt
1/2 tsp black peppercorns
1 tsp juniper berries
3 cloves
2 bay leaves
a sprig of thyme
—
* for cooking:
bouquet garni
1 carrot, chopped
1 onion, chopped
1 stalk celery, chopped
4-6 cloves garlic
—
* at the end:
3-5 large carrots, cut into large chunks
1 medium head cabbage, quartered, leaving core intact (or 4 small heads, halved)
5-10 potatoes, halved
2-3 turnips (optional), halved or quartered
Put all the brine ingredients in a medium saucepan and stir well over low heat until the sugar and salt dissolve. Bring to a boil, then remove from heat and let cool to room temperature.
Place your brisket in a large, non-metallic container (we use a large zip-top bag, but a deep casserole works well, too). Cover the meat with the cooled brine; weigh it down with a saucer or other non-reactive object if it floats (not necessary with the bag). Leave in the refrigerator for 5 to 7 days, turning every couple of days.
The day before you want to cook the corned beef, remove the brisket from the brine and soak it in cold water for 24 hours, changing the water at least once.
After the soak, place the brisket in soup pot with the bouquet garni, chopped vegetables, and garlic. Cover with fresh water and bring to a gentle simmer. Poach gently on top of the stove (or in a 275°F oven) until tender, about 3 to 3-1/2 hours. (A good test is to run a metal skewer through the meat; if it slides in easily, your brisket is done.) About 30 minutes before the brisket is done, add the remaining vegetables and simmer along with the meat.
Serve the hot corned beef cut into thick slices, along with the simmered vegetable chunks. (You can discard the smaller chopped vegetable bits in the broth.) Serve with fresh horseradish cream at the table.
Farmers and food artisans who created the ingredients for this week’s meal:
Prather Ranch, MacDoel: brisket
Catalán Family Farm, Hollister: onion, celery
Dirty Girl Produce, Santa Cruz: carrots, cabbage
Little Organic Farm, Marin: potatoes
Iacopi, Half Moon Bay: garlic
Happy Girl Kitchen Co., Big Sur: prepared horseradish
Clover Organic, Petaluma: sour cream
…and our own homegrown bay and thyme
Exemptions: sugar, peppercorns, juniper berries, cloves
Dark Days challenge, holidays & occasions, locavore, meat
8 Comments »
Posted by Anita on 03.15.10 9:48 PM
 When you stock your larder with good quality staples, you’re able to create some amazing, quick weeknight meals. We’re lucky to live in a part of the country with access to a year-round supply of pastured eggs, a wide assortment of local artisan-made cheeses, and some truly excellent dry pasta, all from local sources.
We’re also blessed to have good friends with amazing food-crafting skills. A case in point: Our friend Sean made his own house-cured guanciale, and generously gifted us with a chunk of the most delicious pork product we’ve tasted in recent memory.
Although Laura’s birthday dinner last Sunday could technically have been my Dark Days Challenge dinner for the week, I felt pretty happy knowing we’d be able to throw together an all-local meal, even though I’d missed the weekly farmer’s market during my Seattle trip. With Sean’s home-cured guanciale in our stash, along with a fresh dozen eggs from last week’s Soul Food Farm CSA delivery, we were only a few ingredients away from one of Cameron’s favorite simple suppers.
Two things set this pasta carbonara recipe apart from the usual. First, we added slivered green garlic as a garnish, an embellishment that’s sure to be frowned upon by carbonara purists, but one we’ll keep making as long as Knoll Farms keeps supplying our weekly fix. The second innovation is simple but revelatory: Separating the eggs and stirring the hot pasta with just the whites, then topping each serving with its own yolk to be stirred in at the table. This small trick lends the sauce a silky quality, and adds a little flair to the proceedings — just the trick for making a quick midweek supper worthy of an ingredient that took weeks to make.
2010 AEC *All Rights Reserved*")
2010 AEC *All Rights Reserved*")
2010 AEC *All Rights Reseved*")
2010 AEC *All Rights Reseved*")
2010 AEC *All Rights Reserved*")
Spaghetti alla Carbonara
— adapted from Molto Italiano
1-1/2 T extra virgin olive oil
4oz guanciale (or pancetta)
1/2 pound spaghetti
3/4 cup freshly grated Parmesan
2 large eggs, separated
1 green garlic, white and light green parts, sliced thin
freshly ground black pepper
In a large pot, bring 4 quarts of well-salted water to a boil. Meanwhile, cut the gianciale into flat pieces, then combine the olive oil and guanciale in a large skillet over medium heat. Cook until the guanciale has rendered its fat, and becomes juicy and lightly browned. Remove the guanciale to a plate; remove the pan from the heat and set aside, reserving the fat in the pan.
Cook the spaghetti in the boiling water until just al dente. Add a good spoonful of the pasta water to the pan with the guanciale fat; drain the pasta. Return the guanciale to the pan, then add the pasta. Turn the heat back to medium-high and shake/toss the pasta with the water, fat, and guanciale for about a minute. Remove the pan from the heat and add 1/2 cup of the cheese, the egg whites, and freshly ground black pepper to taste; toss until thoroughly mixed (the egg whites will cook from the heat of the pasta).
Divide the pasta into nest-like piles between two warmed pasta bowls. Gently slide an egg yolk into the middle of each nest, then season with more pepper, the rest of the cheese, and the green garlic. Serve immediately, allowing each diner to stir the yolk into their own serving.
Farmers and food artisans who created the ingredients for this week’s meal:
Guisto’s Vita-Grain, South San Francisco: sea salt
Bariani, Sacramento: olive oil
Hedonia, San Francisco: guanciale (from Prather pork jowls)
Eduardo’s, San Francisco: spaghetti
Spring Hill Cheese Company, Petaluma: dry Jack cheese
Soul Food Farm, Vacaville: eggs
Tairwa Knoll Farms, Brentwood: green garlic
exemptions: black pepper
Dark Days challenge, Italian, locavore, meat, other blogs
3 Comments »
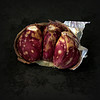
Posted by Cameron on 03.07.10 2:40 PM
2010 AEC *All Rights Reserved*")
Tara, one of our very favorite meat-eating vegetarians, is on the San Francisco leg of her book tour. Happily for us, we’ve been able to see quite a bit of her when she’s not chatting with admirers, moderating debates between militant vegetarians and ethical carnivores, and seducing the crowds with her prose.
We got to talking about meat pies in general and pork pies in particular, and Tara told us about something that she had read in Danny, The Champion of the World, by Roald Dahl. The passage, which she first encountered when she was very young, describes a cold meat pie with hard-boiled eggs buried in it. The description struck a nerve, and it stayed with her into adulthood (apparently, she’s not the only one).
I love meat pies. Love, love, love, love. Cornish pasties, forfar bridies, empañadas, pot pies, steak pies, pork pies, you name it; there’s just something completely, utterly, and ineffably right about the combination of meat and pastry. Tara hadn’t even finished her story before Anita and I were waggling our eyebrows at each other and grinning like schoolkids. “So,” I asked the woman who has only recently begun to forge a relationship with meat after a lifetime of vegetarianism, “Want to make a pork pie?”
What fun! While Anita weighed and diced up the filling, Tara pulled together the hot-water crust with the quick, sure movements of a woman who has been cooking almost since she could walk. I caught the briefest of hesitations when she turned to the next step, but undaunted, she was quickly up to her forearms in a bowl of three different kinds of cold chopped pork. In honor of Mr. Dahl’s Danny, we buried hard-boiled eggs in the filling, and then I rolled out the top crust and crimped it in place.
This is my third time through this recipe, taken from The River Cottage Meat Book, and it’s a winner. The recipe doesn’t call for hard-boiled eggs, but they did just fine when we popped them in there.
The only downside of pork pie is that — because it’s best cold — you don’t get to taste it until the day after you’ve made it. We put together the pie on Sunday and it was our Dark Days Challenge dinner on Monday night, with pickles and mustard on the side.
Raised Pork Pie
– adapted from The River Cottage Meat Book
Filling
2# pork shoulder, cut into 1/2 inch cubes
8 oz fatty sausage meat (or ground pork belly)
8 oz salt pork, pancetta, or bacon, finely chopped
5 to 6 hard-boiled eggs, top and bottom trimmed so yolk shows through (optional)
12 sage leaves, finely chopped
leaves from 2 good sprigs of thyme, chopped
1 tsp salt
1 tsp coarsely ground black pepper
1 t ground white pepper
1/2 tsp ground mace
A good pinch of cayenne pepper
1 bay leaf
1 cup good pork stock that will set to jelly
Crust
7 T lard, diced
7 T butter, diced
Scant 1 cup water
4 1/4 c AP flour (approximately 630 g)
1-1/2 t salt
2 medium eggs, beaten, plus 1 egg, beaten, to glaze
Make the hot water crust pastry first. Put the lard , butter, and water in a saucepan and heat gently until melted; do not let it boil. Put the flour and salt in a mixing bowl. Make a hollow in the center and add the beaten eggs, stirring them gently around with a knife so they are half mixed with the flour. Pour in the melted fat and water and mix together to form a soft dough; add up to 3 1/2 T extra warm water if it is too dry. Knead gently, adding more flour if it is too sticky to handle. Wrap in plastic wrap and chill thoroughly (at least 1 hour).
For the filling, mix all the meats with the herbs, salt, and seasonings (except the bay leaf), so they are thoroughly combined.
Now assemble the pie. Preheat oven to 350 degrees. Cut off a generous quarter of the pastry and keep in the fridge, for the lid. On a floured surface, roll out the rest of the pastry into a 12 inch circle around 1/3 inch thick. Use this to line an 8 inch springform (or removable bottom) cake pan, pressing the pastry into the sides and flattening any overlap with your fingers. It should come 2-1/2 to 3 inches up the sides of the pan.
Fill with the seasoned pork mixture and push the bay leaf into the middle of it. (If you are adding eggs, lay down a thin layer of filling, place the eggs in a ring halfway between the center and the pie edge, and then add the rest of the filling around and covering the eggs.) Roll out the reserved piece of pastry into a circle about the size of the pan. Brush the edges of the lining pastry with a little beaten egg, and lay the pastry lid on top of the pie. crimp the edges together so they are sealed. Cut a 1/3-inch diameter hole in the center of the pastry lid.
Place the pie in the oven and bake for 30 minutes. reduce the temperature to 325 degrees and bake for a further 1-1/4 hours. If your top crust is concave instead of convex, a pool of juice and fat may form around the center hole during baking that you’ll want to remove with a turkey baster, or the crust may become soggy.
Remove the pie from the oven and carefully release the side of the pan. Brush the top and sides of the pie with beaten egg and cook for another 15 minutes to set the glaze. Take the pie out of the oven and allow to cool. The filling will have shrunk slightly, creating a cavity that is traditionally filled with jellied stock. When the pie is still a little warm, heat the jellied stock just until it’s pourable — not too hot! Carefully lift the edges of the center hold of the pastry with the tip of a knife, making sure you have good access to the cavity. Use a small funnel or, better still, a turkey baster to gently introduce the stock through the center hole. Tilt the pie from time to time to distribute the stock, then try and get a little more in. Stop when the stock begins to overflow from the hole. Leave the pie to cool, then put it in the fridge.
Farmers and food artisans who created the ingredients for this week’s meal:
Shasta Valley Farm, Gazelle: pork loin and pork sausage
Boccalone, Oakland: pancetta
Prather Ranch, MacDoel: leaf lard
Soul Food Farm, Vacaville: eggs
Guisto’s Vita-Grain, South San Francisco: flour, sea salt
Spring Hill Cheese Company, Petaluma: butter
…and our own homemade pickles, and homegrown celery and carrots (for pork jelly); sage, bay, and thyme
exemptions: pepper, mace, cayenne
Dark Days challenge, locavore, meat, recipes
15 Comments »
Posted by Anita on 01.03.10 11:40 PM
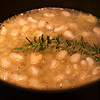
2010 AEC *All Rights Reserved*") If it’s New Year’s week, it must be time for cassoulet at our house. For this week’s Dark Days Challenge meal, we used the same streamlined recipe we’ve been making for the last couple of years. But this year, we went back to the classic preparation, and made our own duck confit.
If it’s New Year’s week, it must be time for cassoulet at our house. For this week’s Dark Days Challenge meal, we used the same streamlined recipe we’ve been making for the last couple of years. But this year, we went back to the classic preparation, and made our own duck confit.
We were lucky enough, last fall, to buy one of the Pekin ducks that Massa Organics was using for pest control in their rice fields. We parted out the bird, setting aside the breasts for searing, making stock out of the carcass, rendering down the fat and skin, and preserving the legs in the rendered fat.
One of my new year’s resolutions is to eat more food grown by people I know in 2010. We already do a pretty good job of finding local sources, but it’s always that much sweeter when we know the families behind our dinner. This cassoulet was a pretty good first step — we’re friends with three of the producers: Steve Sando from Rancho Gordo, Taylor Boetticher from Fatted Calf, and Greg Massa of Massa Organics. We know many of our other farmers by sight from our market trips, but in the next year we’re going to try and become even more familiar with the people who put food on our plates.
The recipe below may seem long, but trust me when I say that it’s a gross simplification of Judy Rogers’s original recipe, which runs to 6 full pages. Just like her Mock Porchetta (and pretty much every other Zuni recipe), the length isn’t so much an indicator of complexity or difficulty, but rather a mix of thoughtful hints, step-by-step signposts, and thought-provoking commentary. In the book, Rogers details how various duck breeds adapt to the master recipe, recounts her laborious process to find the best variety of salt for curing, offers ideas on how to get enough fat to cover your meat, makes suggestions for adapting the recipe to duck breasts or gizzards, and provides a number of serving ideas. It’s a treatise on duck confit in all its glory, and I highly recommend you read it at least once in its entirety. (If you don’t already own a copy, it’s well worth picking up. You don’t have to take my word for it: Eat Me Daily named it one of their top cookbooks of the past decade.)
2010 AEC *All Rights Reserved*")
2010 AEC *All Rights Reserved*")
2010 AEC *All Rights Reserved*")
2010 AEC *All Rights Reserved*")
2010 AEC *All Rights Reserved*")
Duck Confit
– adapted and condensed from The Zuni Cafe Cookbook
4 whole duck legs (legs and thighs attached)
1/3 oz (approximately 2 tsp) sea salt per pound of meat
rendered duck fat, sufficient to cover the legs
– (approximately 2 cups fat per pound of meat) plus a little extra for insurance
Rinse the legs well and pat dry, trimming off any ragged edges of skin or fat. Working on a sheet of parchment, salt the legs all over, a little more on the thick parts and less on the bony legs and ankles. Roll the legs in the salt left on the parchment. Arrange the legs in a single layer in a wide glass, ceramic, or stainless container, skin side down. Refrigerate for 18 to 24 hours, depending on the size and meatiness of the legs.
Rinse the legs well, one at a time, under cold running water; do not soak or you will end up with waterlogged meat. The flesh should feel firm, but knead the excess salt out of any areas that feel especially hard. Dry the rinsed legs on a clean towel and pat dry. Test for saltiness by trimming off a bit of meat and simmering it in duck fat for 5 minutes. If it tastes too salty, rinse and dry each leg again. (Rogers says it should be reminiscent of well-seasoned sausage, and not to worry if it’s tough at this stage.) Place the legs on a very clean plate and rest at room temperature for an hour, or overnight in the refrigerator, covered with plastic wrap.
Heat the fat until warm but not bubbling, then add the duck legs to the warm fat. Choose the smallest pot that will fit your duck, to reduce the amount of fat you’ll need. Unlike most recipes, it’s fine — in fact, it’s desirable — to crowd the pieces into the pan, but do not stack more than 2 layers deep. If needed, add more fat to submerge the legs completely. Heat the fat and legs to just below a simmer (200°F is a good target, if you have a deep-frying thermometer), skimming off any foam.
Stand by to adjust the heat, maintaining a steady temperature to avoid toughening the meat. Cook for an hour, then begin testing for doneness every 10 minutes. (Large legs often take 90 minutes to 2 hours; small legs, like those on the Massa ducks, are done just after an hour.) The meat should yield to a firm prodding in the pot; when it does, remove a piece from the fat, and slice off a bit. Allow the sample to cool; fully cooked meat will be tender when just cooled enough to hold with your bare hands.
When the meat is done, remove the pot from the heat and allow to sit undisturbed for 20 to 30 minutes. Skim the surface of the fat, removing any stray bits. Using tongs, gently move the legs to a sterilized glass or ceramic container, trying not to tear the skin or to disturb the liquid on the bottom of the pot beneath the fat. Skim the fat again, and ladle it through a fine-mesh strainer over the meat, again taking care not to disturb the gel at the bottom of the pot. Cover the meat completely — depending on the size of your storage container, you may need to melt more fat — and cool to room temperature. Cover the container well, then refrigerate for three days to a week before using. For longer storage, I prefer the freezer; the fat protects the meat from drying, and the deeper chill prevents any off flavors.
Farmers and food artisans who created the ingredients for this week’s meal:
Rancho Gordo, Napa: flageolet beans
Fatted Calf, Napa: Toulouse sausage and ham trimmings
Massa Organics, Hamilton City: duck
Catalán Family Farm, Hollister: onions
Guisto’s Vita-Grain, South San Francisco: sea salt
…and our own homegrown thyme and crumbs from homemade bread
Dark Days challenge, locavore, meat, preserving & infusing, recipes
5 Comments »
Posted by Anita on 11.22.09 11:31 AM
2009 AEC - All Rights Reserved") Possibly the only thing I love more than food is travel. I just don’t feel right unless there’s at least one trip on the horizon, preferably two. We’ve been lucky enough lately to spend three of the last four weekends on the road — on a spontaneous trip to Los Angeles, then back down to Long Beach for Matt’s photography class, and then up to Sea Ranch to celebrate Sean’s 40th birthday.
Possibly the only thing I love more than food is travel. I just don’t feel right unless there’s at least one trip on the horizon, preferably two. We’ve been lucky enough lately to spend three of the last four weekends on the road — on a spontaneous trip to Los Angeles, then back down to Long Beach for Matt’s photography class, and then up to Sea Ranch to celebrate Sean’s 40th birthday.
But all this gallivanting around — especially over the weekends, when our biggest and best farmers markets are held — makes it rough to eat local. We’re lucky enough to have a shop or two in San Francisco that really pays attention to the issues of local eating, but when summer comes to an end, even their 100-mile offerings can make it hard to shop on a whim.
Our chicken-and-egg CSA keeps us stocked with a relatively painless source of fallback protein, and we’re pretty good at freezing, canning, and otherwise putting up food for just these sorts of circumstances. In a regular post-travel week, we’d probably have pasta bolognese one night, chili or sloppy joes for another dinner, and maybe chicken soup for a third. But this week marks the start of the 3rd Annual Dark Days Eat Local Challenge, so I wanted to have a photo- and post-worthy recipe to share.
We’re still pulling carrots and a small handful of beans out of our garden, so our first side-dish was a simple combination of quick-braised vegetables. And since we’ve got local sources for rice, not being able to get to the farmers market for local potatoes or other starches was no hardship. I knew we had some chicken in the freezer from our last CSA delivery, so I just had to find a new way to prepare it. (After four years of blogging and three years in this particular challenge, I’ve pretty much used up my stash of tried-and-true recipes!)
Because we’ve been up to our ears in tomatoes from the garden, I wanted to avoid most of the Italian-style recipes that would take us back in a tomato-y direction. And since it’s finally feeling like autumn around here, I craved a recipe with a heartier presence, one that would give us a good dose of internal warmth for the cool evening. This traditional Alsatian dish fit the bill quite nicely: Simple enough to whip together on a weeknight from easily-sourced local ingredients, but pretty and delicious enough to share with you. A simple snack of baguette, cheese, and radishes from our garden kept us happy while the chicken braised, and dinner was on the table in just about an hour.
2009 AEC ** All rights reserved **")
2009 AEC ** All Rights Reserved **")
2009 AEC ** All Rights Reserved **")
2009 AEC **All Rights Reserved**")
2009 AEC ** All Rights Reserved **")
Poulet au Riesling
– adapted from Jean-Georges Vongerichten in Food & Wine
5T unsalted butter, at room temperature
a 3-1/2-pound chicken, quartered
1 large shallot, minced
2T brandy
1 cup dry Riesling or other spicy/fruity dry wine
6 ounces white or brown mushrooms, sliced 1/4 inch thick
1T flour
1/3 cup cream
Rinse and dry the chicken parts, and season with salt and pepper. Melt 2T of the butter in a large skillet; add the chicken and cook over medium heat until lightly browned, turning to brown all sides.
Add the shallot to the pan and saute for 1 minute. Add the brandy — flambé it for added flavor, if you like — then add the wine. Cover and simmer over medium-low heat until the chicken breasts are just cooked through. Transfer the breasts to a plate and cover. Continue to simmer the legs about 10 minutes longer, then remove them to the same plate with the breasts.
While the chicken simmers, melt 2T of the butter in a second skillet. Add the mushrooms and cook over low heat until the liquid evaporates. Season with salt and pepper, then increase the heat to medium and saute until browned.
Make beurre manié with the remaining butter and the flour. Stir the cream into the skillet with the chicken, and bring to a simmer. Gradually whisk the beurre manié into the cooking liquid and simmer while whisking, at least 3 minutes. Add the mushrooms and adjust seasoning to taste. Return the chicken to the skillet and briefly reheat. Serve with rice or noodles.
Farmers and food artisans who created the ingredients for this week’s meal:
Soul Food Farm, Vacaville: chicken
Dirty Girl Produce, Santa Cruz: shallot
Spring Hill Cheese Company, Petaluma: butter
Korbel, Geyserville: brandy
Handley Cellars, Philo: Gewürztraminer
Far West Fungi, Moss Landing: cremini mushrooms
Guisto’s Vita-Grain, South San Francisco: flour
Clover Organic, Petaluma: cream
Massa Organics, Hamilton City: rice
Semifreddi’s, Alameda: sweet baguette
Andante Dairy, Petaluma: Picolo triple-cream cheese
…and our own homegrown radishes, carrots, and beans
Dark Days challenge, locavore, meat, recipes
4 Comments »
Posted by Anita on 07.14.09 12:33 PM
 One day a couple of weeks ago, I decided to make a batch of homemade kimchi using an extra head of cabbage I had knocking around. Of course, this simple use-it-up kitchen project required a trip across town to a Korean grocery store for the requisite red-pepper seasoning mixture, but I’ve got an anti-food-waste streak a mile wide.
In a bit of kitchen synchronicity, I’d been meaning to make our friend Matthew‘s recipe for Korean tacos — a recent trip to L.A. left us with a hankering for this hipster street chow but unable to stomach Kogi‘s ridiculous 3-hour lines — and kimchi seemed like a natural accompaniment.
Last weekend at the farmers market, our list was very short. Knowing we were heading off to New Orleans last Wednesday, we really only needed to make one dinner at home. Could we combine our Korean supper with our One Local Summer meal? Turns out, the recipe doesn’t require any exotic ingredients, and by stretching our challenge’s seasoning exemptions to include soy sauce and a small amount of sesame oil, we were able to source everything we need from within our 100-mile radius.
Of course, the best-laid plans often lead to disappointment, and my first batch of kimchi never really got the hang of fermentation. I tried again a few days later using a different recipe, and although it seemed headed in the right direction, the cabbage never released enough liquid, and the result was dry and funky.
But although I still haven’t found a kimchi recipe that works for me, that didn’t stop me from including it in our locavore feast. Turns out, there’s a locally made brand — King’s — that all the nearby Asian markets sell. It’s spicy and fresh-tasting, even if it’s not as beautiful or as romantic as the homemade sort.
This recipe also gave us a chance to try out the meat slicer we bought a few weeks ago. If you don’t have a fancy gizmo like ours, you may be able to ask your butcher to shave the meat for you. Or, you can freeze it briefly (although not until it’s completely solid) and use a very sharp knife to cut pieces as thin as possible.


Korean Rib-Eye Tacos
– adapted from Matthew Amster-Burton
3/4 pounds rib eye, sliced paper thin
1T soy sauce
1 to 2T sugar
1T minced garlic
2 tsp Asian sesame oil
1 tsp sherry or mirin
1 tsp water
—
1-1/2 tsp soy sauce
3/4 tsp lime juice
3/4 tsp toasted sesame oil
2 cups shredded romaine lettuce
1 cup shredded Napa cabbage
1/4 cup thinly sliced red onion
toasted sesame seeds
—
chopped avocado
kimchi, Korean red pepper flakes, or fermented chili paste
corn tortillas (6 to 10, depending on size)
Combine the meat with the rest of the marinade ingredients, and refrigerate for between 2 and 24 hours. Bring meat to room temperature, then cook under a broiler or in a well-heated skillet. If needed, chop into smaller, taco-friendly pieces.
Whisk together the soy sauce, lime juice, and toasted sesame oil. Toss the lettuce, cabbage, and red onion in a large bowl with half of the dressing. Add more dressing to taste, then garnish generously with sesame seeds.
Warm the tortillas over a gas burner or in a dry skillet. Top with meat, slaw, avocado, and your choice of spicy condiments.
Farmers and food artisans who created the ingredients for this week’s meal: Marin Sun Farms
, Point Reyes: Grass-fed pastured rib-eye steak
Hunter Orchards, Grenada: Garlic
Paradez Farms, Exeter: Limes
Marin Roots Farm, Petaluma: Romaine
Dirty Girl Produce, Santa Cruz: Cabbage
Mariquita Farm, Watsonville: Red onions
Will’s Avocados, Soledad: Avocados
Primavera, Sonoma: Corn tortillas
King’s Asian Gourmet, San Francisco: Kimchi
locavore, meat, One Local Summer, recipes
8 Comments »
Posted by Anita on 07.05.09 11:03 PM
 When I first read the recipe that served as the inspiration for this week’s One Local Summer supper in the September 2006 issue of Bon Appetit, I knew we would have to make it. The official name of the dish was the prosaic “Spanish Pork Braise”, but the real hook was rendered in 48-point type over a stunning photo of braised pork shanks and sunny garbanzo beans: “PORK x4”. Really, have you ever heard of a happier notion? Not just pork — pork four times over!
Of course, with September being the height of San Francisco’s Indian summer, the idea of a hearty braise heating up the house wasn’t really appealing at the time. But I knew, some foggy summer day in the future, I’d have the perfect recipe at hand.
Finding osso-bucco–style pork-shank pieces at the farmers market isn’t really an everyday occurrence (although Marin Sun Farms will do them by special order), so I never found myself hunting down the recipe. But then, last week, while browsing through my recipe file looking for a way to use up some porky odds and ends in the freezer, I rediscovered this captivating clipping. The pork shank I had on hand was whole — we’d brought it home from our pig-butchering class — but a braise is a braise is a braise. Even if pulled meat doesn’t look quite as nice as a neatly tied shank steak, it still tasted delicious.
The original recipe is served with a side of garbanzo beans dressed up with a sprinkling of gremolata. We were lucky enough to pick up fresh, green garbanzos at the market last week, and substituted them for canned, after a quick pan-poaching. If you’re wondering what to do with the starchy late peas you’re finding at the market, I suspect they’d made a great alternative, too.


Pork Times Four
– adapted from Steve Johnson’s Spanish Pork Braise, Bon Appetit
4 to 5 pounds bone-in pork for braising
(such as a whole pork shank, or 6 x 2-1/2-inch thick shank pieces, or a meaty soup bone plus large chunks of shoulder meat)
1/2 pig’s foot
1 to 2 links Spanish-style chorizo, sliced
2 T extra-virgin olive oil
2 large carrots, medium dice
1 large onion, medium dice
6 large garlic cloves, smashed
1/2 T chopped fresh savory (or 1T chopped thyme)
1 cup medium-dry Sherry
1 28-ounce can plum tomatoes in juice, tomatoes coarsely chopped
2 cups pork (or chicken) stock
3 dried ancho chiles, halved, stemmed, seeded
2 T tomato paste
1-1/2 tsp ground cumin
1 tsp ground coriander
—
2T olive oil
3 cups cooked garbanzo beans
1 large clove of garlic, minced
large pinch of saffron
1/4 cup chopped parsley
2 thin slices proscuitto or ham, minced
1/2 cup chopped toasted almonds
1T grated citrus peel, preferrably orange
Preheat the oven to 350°F. Sprinkle pork and pig’s foot with salt and pepper. Heat a wide Dutch oven over medium heat, and add the chorizo slices. Saute the chorizo, adjusting heat as needed to render the fat and brown the meat. Remove the browned chorizo to a plate using tongs or a slotted spoon. Increase heat to medium-high, and saute the pork until brown, turning to caramelize all sides. (Depending on the size of your pan, you may need to work in batches. If your chorizo is particularly lean, you may need to add some additional oil.) Remove browned pieces to a plate or baking sheet, and reduce heat to medium low.
Add carrots, onion, garlic, and herbs to the pan, and cook until onion softens, about 4 to 6 minutes. Add the sherry to the pan, and deglaze. Add the tomatoes and their liquid, stock, chiles, cumin, and coriander. Bring to a boil, and return browned meat, chorizo, and pig’s foot to the pan. Return to a boil, then cover and place in the preheated oven. Braise until the meat is tender and just pulling away from the bone, 90 minutes to 3 hours.
When meat is cooked through, de-fat the sauce with a spoon. (Alternately, you can cool the mixture and refrigerate overnight; the fat will solidify and be easily removed the next day.) If the sauce remains chunky, you may want to remove the meat and puree it with a stick blender; if so, take care to leave some texture.
Heat oil in a skillet over medium-low heat. Add beans, garlic, and saffron, and saute until heated through. Mix in the proscuitto, and season to taste with salt and pepper.
Mix together parsley, almonds, and zest in a small bowl.
To serve, place equal amounts of pork on 6 plates, spooning sauce around. Serve garbanzos on the side, and sprinkle the whole plate with gremolata, reserving some to pass at the table.
Farmers and food artisans who created the ingredients for this week’s meal:
Devil’s Gulch Ranch, Nicasio: Pork shank & picnic meat
Marin Sun Farms, Point Reyes: pig foot
Fatted Calf, Napa: Chorizo
Bariani, Sacramento: Olive oil
Mariquita Farm, Watsonville: Onion, savory
Hunter Orchards, Grenada: Garlic
Tierra Vegatables, Santa Rosa: Ancho chiles & carrots
Short Night Farm, Dunnigan: Green garbanzo beans
Boccalone, Oakland: Proscuitto
Star Route, Bolinas: Parsley
Alfieri Farms, Esaclon: Almonds
Paradez Farms, Exeter: Blood orange…plus our own home-canned tomatoes & paste (from Mariquita’s tomatoes), homemade pork stock, and homegrown coriander.
locavore, meat, One Local Summer, recipes
2 Comments »
Posted by Anita on 06.03.09 6:19 PM
 I first read about ‘nduja — a red-hot Italian meat paste that’s pronounced “en-DOO-ya” — in Saveur magazine, ages ago. Despite being the sort of foodstuff that’s right up my alley (hello, chiles and pork… together?!), I never seemed to be able to put my hands on the stuff. We’d heard rumors of a stall at London’s Borough Market selling ‘nduja, but our travels there never seemed to line up with their production. It seemed we’d have to make a trip to Calabria for the real thing, or go without.
All that changed last month, with the introduction of locally made ‘nduja from Chris Cosentino’s Boccalone Artisan Meats. This spicy, spreadable salami’s quickly become the darling of the Bay Area carnivores, complete with an adorable nickname and mouth-watering coverage in all the hip spots.
But as delicious as it is when simply spread on a slice of baguette or a cracker, it seemed sacrilegious to snarf down such a long-sough treasure as an appetizer. Searching for other options, I came up with Gina DePalma’s very loose recollection of an ‘nduja-centric pasta dish she whipped up in her Roman kitchen. Despite not being much of a recipe — it lacked both measurements and timing cues — our first attempt at reproducing it turned out incredibly well, if I do say so myself. (You don’t have to take my word for it: Our friend Matthew, a former restaurant critic for the Seattle Times, pronounced it “as good as anything I had in a restaurant” during his visit to San Francisco.)
Now, I’m not sure I’d pick this humble pasta over an evening at SPQR or Contigo, but the dish was far more delicious than the effort it took to whip together. We nearly always have some dried pasta and a frozen container of leftover beans in the freezer; if I just keep a package of ‘nduja around, we’ll never lack a quick, weeknight supper.
The hardest part of the recipe may be getting your hands on the ‘nduja, which isn’t hard at all if you live in or near San Francisco: They sell it at the Boccalone Salumeria at the Ferry Building. For those of you farther afield, there’s always mail order (or a trip to Calabria?). Once you get your hands on the necessary ingredients, free to wing it with the ratios, just as we did. With such flavorful ingredients, I’m sure it’ll be just as good.


Pasta e Fagioli with ‘Nduja
– adapted from Gina DePalma
1 cup dry white beans
1 small onion, diced
olive oil
1 sprig rosemary
1 bay leaf
salt and pepper, to taste
1 carrot, peeled (if needed) and diced
1 stalk celery, chopped
2 cloves garlic, minced coarsely
4 oz (1/2 chub) cured ‘nduja, broken into chunks
8 oz dry small pasta, such as shells or ditalini
more olive oil, for garnish
hard Italian-style grating cheese, such as Pecorino
Soak the beans in enough water to cover by double their height, overnight if possible. When beans are soaked, heat a medium saucepan over medium-low heat; saute the onion in a good amount of olive oil until soft but not brown. Add the beans, their soaking liquid, rosemary, and bay. Bring to a hard boil for a few minutes, then reduce heat to a gentle simmer and cook until beans are beginning to become tender, but still firm. (This will take anywhere from 45 minutes to 3 hours, depending on the age of your beans and the length of their soaking.) Add the salt and pepper to taste, and simmer for another 10 to 15 minutes. At this point, you can discard the herbs and cool the beans in their liquid for later use.
When ready to bring the dish together: If you’ve made the beans ahead, gently warm them in their liquid in a small saucepan. Cook the pasta, stopping a minute or two before the cooking time on the package; drain and set aside. Meanwhile, heat a large skillet and add 2T olive oil. Saute the carrots and celery until soft; add the garlic and saute another minute. Add the ‘nduja, pressing to break it up and melt it as it heats. Add the beans and a small amount of their cooking liquid to the ‘nduja pan, along with the cooked pasta. If the mixture is dry, add more bean liquid until it’s wet; simmer a few minutes to allow the flavors to come together.
Divide the pasta into two or three warmed bowls. Drizzle with olive oil and top with shredded cheese.
This recipe is our entry for the inaugural week of
One Local Summer 2009, hosted by
Farm to Philly, with Western Region posts graciously recapped by
Columbus Foodie. Just like
last year, we’ll be exploring and honoring the foods from our local farmers and producers with at least one meal each week made from 100% local ingredients. We’re not declaring any exemptions this time — other than salt and spices — and our radius will be 100 miles.
Farmers and food artisans who created the ingredients for this week’s meal:
Iacopi, Half Moon Bay: Italian butter beans
Catalán Family Farm, Hollister: Onions
Bariani, Sacramento: Olive oil
Star Route, Bolinas: Carrots
Chue’s Farm, Fresno: Celery and garlic
Boccalone, Oakland: ‘Nduja
Eduardo’s, San Francisco: Pasta shells
Joe Matos, Santa Rosa: St. George cheese
….plus rosemary and bay leaf from our garden
cooking, locavore, meat, One Local Summer, recipes
11 Comments »
