Posted by Anita on 03.15.10 9:48 PM
 When you stock your larder with good quality staples, you’re able to create some amazing, quick weeknight meals. We’re lucky to live in a part of the country with access to a year-round supply of pastured eggs, a wide assortment of local artisan-made cheeses, and some truly excellent dry pasta, all from local sources.
We’re also blessed to have good friends with amazing food-crafting skills. A case in point: Our friend Sean made his own house-cured guanciale, and generously gifted us with a chunk of the most delicious pork product we’ve tasted in recent memory.
Although Laura’s birthday dinner last Sunday could technically have been my Dark Days Challenge dinner for the week, I felt pretty happy knowing we’d be able to throw together an all-local meal, even though I’d missed the weekly farmer’s market during my Seattle trip. With Sean’s home-cured guanciale in our stash, along with a fresh dozen eggs from last week’s Soul Food Farm CSA delivery, we were only a few ingredients away from one of Cameron’s favorite simple suppers.
Two things set this pasta carbonara recipe apart from the usual. First, we added slivered green garlic as a garnish, an embellishment that’s sure to be frowned upon by carbonara purists, but one we’ll keep making as long as Knoll Farms keeps supplying our weekly fix. The second innovation is simple but revelatory: Separating the eggs and stirring the hot pasta with just the whites, then topping each serving with its own yolk to be stirred in at the table. This small trick lends the sauce a silky quality, and adds a little flair to the proceedings — just the trick for making a quick midweek supper worthy of an ingredient that took weeks to make.
2010 AEC *All Rights Reserved*")
2010 AEC *All Rights Reserved*")
2010 AEC *All Rights Reseved*")
2010 AEC *All Rights Reseved*")
2010 AEC *All Rights Reserved*")
Spaghetti alla Carbonara
— adapted from Molto Italiano
1-1/2 T extra virgin olive oil
4oz guanciale (or pancetta)
1/2 pound spaghetti
3/4 cup freshly grated Parmesan
2 large eggs, separated
1 green garlic, white and light green parts, sliced thin
freshly ground black pepper
In a large pot, bring 4 quarts of well-salted water to a boil. Meanwhile, cut the gianciale into flat pieces, then combine the olive oil and guanciale in a large skillet over medium heat. Cook until the guanciale has rendered its fat, and becomes juicy and lightly browned. Remove the guanciale to a plate; remove the pan from the heat and set aside, reserving the fat in the pan.
Cook the spaghetti in the boiling water until just al dente. Add a good spoonful of the pasta water to the pan with the guanciale fat; drain the pasta. Return the guanciale to the pan, then add the pasta. Turn the heat back to medium-high and shake/toss the pasta with the water, fat, and guanciale for about a minute. Remove the pan from the heat and add 1/2 cup of the cheese, the egg whites, and freshly ground black pepper to taste; toss until thoroughly mixed (the egg whites will cook from the heat of the pasta).
Divide the pasta into nest-like piles between two warmed pasta bowls. Gently slide an egg yolk into the middle of each nest, then season with more pepper, the rest of the cheese, and the green garlic. Serve immediately, allowing each diner to stir the yolk into their own serving.
 Farmers and food artisans who created the ingredients for this week’s meal:
Guisto’s Vita-Grain, South San Francisco: sea salt
Bariani, Sacramento: olive oil
Hedonia, San Francisco: guanciale (from Prather pork jowls)
Eduardo’s, San Francisco: spaghetti
Spring Hill Cheese Company, Petaluma: dry Jack cheese
Soul Food Farm, Vacaville: eggs
Tairwa Knoll Farms, Brentwood: green garlic
exemptions: black pepper
Dark Days challenge, Italian, locavore, meat, other blogs
3 Comments »


Posted by Anita on 02.22.10 12:12 PM
2010 AEC *All Rights Reserved*") I find it fascinating how some recipes languish in my clippings folder for months, years even, before I set my mind to trying them. It’s not that they don’t sound appealing — clearly they do, or I wouldn’t have bothered putting them aside — but maybe the moment’s not right, the ingredients aren’t at hand, the quantities are best saved for a party.
I find it fascinating how some recipes languish in my clippings folder for months, years even, before I set my mind to trying them. It’s not that they don’t sound appealing — clearly they do, or I wouldn’t have bothered putting them aside — but maybe the moment’s not right, the ingredients aren’t at hand, the quantities are best saved for a party.
Not every recipe gathers dust, though. Some send me sprinting to the kitchen as soon as I read them. And our friends Michael and Jen’s deep-dish pizza is one that I absolutely had to try right away.
I saw the original version of the recipe on Jen’s blog, Last Night’s Dinner, almost a year ago. We made it ourselves fairly soon thereafter, and we liked it. But we’re rather set in our pizza-making ways here, generally leaning toward thin-crust Italian-style pies when we decide to go the home-pizzeria route. Seeing Jen’s photos of Mike’s latest tweaks to his deep-dish recipe reminded me that we have a giant stash of Italian sausage waiting in our freezer, and got me thinking how well it would complement a sauce made from last summer’s home-grown tomatoes for this week’s Dark Days Challenge meal.
We gave Mike’s new edition a try — actually two tries in one week, that’s how much we like it — and weren’t surprised that it’s even better than the original pie. I made a few tweaks to the crust to adjust it to our taste; unfortunately, these changes turn Mike’s relatively painless recipe into a process that’s less convenient for weeknight preparation, so you may very well prefer his streamlined version. I often like to make and rise my pizza dough after dinner on one night, then tackle the second rise on the next. If your schedule’s a little more compressed, you can quick-rise the dough — as Mike’s master recipe does — and the end result will still be very, very good.
2010 AEC *All Rights Reserved*")
2010 AEC *All Rights Reserved*")
2010 AEC *All Rights Reserved*")
2010 AEC *All Rights Reserved*")
2010 AEC *All Rights Reserved*")
Deep-Dish Pizza
Adapted from Last Night’s Dinner, with crust tips from American Pie
– Crust
2 tsp active dry yeast
1 tsp sugar
1C warm water
3T unsalted butter, softened
1tsp table salt or 2tsp kosher salt
3C unbleached AP flour [15oz]
Grease a medium bowl with olive oil and set aside. In the bowl of a stand mixer fitted with a dough hook, combine the yeast, sugar, butter, and water; let sit 5 minutes or until frothy. Add the flour and salt, and combine at low speed. Increase speed to medium and mix until the dough pulls away from the sides of the bowl and crawls up the dough hook, about 1 minute. Add 1 to 2 tablespoons water if dough is dry; add 1 to 2 tablespoons flour if dough is wet. Continue to knead (in the mixer, or by hand) until dough is silky smooth and passes the windowpane test.
Form the dough into a ball and place in the oiled bowl, turning to coat all sides of the dough ball with oil. Cover with plastic wrap and let rise until it doubles in bulk, about an hour. Punch down, reshape, and let rise again (covered) in the refrigerator, at least 2 hours or overnight. Bring the dough back to room temperature 2 hours before you plan to roll it out. (You can also use the dough immediately after the first rise, or even let it complete the second rise at room temperature, but the texture and taste will be better if you proceed with the second, slower rise.)
– Sauce
1T extra-virgin olive oil
1 small onion, peeled and diced
2 cloves fresh garlic, peeled and sliced
2T shredded carrot
1-1/2 T chopped fresh thyme
a 28oz can of whole peeled tomatoes, crushed with your hands
1/4 C red wine or port
salt, to taste
In a medium saucepan, heat olive oil over medium heat. Add onion and a pinch of salt; sauté until soft and golden, then stir in garlic and cook until soft. Add carrot and thyme and continue cooking until the carrot is soft.
Add tomatoes and their juice, plus wine. Lower the heat and cook until the sauce is thick, about 30 minutes, seasoning to taste as you go.
– Finishing
1 recipe crust
1 recipe sauce
1/2 lb Italian sausage
2T olive oil
3/4 to 1 pound button mushrooms, quartered
8 oz mozzarella (if fresh, torn into 1-inch pieces; if drier, shredded — we like half and half)
1/2 cup freshly grated hard cheese (such as Dry Jack or Parmesan)
1/2 cup fresh basil or spinach leaves, chiffonade
Preheat the oven to 400°F.
Heat a 12-inch cast-iron skillet on the stove over medium heat. Add 1T olive oil and crumble Italian sausage into the skillet. Brown, adding more olive oil if needed, until cooked through. Using a slotted spoon, remove the sausage to a plate lined with paper towels, leaving the fat in the skillet. (If your sausage is on the fatty side, you might remove some of the fat, but be sure to leave the skillet well greased.)
While sausage is cooking, saute the mushrooms in a large skillet: Heat 1T olive oil over medium heat, then add the mushrooms and saute until they lose their liquid. Salt if desired, and set aside.
Pat or roll the room-temperature dough into a circle about 12 inches in diameter. Let rest for 5 minutes — this will help keep the crust from shrinking — then transfer it to the skillet. Press dough down into bottom of skillet and partway up the sides. Drizzle a little olive oil over the crust, then layer the sauce, sausage, mushrooms, and mozzarella. Bake on bottom rack of oven for 30 minutes. Start checking the pizza for doneness; you want the pizza crust to be golden brown, and the toppings to be just starting to brown. Remove pizza from oven and top with grated cheese and basil.
Farmers and food artisans who created the ingredients for this week’s meal:
Spring Hill Cheese Company, Petaluma: butter
Guisto’s Vita-Grain, South San Francisco: sea salt, flour
Bariani, Sacramento: Olive oil
Catalán Family Farm, Hollister: onion
Iacopi, Half Moon Bay: garlic
Ottimino, Occidental: Rancho Bello Zinfandel (for sauce)
Shasta Valley Farm, Gazelle (via Live Culture): Mangalitsa Italian sausage
Far West Fungi, Moss Landing: button mushrooms
Belfiore Cheese Company, Berkeley: mozzarella
Vella Cheese, Sonoma: dry Jack cheese
Mariquita Farm, Watsonville: spinach
Anchor Brewing, San Francisco: beer
…and our own homegrown carrots, tomatoes, thyme
exemptions: yeast, sugar
Dark Days challenge, locavore, other blogs, recipes
7 Comments »
Posted by Anita on 12.24.09 3:54 PM
2009 AEC *All Rights Reserved*") Merry Christmas to all! Hope you have a lot of delicious treats in store over the long weekend.
Merry Christmas to all! Hope you have a lot of delicious treats in store over the long weekend.
You probably have an electric knife — heck, you might even be hauling it out to carve your Christmas ham or prime rib — but I bet you don’t have an electric fork.
Think you might need one? Check out my guest post today on The Kitchn, Apartment Therapy’s food site, for the story of my family’s silly holiday tradition.
family, levity, other blogs
5 Comments »
Posted by Anita on 11.30.09 5:16 PM
2009 AEC **all rights reserved**") We’re in the initial planning stages of Menu for Hope, the annual food bloggers’ charity raffle that benefits the World Food Programme. If you’re a blogger, check out Pim’s page on how to get in on the fun.
We’re in the initial planning stages of Menu for Hope, the annual food bloggers’ charity raffle that benefits the World Food Programme. If you’re a blogger, check out Pim’s page on how to get in on the fun.
But whether or not you have your own blog, I could use your help: What kind of prize would you like to see offered here on Married …with dinner?
In the past, our prizes have covered a lot of bases, from “Best of the Ferry Building” local food baskets, a set of Drink of the Week cocktail notecards, and even a custom mixology service.
The food baskets have been the most popular, year to year, but they’re a pain to shop for, and a hassle to ship. And relative to the prizes from other blogs, they’ve never done all that well. I’m game to do the goody basket again, if that’s what you all really love, but I can’t help but wonder what other treats might entice you to open your wallet for a good cause. Books? Gift cards? Something creative? Something homemade?
Tell me.
giving back, Menu for Hope, other blogs
3 Comments »
Posted by Anita on 11.19.09 8:53 AM
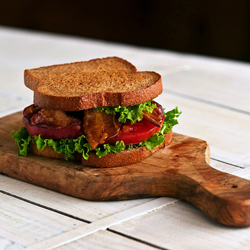 I’m pretty proud of most of the photography on our blog. I’ve won an award or two, and I’ve even taught people how to shoot better cocktail photos. But even though I’d gotten pretty handy behind the lens, for the life of me I could not shoot a beautiful sandwich. (If you don’t believe me, check out some of my older posts.)
This competence gap of mine had gotten so bad, I’d basically scratched sandwiches off the blog to-do list. I even participated in Michael Ruhlman’s Grow-Your-Own BLT Challenge this summer, but the end result was so photographically uninspiring — so utterly unworthy of all the effort we put into growing, butchering, curing, smoking, kneading, and whisking every last ingredient we used — that I never wrote about it here. (Though I did recap, briefly, here.)
All that changed last weekend, when I took the class that will forever change the way I think about photographing food in a studio setting.
For years, I’d drooled over other blogger‘s accounts of the food-styling workshops led by Food Fanatics Denise Vivaldo and Cindie Flannigan, but had never taken the plunge and signed up myself. But when I heard they’d teamed up with food photographer (and MattBites blogger extraordinaire) Matt Armendariz to host a special two-day workshop just for food bloggers, I knew the time had come.
During Saturday’s session, Denise and Cindie walked our small group through a number of food-styling tasks, first demonstrating techniques, then setting up stations in Matt’s studio kitchen for us to practice ourselves. Although Cindie demonstrated a handful of non-edible styling tricks (like using petroleum jelly to add a juicy glow, or propping up a stack of pancakes with makeup sponges) she always demonstrated edible alternatives (like freezing syrup to keep it viscous, or using a kitchen torch to get a hamburger deliciously browned). All through the class, Denise kept us laughing with snippets of industry gossip and a rolling patter of hilarious quips to illustrate key lessons. (My favorite: “The longer you cook a piece of meat, the more it looks like George Hamilton!” So true.)
On Sunday, each student chose a project to put real-world skills to the test. As we prepped our dishes for their moment in the spotlight, Cindie and Denise stepped in to offer suggestions and share tricks. The kitchen hummed with a gaggle of bloggers hand-arranging strands of pasta in a bowl, selecting only the reddest pomegranate arils to garnish a salad (and then arranging them with tweezers!), melting pizza cheese with a heat gun, and bulking up the bottom of a bowl of curry to keep the prettier ingredients from sinking to the bottom.
For my own project, I knew I was in a safe place to tackle my sandwich fears. Denise showed me three different ways to cook bacon so that the edges stayed curly and appetizing, taught me to cook toast to a perfect golden-brown glow, and stood by as I sorted through a pile of lettuce to find the freshest, prettiest leaves. After stacking and restacking the ingredients in various combinations, I was able to create a BLT that actually looked as good as I knew it would taste.
I chose a relatively simple setting for my “hero” sandwich, and waited for my turn at one of the two shooting stations Matt had positioned in the abundant natural light of the studio’s roll-up doors. One of the most enjoyable parts of the day was watching my classmates set up their projects, place their props, adjust their tripod positions, and fiddle with the details. Blogging is such a solitary activity; it was a real treat to watch other people’s creative processes up close. Matt worked with each of us to find the best angle for our shots, adjust lighting, suggest changes to props, and generally hold hands and help us feel confident about our own abilities.
The class wasn’t cheap — $695 for two days of combined demos and hands-on workshop — but even as an experienced photographer, I felt it was worth the expense. There are precious few opportunities to learn food styling from reputable stylists at the top of their game, fewer still to work one-on-one with one of the country’s top food photographers. Having all three of these experts together in a single, collaborative workshop was invaluable, and getting to play in a professional food-photography studio was the icing on the cake.
The biggest and most pleasant surprise of the weekend was just how much everyone in the class collaborated, helping each other choose our project subjects, select appropriate props from Matt’s amazing inventory, set up our cameras to capture the best shots, and make adjustments to food on the set. Though we all were working at different levels — some were more experienced at styling but needed help with their cameras, and vice-versa — we all helped each other get great results.
At the moment, Food Fanatics doesn’t have any additional styling-plus-photography classes like this one scheduled, but that’s due to change soon: A repeat of the blogger-specific class is slated for late spring/early summer 2010. (Watch the Food Fanatics blog for details.) If you’re just interested in the styling aspect, Denise and Cindie will be teaching two classes in January: a 3-day food-styling workshop in Long Beach, and a 2-day hands-on food styling class in San Francisco at the The Art Institute.
2009 AEC - All Rights Reserved")
2009 AEC - All Rights Reserved")
2009 AEC - All Rights Reserved")
2009 AEC - All Rights Reserved")
2009 AEC - All Rights Reserved")
Food Fanatics
Professional site: Food Fanatics
Food styling classes: Culinary Entrepreneurship
Blog: Food Fanatics Unwashed
Twitter: @FoodFanatics
Matt Armendariz
Professional site: Matt Armendariz Photography
Food & photo blog: MattBites
Twitter: @MattArmendariz
classes, other blogs
12 Comments »
Posted by Anita on 08.17.09 10:12 PM
 Years ago, I knew a guy who fancied himself a gourmet cook, even though his culinary skills were marginal at best. His one saving grace, kitchen-wise, was his signature pasta dish: Linguine combined with mozzarella — right in the hot pasta pan, so it got all stringy — then tossed with ripe tomatoes, loads of garlic, and a bunch of basil.
It was a good meal, even great when the seasons were right, but its real charm was its artlessness: No measuring, no fancy technique; just good food, simply prepared.
Even though tomatoes, mozzarella, and basil is a classic summer combination, I hadn’t thought of this pasta for years until I read our friend Jennifer’s post last week, where she described a remarkably similar dish. Her version keeps the cheese separate until the end, uses a combination of Mediterranean herbs, and omits the garlic. In a way, it’s a lot like seeing an old friend again after a long absence: A few things have changed, but the basic features are unmistakable.
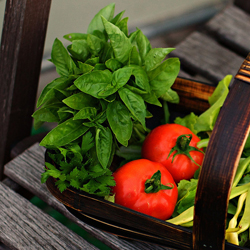
For this week’s One Local Summer dinner, we whipped up a batch this new/old favorite, using some of the first tomatoes from our garden, along with basil, parsley, and chives from the herb beds. We used our favorite local pasta from Eduardo’s, a dense, wheaty fusilli. If you use a similar hearty pasta, this recipe makes four generous servings.

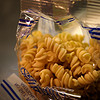
Pasta alla Jenblossom
— adapted from Last Night’s Dinner
4 to 5 ripe tomatoes (enough for 4 cups coarsely chopped)
~1 cup fresh herbs, coarsely chopped (I used 3/4 cup basil, 1/4 cup parsley, 2T chives)
2 cloves garlic, pressed
1/2 tsp crushed red chile flakes
sea salt, to taste
8oz good-quality dried pasta
3T olive oil
8oz fresh mozzarella, cut into smallish chunks
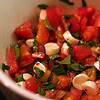
Put a pot of well-salted water on to boil. Meanwhile, chop the tomatoes into large chunks, and combine in a large bowl with herbs, garlic, chile, and sea salt. Toss and let sit to combine.
Boil your pasta according to package directions, stopping at the al dente stage. Just before the pasta is done, combine tomatoes with the olive oil and mozzerella. Drain the pasta and add it to the bowl with the tomatoes. Toss well and let sit it soak for as long as you can bear the heavenly smell of summer. Enjoy warm or at room temperature.
Farmers and food artisans who created the ingredients for this week’s recipe: Thomas Family Farm
, Corralitos: Hard-neck garlic
Bariani, Sacramento: Olive oil
Belfiore Cheese Company, Berkeley: Bocconcini
Eduardo’s, San Francisco: Pasta
…and our homegrown tomatoes(!), basil, parsley, chives
locavore, One Local Summer, other blogs, recipes
10 Comments »
Posted by Anita on 05.14.09 6:26 AM
 Despite our enduring love for our nieces and pint-sized friends, this blog will never feature the sort of recipes that usually pass for kid-friendly meals. With high-octane cocktails, labor-intensive recipes, and frequent bouts of profanity, no sane reader would ever mistake me for a mommy blogger. And yet, one of the best food books I’ve read in quite some time — one I actually forked over cash to buy — is Hungry Monkey: A Food-Loving Father’s Quest to Raise an Adventurous Eater. A title that’s shelved not with the cookbooks, but in the heretofore unexplored Baby & Toddler section of my local bookstore.
I doubt Hungry Monkey would have found its way to our house if we weren’t already friends with the book’s author, Matthew Amster-Burton, and his daughter Iris. But that surely would have been my loss, because once I picked it up, I couldn’t stop reading. Or laughing. Matthew’s a pretty funny guy, something you may already know if you read his blog, Roots & Grubs, or his witty writings on Culinate, Gourmet.com, or pretty much anywhere else you go for clever, thoughtful food writing these days. And even if you couldn’t give a fig for the intricacies of raising a little fresser, you can’t help but be drawn in by Matthew’s no-nonsense ideas about food.
Now, in the interest of full disclosure, I think it’s only fair to admit that I’m friends not only with Matthew, his wife Laurie, and little Iris, but also with grandma Judy, and many of the other characters in the book — Tea, Shauna, Molly, and the gang — so reading a chapter is like old home week for me. Some of my favorite memories from our Seattle days involve the dinner parties we used to throw. Every New Year’s Day, we’d make an enormous pot of cassoulet and invite our friends to polish it off; the Amster-Burtons were among the 50 or so food-obsessed friends who came to the second-annual fête.
I don’t remember much else from that day, but I do remember Iris — who had just turned one — sitting on our kitchen floor and calmly polishing off an adult-sized plate of braised pork, beans, and duck confit. Reading the book, I was tickled that Matthew remembered, too: The cassoulet-gobbling tale is but one of dozens of spot-on anecdotes he uses to illustrate his theories. (In this case, the point is: “Stew is the ultimate in baby food. It’s easy to make. It’s easy to eat: you don’t even need teeth.”)
But aside from personal affection, Matthew’s stories of cooking for Iris are universal, whether you’re a parent, a proud aunt, or even kid-agnostic. In a way, my feelings about Hungry Monkey are similar to Matthew’s own enthusiasm for his daughter’s culinary education:
“I was gung-ho about sharing our food with Iris for the same reason people share food with each other everywhere: it’s fun. It was the first opportunity for Iris and me to share an experience and enjoy it for the same reasons. I mean, I liked playing peek-a-boo (I called it “peekytoe”) because it made Iris laugh, but it’s not like it’s something Laurie and I played before Iris was born — or, at least, I wouldn’t admit to it. But I like enchiladas. Iris likes enchiladas. We can agree on enchiladas.”
On the surface, I may not have a lot in common with a stay-at-home dad. But our mutual love of food — and a fondness for belly laughs — makes Hungry Monkey worth a read, even if you have no experience with the tribulations of breastfeeding, or coaxing a toddler to the dinner table. With the exception of a couple of purees, there’s hardly a recipe in the book that looks or tastes like kid chow. Last winter, Cameron and I tested a dozen or so of the recipes during the book’s development, and we’ll personally vouch for Matthew’s stacked enchiladas, Cornish pasties, and bibimbap, not to mention a recipe for carnitas that’s so quick and simple we didn’t believe it would work. (It did, deliciously.)
If you need further convincing, plan to pop by one of Matthew’s readings in the Bay Area the week of May 24 (check the schedule here). Photographic evidence indicates that Hungry Monkey is even more hilarious when read aloud by its author.
If you can’t get to one of Matthew’s book-signings, there’s still a chance to have your own brush with fame: I’ve got an extra copy of the book — there is some payoff for being a recipe-tester! — and it just so happens that Matthew will be visiting us on his swing through town. So, if you’d like to win an autographed copy of Hungry Monkey, leave a comment below telling us about your favorite food when you were little. Next weekend, I’ll pick a comment at random and get in touch with the lucky winner to ask how they’d like the book inscribed.
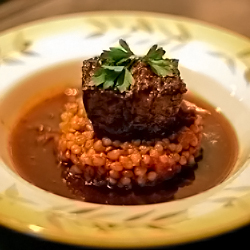
In the meantime, here’s a little proof that not all kid-friendly food has to look like stewed prunes and taste like mush.
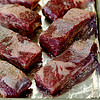

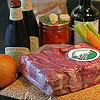
Beer-Braised Short Ribs with Wheat Berries
– from Hungry Monkey by Matthew Amster-Burton, reprinted with permission
3 to 4 pounds beef short ribs (flanken or English-style)
salt and pepper
3 tablespoons olive oil
2 cloves garlic, thinly sliced
1 large onion, diced
1 carrot, peeled and diced
1 celery stalk, diced
1 cup wheat berries (see note)
2 bottles (2-1/4 cups) porter-style beer
1 cup canned crushed tomatoes, not drained
1-1/2 cups chicken stock
2 tablespoons minced parsley
Preheat oven to 450°F.
Season the ribs liberally with salt and pepper and place them on a foil-lined baking sheet (bone-side down if you’re using English style ribs). Roast 45 minutes or until they’re nicely browned and have rendered plenty of fat. Reduce oven temperature to 275°F.
While the ribs are roasting, heat the olive oil in a Dutch oven or other large pot over medium heat. Add the garlic, onion, carrot, and celery. Cook until vegetables are limp but not browned, 5 to 10 minutes.
Add the wheat berries, beer, tomatoes, and chicken stock, and stir to mix. Add the browned ribs, raise the heat to medium-high, and cover. When the pot is boiling, transfer it to the oven (you did remember to turn it down to 275°F, right?). Braise for 2-1/2 to 3 hours, or until meat is very tender. Season with additional salt and pepper to taste.
If serving immediately, remove the meat and strain the sauce, then skim off the fat with a spoon or gravy separator. Otherwise, cool to room temperature and refrigerate everything together, skimming off the solidified fat before reheating. Give each person one or two ribs (remove the bones before serving if you like), a ladleful of wheat berries and sauce, and a sprinkling of parsley.
Note: Wheat berries are available in the bulk section at any health food store. Mine has sometimes managed to run out, so I’ve substituted pearl barley to good effect. Hard or soft wheat berries will work. For another variation, substitute French green lentils for the wheat berries.
cookbooks, meat, other blogs, recipes
26 Comments »
Posted by Anita and Cameron on 03.03.09 7:44 PM
Meeting a friend you’ve only known online can be a nervous affair. Will you get along? Will they be cool in person? What if they have a funny voice and a big nose? When the moment comes and they turn out to be even more fabulous than you’d hoped, the elation feels like a glassful of Champagne… or cava in this case.
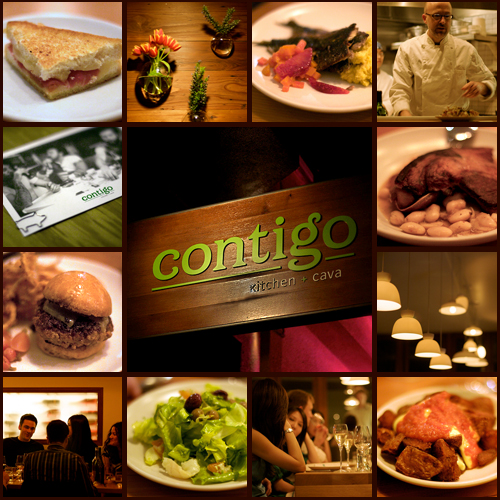
Elation was definitely the order of the evening Saturday night when we finally met Contigo, the new Spanish restaurant from our friend, Chef Brett Emerson. If you’re a fan of his blog, In Praise of Sardines, you’re probably familiar with the saga of Contigo’s opening, from the thrill of Brett’s snagging of a rare new-restaurant permit in Noe Valley, through the agony of multiple construction delays. I don’t know how Brett feels, but after tasting his food at a friends-and-family dinner before Contigo’s formal opening, I think all the drama was all worth it.
The space is beautiful, simultaneously contemporary and cozy. It’s not large, but it feels expansive thanks to five distinct dining zones — chef’s counter, lower dining room, cava bar, upper dining room, and a heated, covered outdoor patio surrounded by herb gardens.
Contigo’s ingredients are locally sourced, but not slavishly so — there’s jamón from Spain (and Iowa), alongside meat and vegetables from the usual assortment of local farms. And the food on the plate is every bit the equal of its gorgeous environment. We had a devil of a time deciding what to order; everything sounded appealing. Like an Iberian version of our favorite SPQR, Contigo offers an assortment of small pica-pica plates ($8 each, or $21 for three). Venerable tapas like crisp patatas bravas and marinated sardines take their place alongside an assortment of salads with Spanish twists. In the latter category, we loved the remojon: salt cod, oranges, and olives atop white radicchio.
We tried a couple of larger platillos as well. The juidones a la segovia were a dreamy assortment of delectable pork parts (belly, ears, yum!) atop creamy butter beans. The chorizo-y txistorra burger was fabulous, but be ready to share it with a friend; it’s too good to miss, but a little too rich to eat as an entree.
We weren’t sure how we managed to save room for dessert, but we were happy we did. We made short work of the not-too-sweet almond cake, filled with a dollop of pastry cream and a schmear of olallieberry preserves, a sweet nod to the restaurant’s history.
Contigo opens tonight, and there’s sure to be a line; reservations are accepted only for parties of 6 or more. But there’s a stand-up drink rail along the entryway, where you can enjoy a glass of cava and a nibble or two while watching the cooks work their magic in the beautiful open kitchen.
Contigo Kitchen + Cava
1320 Castro Street (x 24th Street)
San Francisco, CA 94114
415.285.0250
Noe Valley, other blogs, restaurants
9 Comments »
Posted by Anita on 02.24.09 9:40 PM
 Now, I don’t know where you go for good Cajun and Creole recipes, but my first (and last) source is Chuck Taggart’s fabulous Gumbo Pages. Chuck’s site covers a whole lot more than just food. It’s a true mélange of everything that’s wonderful about the culture of New Orleans and the surrounding area — recipes, dining recommendations, cocktails, music, and so much more.
A native New Orleanian, Chuck saved our collective asses at Tales of the Cocktail last year: You pretty much couldn’t leave the Monteleone without running into a cocktail blogger clutching a printout of Chuck’s French Quarter restaurant recommendations; it was the most-viewed page on the Tales Blog, gathering more hits than all the other pages put together. Uh-huh.
 But back to the food. Over the years — even before we’d had the pleasure to make his acquaintance — we’ve used Chuck’s recipes for everything from turkey gumbo to creole hot sausage to dirty rice, all with uniformly excellent results.
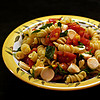
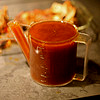
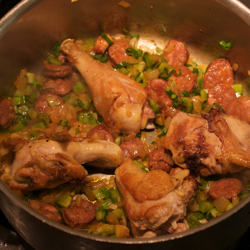
For our Mardi Gras celebration, we made Dee Gautreau’s World Championship Jambalaya. Because we just don’t feel complete without pork, we took the liberty of adding andouille sausage. (A quick chat with Chuck revealed that sausage was likely in the original, but somehow disappeared from the printed recipe.)
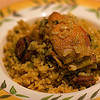
No offense meant to the original recipe, but we’ve made a few minor tweaks to make things a little clearer. I’m sure any Louisiana native would know exactly what Dee meant, but there’s a fair bit of ambiguity there for anyone who wasn’t lucky enough to grow up watching jambalaya being made on a regular basis. You’ll see in the photos that I’ve halved the recipe; it still made four exceptionally generous servings.


Championship Jambalaya
– adapted from Gumbo Pages
3-to-4 pound chicken, cut into 8 serving pieces (with neck, back, and wingtips reserved)
6-1/2 cups water
1/4 cup cooking oil
3/4 pound andouille sausage, sliced 1/2-inch thick
3 medium white onions, chopped
1 tablespoon salt, or to taste*
2-1/2 teaspoons granulated garlic
1 cup sliced green onions
1/2 cup chopped green peppers
1/2 cup chopped celery
1/4 teaspoon black pepper
Red pepper to taste*
2 tablespoons Louisiana hot sauce (such as Crystal)
3 cups uncooked long-grain rice
Place the chicken neck, back, and wingtips in a saucepan with 6-1/2 cups of water. Bring to a boil, then reduce heat and simmer, covered, while prepping the rest of the jambalaya.
Heat the oil in a heavy Dutch oven over medium heat. When the oil is hot but not smoking, add the chicken parts, skin side down. Fry, without disturbing the chicken, until the skin is a nice golden brown, then turn to brown the other sides equally well. Remove the chicken from the pan and set aside in a warm place near the stove.
Pour off the oil, leaving just enough to coat the bottom of the pan. Add the chopped onions and cook until golden brown, adding a little water if necessary to keep sticking to a minimum. Add the andouille and saute until the fat begins to render. Return the chicken to the pan with the sausage and onions.
Remove the neck, back, and wingtips from the quick broth. Measure the remaining liquid in a heatproof measuring cup, add enough water to make 6 cups, and add this liquid to the sausage/chicken pan. Note the liquid level in the pan; this will be important later.
Add the remaining ingredients except the rice to the pot, and simmer, well covered, until the chicken is cooked through (10 to 15 minutes). Check the liquid level, and add water to return it to the same point it was before simmering, if necessary. Bring back to a rolling boil, and add the rice. Reduce heat to a slow simmer and cook, uncovered and without stirring, for 10 to 15 minutes, until the water level is below the rice. Turn the rice (see notes below), reduce heat to low, and cover with a tight-fitting lid; cook for 15 minutes until the rice is tender. Turn the rice again, turn off the heat, and let the rice steam on the warm burner for 10 minutes more.
* The amount of salt and red pepper needed will depend on the age and strength of your spice, as well as the seasoning in your andouille. I used 1/2 tsp of cayenne pepper for a medium-hot result.
———
Chuck’s jambalaya notes:
– This recipe produces a brown-style jambalaya rather than the red tomato-based jambalayas you see in New Orleans.
– Jambalaya should never be stirred. Turn, rather than stir, to prevent the grains of rice from breaking up, scooping from the bottom of the pot.
Dark Days challenge, holidays & occasions, other blogs, recipes
7 Comments »
Posted by Anita on 02.22.09 8:54 PM
 It’s such a treat to travel around the country (and the world), enjoying all sorts of things that we don’t get here in San Francisco, so we usually put our locavore ways on hiatus when we’re on the road. Occasionally, we’re able to enjoy the best of both worlds, either by visiting a restaurant where the chef sources his ingredients locally, or by shopping for local ingredients and cooking our own meal.
But during our Seattle trip over President’s Day weekend, we did one better: We wrangled an invitation up to the (Not So) Urban Hennery for dinner with Laura and her husband Mike.
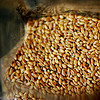
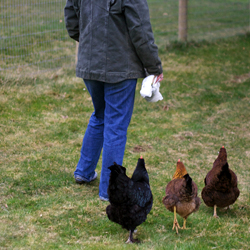
Despite a persistent drizzle that followed us up I-5 from the city, we arrived in Arlington with just enough sunlight left for a quick farm tour. We put on our boots and headed out to visit the hens. As soon as they saw us (or, really, Laura… she’s definitely at the top of their pecking order!), the girls started up with such a symphony of cackles, chortles, and clucks that we couldn’t help but laugh. They know that the bag in Laura’s hand is full of kitchen scraps, and I suspect they have an idea that there’s cracked corn on offer, too.
As the light waned, we watched Jake and Sam play in the yard as the chickens devoured the goodies Laura had brought them. (Talk about sustainability! Table scraps in, eggs out.) We talked about the plans for the rest of the acreage behind the house, admired Mike’s new fence, and then retreated into the warm kitchen for a snack of local cheeses and a basket of homemade crackers, along with some locally produced hard cider.
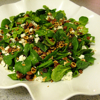
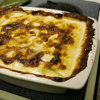
We gathered around the table in the stylishly cozy dining room for an all-local — and pretty much all-homegrown — supper of home-farmed chicken (naturally!) grilled to golden perfection by Mike, along with local wines, pan-braised purple carrots, and a stunning salad of garden spinach topped with local hazelnuts and dried cranberries. It was all delicious, but my favorite part was an amazingly simple potato gratin that showcased Laura’s earthy home-grown potatoes.
The recipe — which Laura’s adapted over the years from Nigel Slater’s Appetite — calls for what the author rightly calls an “almost obscene quantity of cream”. Laura says she’s had relatives refuse to eat it after they watched her make it! But really, without any cheese or extra butter, it’s probably not much more decadent than the gratin that you likely already call your favorite. The recipe serves 6 at least, maybe 8 (unless they’re shameless potato gluttons like me).
Back home amid the rain and the beginnings of our spring-cleaning project, we decided to make a whole batch just for the two of us — they’re that spectacular. “They’re even better left over,” says Laura, “Especially if you warm them back up in the oven with a bit of foil over the top.”


Dreamy Potato Gratin
– adapted from Appetite
2 pounds potatoes (about 3 large)
1/2 medium onion (or a leek), sliced very thin
4 cloves garlic, minced
salt & pepper to taste
1 to 2 pints heavy cream, as needed*
Preheat the oven to 400°F.
Peel potatoes and slice thin (about 1/8-inch or 3mm). Toss with the sliced onion and minced garlic, and salt and pepper to taste. Layer the mixture in a well-buttered 9×9 pan and top with enough cream to come halfway up the top layer of potatoes but not submerge them completely. Sprinkle with a little more salt and pepper.
Put the baking pan on top of a rimmed cookie sheet as insurance against a huge oven mess in case of bubbling over. Bake in the preheated oven, pressing the potatoes down into the liquid when the cream starts to expand. At the 20-minute mark, press the potatoes into the cream again and reduce the oven temperature to 350°F.
When the gratin starts to color and smell good — about the hour mark — check the potatoes for doneness by inserting a knife into the center. Continue to bake until the potatoes are no longer at all crunchy but not yet mushy. If the top begins to get too brown, move the gratin to a lower rack and turn the temperature down to 300°F. When done, remove from the oven and let sit for a few minutes to allow the gratin to set.
* The quantity of cream needed will depend on how close you’re able to get your potatoes to the 2-pound mark, how much potato you lose to peeling and trimming, and the exact dimensions of your pan. Laura’s dish is closer to 10×10 and fairly deep, so she uses 2 whole pints. 1 pint was perfect in my standard 2-quart 9×9 pan.
Dark Days challenge, locavore, other blogs, recipes, Seattle
9 Comments »
