Posted by Anita on 07.30.07 12:48 PM
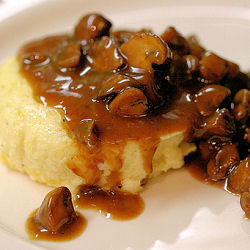 In my new favorite cookbook, Big Small Plates, author Cindy Pawlcyn names her savory corn custard as a brunch favorite. I have no problem believing that this dish flies out of the kitchen, no matter the time of day: We served this recipe a recent dinner party, and our guests all but licked the plates.
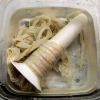
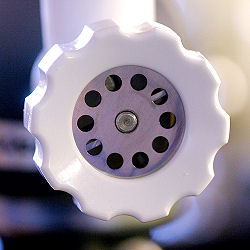
The first time I made the custard, I used a standard box grater to remove the kernels from their cobs — a messy proposition when dealing with super-fresh farmer’s market corn that spurts milk everywhere. After reading about the Kuhn-Rikon corn zipper in a magazine, I decided to invest in one of these $12 gadgets. Remarkably, it works just like its namesake: Wedge its little crown-shaped tooth at the end of an ear, give a gentle tug, and watch in amazement as two rows of corn unzip right off the cob in perfect alignment.
Does the corn zipper really make this custard better? Given that you end up whizzing the corn to a puree, the answer’s a definite NO. But it certainly makes the prep a lot less messy, and far more amusing. I’d even go so far to say that the corn zipper’s a must-have item if you’re you’re making corn relish or succotash, or any other recipe where whole kernels are a plus, or even if you’re cooking for anyone who loves fresh corn but can’t handle the cob. Yes, Alton acolytes, it’s a unitasker. (But then again, so’s my citrus squeezer, and you’d have to pry it out of my cold, dead hands.) On the plus side: It doesn’t take up much room in the prep drawer, and it’s so freaking cheerful that you just have to smile back — who could resist its happy little face? And as a side benefit, once you own a corn zipper, you’ll have no trouble deciding what to enter into a crazy kitchen gadget event (EDIT: like the one Kathy’s hosting here).
Like other Big Small Plates recipes we’ve tried, this one yields a serious mismatch of sauce and custard quantities. I doubled the sauce on my second attempt, and still ended up with just enough to garnish six servings (albeit rather generously). Either prepare for scantier saucing, or consider doubling the recipe — or at least the stock portion — yet again.


Sweet-Corn Custard with Mushroom Sauce
— adapted from Big Small Plates
Custard
3 ears fresh corn (to yield 2 cups kernels)
2 cups heavy cream
4 large eggs
1 cup (4oz) loosely packed grated Monterey Jack cheese
1 T Dijon mustard
1/2 tsp. salt
1/4 tsp. white pepper
Sauce
4 cups rich stock (beef, chicken, or veal)
2-4 T olive oil
1 pound mushrooms, stemmed and quartered
2 T butter
2 shallots, minced fine
Salt and freshly ground black pepper
Minced fresh chives, for garnish
Using a corn zipper or the coarse side of a box grater, cut the kernels off the cobs. Heat the corn and cream together in a medium saucepan. Bring to a gentle simmer and cook 5 to 10 minutes until the corn is tender. Cool slightly, then puree with a stick blender. (If using a traditional blender, let mixture cool further.) Strain the puree through a fine sieve into a large mixing bowl, pressing well to extract all the liquids. Add the eggs, cheese, mustard, salt, and pepper to the bowl, and stir gently to combine.
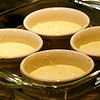
Preheat the oven to 325F, and butter eight 6-to-8 oz ramekins. Measure an equal amount of custard into each dish, leaving at least 1/4-inch of headspace. Place the ramekins in a large, shallow pan and carefully fill the pan with enough hot water to reach 2/3 of the way up the side of the ramekins. Cover the pan with aluminum foil, punching a few holes in the top with a skewer, to help prevent condensation drips. Bake the custards in the water bath until just set; start checking at 45 minutes. (The time will depend on the thickness and size of your ramekins, and the size of your water bath.)
To make the sauce, rapidly simmer the stock in a saute pan over high heat until reduced to a sauce-like consistency. Meanwhile, heat the olive oil in another saute pan over medium-high heat. Add the mushrooms and cook, stirring, until they have released their juices and the pan has dried out a bit, 10 to 15 minutes. When the mushrooms are done, salt them to taste and increase the heat to high and pour the stock into the mushroom pan. Bring the stock to a simmer and cook 2 minutes. Just before serving, add the butter and shallots, swirling into the sauce. Season to taste with salt and pepper.
Turn the custards onto individual plates. Pour some sauce over or around each of the warm custards and garnish with the minced chives.
Note: Custards can be kept warm in their water bath for about 20 minutes; if you need to wait longer, refrigerate and gently reheat in a water bath for 10 to 15 minutes before serving. The texture will suffer slightly, but the taste is undiminished.
cookbooks, equipment, other blogs, recipes
12 Comments »


Posted by Anita on 07.25.07 9:21 PM
 Otto von Bismarck reportedly quipped that “The less the people know about how sausages and laws are made, the better they sleep at night.” Although the ol’ Prussian was undoubtedly right about legislation, when it comes to wurst, I’d beg to differ. Not only is sausage-making entertaining and educational, it’s also much easier than you might think.
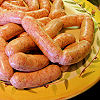
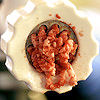
It can even be fun, especially if you divvy up the work among a crew of like-minded friends. One recent Sunday, we rounded up Sean and DPaul plus our new pals Jon and Karen, classmates from Kasma’s Thai cooking series. Everyone brought a dish to share and a five-pound pork shoulder; Cameron and I provided the recipes, the seasonings, the casings, and other miscellaneous bits. In a matter of hours, the six of us created a spectacular assortment of sausages to stock our freezers.
Between us, we amassed four KitchenAid mixers, three meat grinder attachments, two pairs of sausage-stuffing tubes, and one very porky kitchen. All told, we ended up cranking out more than 25 pounds of sausage. We stuffed a French-style garlic saucisse — courtesy of Michael Ruhlman’s acclaimed Charcuterie — into stout links, curled Kasma’s recipe for spicy sai oa into a hog-casing spiral, squeezed delectable Kentucky-style breakfast sausage into petite sheep casings (plus a few patties), and parceled out our spicy Mexican chorizo in bulk. Even after a hearty sampling, everyone went home with a bit more than a pound of each flavor, with no more effort than making a single batch on their own.
Although we had a blast with the grind-and-stuff method, don’t let a lack of specialized equipment hold you back from making great sausage. Most good butchers will grind any roast to order. Choose a nice, fatty pork shoulder — also known as a Boston butt or simply pork butt, even though it comes from nowhere near the hind end of the pig — and ask for a coarse grind. Mix the ground pork with your seasonings, shape into patties, and voilá: You’ve just made sausage.
Folks were pretty evenly divided about which of our creations they loved best. For me, the winner of the day was the Kentucky breakfast sausage. There’s no stronger compliment that I can pay it than it just tasted right… something like your Southern grandmaw would have made, if you’d been so blessed.
Go on, don’t be shy: Be your own Southern grandmaw. It’s much easier than getting a bill through Congress, I promise.


Kentucky Breakfast Sausage
– adapted from Bruce Aidells’ Complete Sausage Book
4 pounds well-marbled pork shoulder, cubed
1-2 pounds pork back fat, cubed
— quantity varies depending on the fattiness of the meat
2 T kosher salt
4 tsp freshly ground black pepper
1/4 cup ground, dry sage
2 tsp ground cayenne pepper
2 tsp ground coriander seeds
1 tsp freshly grated nutmeg
1 cup water
sheep casings (optional)
Cut the pork and fatback into cubes. Place in a metal bowl in the freezer for 30 minutes to chill well, along with the grinder parts. When thoroughly chilled, grind the pork and 1 pound of fatback through the coarse plate of the grinder.
In a large bowl, mix all the ingredients (except casings), kneading and squeezing until well blended. Fry a test patty and taste for seasonings and fat content; adjust as needed.
For links, stuff the sausage into casings and tie or twist at three-finger-width intervals. If making patties, shape the meat into large rolls, 2 inches in diameter. Wrap them in waxed paper, and refrigerate until ready to use; slice into patties as needed.
(Sausage keeps refrigerated for 3 days, or frozen for 2 to 3 months.)
cookbooks, cooking, equipment, meat, recipes
14 Comments »
Posted by Anita on 07.02.07 12:18 PM
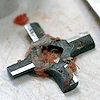
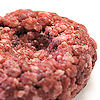
 Frankly, I don’t know how I ever survived without my KitchenAid mixer’s meat-grinder attachment. Sure, it’s great for the occasional sausage-making session, but its real appeal lies in its ability to turn a worthy chuck roast into the world’s juiciest, tastiest hamburger in nothing flat.
When we were living in the basement, I resorted to store-ground meat a few times, and got a taste of what I’d been missing: Even when we bought good Prather Ranch ground beef, the pre-processed meat morphed into chewy, dry-ish, and lackluster patties — a pale shadow of the glorious burgers made the same beef, freshly ground.
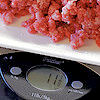
Fortunately, grinding your own burgers is so simple it’s easy enough for a weeknight: Cube your chuck roast, run it through the grinder’s coarse plate, season the ground meat, and measure out 5 to 6 ounces per patty. Ever-so-gently, pat each portion into a thick disk, then make an indentation in the center to keep the patties flat when cooked. Grill or broil to your desired doneness, and serve on a good, lightly toasted bun — we like the pain de mie buns from Acme.
Cleanup’s a snap, too: All the grinder parts go right in the dishwasher. Even taking into account setting up the mixer — which takes all of 2 minutes — the process isn’t drastically more troublesome than opening a cellophane-covered styrofoam pack.
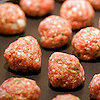
And in this age of mad cows, it’s comforting to know that our hamburgers contain only the parts that I put through the grinder. But even if it weren’t a safer alternative, the taste of home-ground meat alone would win me over. And if you aren’t feeding a crowd, you can make more patties and freeze them for later, although I find they lose a bit of the charm in the freeze-thaw cycle — I usually turn my leftover ground chuck into meatballs.
Whatever you do with your home-ground beef, I promise you’ll taste the difference.
cooking, equipment, meat
17 Comments »
Posted by Anita on 06.11.07 11:43 PM
 In my youth, I was actually something of a photo geek: I built a darkroom in my parents’ garage, I worked for my Dad all summer between 8th and 9th grade to buy my first SLR, and I won a school-wide award for photography a year later. I was, even then, a tinkerer, a collector of gadgets and gizmos.
By all rights, you’d think an equipment geek like me would have some big, black, long-lensed monstrosity… when instead I actually tote a cute, shiny, pocket-sized snapshot-maker. I’ve looked longingly at the gorgeous shots created by those who own the real deal, all the while coaxing my poor little PowerShot into giving up decent photos.
Cameron — who hails from a photo-obsessed clan — hasn’t helped matters. He’s been egging me on to purchase a dSLR for months, reminding me of the old adage that equipment should always be better than the human behind it. I knew he was right, but I felt like I couldn’t justify the expense: I’d just upgraded my point-and-shoot last November, a purchase that set me back far more than I really wanted to spend. And ultimately, the blog’s just a hobby… it’s not like anyone cares whether the image is a little noisy, or the lens distortion gets a little distracting.
Early last week, my equipment envy reached a peak. A friend who just started blogging mentioned that he’d splashed out for some gear to help improve his online shots. I replied covetously, saying something to the effect of “I wish I could buy a dSLR, but it’s not like I have a spare grand sitting around.”
And then, two very interesting things happened.
I got home, opened the mailbox, and found a check — a completely unexpected payment for something I did on a lark more than a year ago — for $945. Not quite a grand, it’s true, but you could say that the universe had succeeded in grabbing my attention.
The next morning, I noticed a lot of inbound blog traffic from a link called “DMBLGiT: The Winners!” I clicked the tracking URL, and my jaw hit the keyboard. Holy cats: I’d tied for first place in this month’s Does My Blog Look Good in This?, the food-bloggers’ photo contest! I’d never even entered before, and I’m up there on the big screen with DPaul & Sean, and Ilva, and plenty of other talented folks whose blogs I read regularly and whose photos make me swoon. It’s so ridiculous, I still don’t really believe it. But does that stop me from celebrating? No, it most certainly does not. Celebrating is something I understand very, very well.
The rather obvious end of this little tale: I am now the proud owner of a brand-spanking new Canon 30D. At last, a real camera. Interchangeable lenses! A usable viewfinder! And best of all, as Cameron says, “It makes that Girls on Film noise!”
We took the new toy up to Napa this weekend, and both of us captured a surprising number of lovely shots, considering we hadn’t even read the manual yet. (No, I didn’t haul this behemoth out at The French Laundry. Shuh… even I have my limits!) I know it’ll take a while before I dial in the seemingly limitless new features at my disposal — no film camera was ever this confusing …or have I just gotten old? But in the meantime, if you keep an eye on my photostream, you’ll get to see me take my first baby steps back from the point-and-shoot realm.


equipment, geekery, other blogs, other stuff
10 Comments »
Posted by Anita on 12.17.06 8:39 PM
 What’s your big holiday present this year? A fancy gadget? A new appliance? Maybe a fabulous cookbook? Not to brag, but I think I’ve got you beat: This year, our Christmas present to each other is a full-fledged kitchen remodel.
We knew the second we stepped foot in the house that’s now ours — and saw the utter disaster that was the kitchen — that a gut-job was in order. (If you clicked that link, I feel compelled to tell you that was the previous owners’ idea of tidying up for an open house.) But for the last 18 months, we’ve had more pressing remodel issues to tackle, and we also spent nearly 6 months working with a very talented architect to get all of our ‘must-have’ and ‘really-want’ items into one room while staying reasonably close to our original budget. But it’s gonna happen, boys and girls — it’s gonna happen soon.
January 2 is our scheduled start date, the day the big Irish guys show up with sledgehammers and dust masks and a big-ass Dumpster. And since this project includes not just our kitchen but also our master bathroom, we’re movin’ on down to the basement. Happily, like many SF houses, our “basement” is really the ground floor of our house, opening onto the backyard.
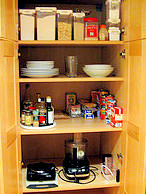
For the last year and a half, this space has served as our guest suite, home office, and music studio. Over the last month, we’ve worked with our kitchen contractor to turn part of it into our new laundry room and craft workshop (finally — a place for all those canning jars and infusion bottles!), a space that will serve as our makeshift kitchen during the remodel. Hence, the photo above: Our pantry-china cabinet-appliance garage-bar.
As you might imagine, I’m coping with the chaos by writing lists: A list of appliances we’ll need (toaster oven, yes. rice cooker, yes. coffeepot, yes. ice-cream maker? not so much), a list of one-dish suppers we can make in our screwball cafe… and another list of nearby restaurants that deliver.
I keep telling myself that our temporary home is larger than many apartments where we’ve lived over the years, and (sadly) that we actually have more counter space in the laundry room than we had in the old kitchen. My first college apartment lacked a kitchen entirely, and yet I cooked quite respectably — even for parties — using a microwave and a hotplate, washing dishes in the tub. Surely I can do at least as well with my current set of skills and resources. If all else fails, I’ll remember my mantra: “It’s only temporary.”
In addition to the contents of the server closet cabinet above, we’ll also have our gas grill on the deck, an incredibly expensive toaster oven, a coffee maker, and (temporarily) a big washtub in the bathroom — the kind you see in laundry rooms, but right in the shower.
cooking, equipment, holidays & occasions, kitchen
6 Comments »
