Green tomatoes, black salsa
 When life gives you lemons, as the saying goes, make lemonade. When life — or, in this case, a distracted farmer — gives you under-ripe tomatoes, make salsa.
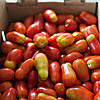
I’d ordered 40 pounds of San Marzano tomatoes from my favorite farm, planning to use some for my contribution to this month’s CanJam — hosted by What Julia Ate — and to pressure-can the rest for this winter’s cooking.
But when I got home and opened the crates, my heart sunk. I’d gotten two whole cases of tomatoes that ranged from rock-hard-green to just-barely-red, with the vast majority in the not-really-ripe category.
Already up to my ears in green-tomato jam from last season’s garden, I really didn’t want to go that route again. Happily, I remembered — no doubt from some wise Rick Bayless recipe — that the judicious application of heat helps less-than-perfect tomatoes become something better than they ought to be. Roasting tomatoes under a broiler gives them a soft, smoky sweetness, making them the perfect base for sauces and salsas.
The most appealing canner-ready recipe I found for roasted tomato salsa calls for a mix of dried chipotles and cascabel chiles. Having neither on hand, I opted for a mix of locally grown guajillos and some chilhuacles de oaxaca left over from a mole-making adventure. (Although you shouldn’t generally tinker with canning recipes, this kind of one-to-one substitution is fine, so long as the ingredients have the same acidity and moisture levels as the ones they’re replacing.)
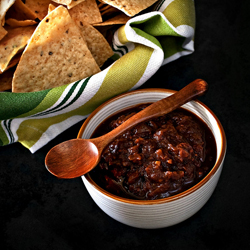
The resulting salsa is a mix of bright acidity and smoky complexity, garlicky and rich with chile flavor. It’s definitely the best tomato salsa I’ve ever canned, and a great change from our usual tomatillo salsa. And although I seriously hope I’m never confronted with another case of under-ripe tomatoes, at least I now know exactly what to do with them.
Fire-Roasted Salsa Negra
– adapted from the Ball Complete Book of Home Preserving
Makes eight 8-oz jars or four pint jars
 24 dried chile peppers, such as chipotle, guajillo, ancho, etc.
2 cups hot water
3 pounds ripe plum tomatoes
2 large mild to medium-hot green chiles, such as Anaheims (or bell peppers, if you prefer)
2 small onions
1 head garlic, broken into cloves but not peeled
2 tsp white sugar
1 tsp salt
1 cup white vinegar
Preheat your broiler. Meanwhile, toast the dried chiles in a large, dry skillet over medium heat, about 30 seconds per side, until they are softened and fragrant. Transfer softened chiles to a heatproof bowl and cover with the hot water, weighing down with a saucer or small plate to keep chiles submerged. Soak the chiles for 15 minutes.
Working in batches, transfer soaked chiles and some of their soaking liquid to a blender; puree until smooth. Taste the puree; if you find it bitter, press the puree through a mesh strainer or sieve with a wooden spoon. Continue pressing and scraping until you’re left with a dry lump of seeds and bits of skin with no flesh attached.
Meanwhile, roast the tomatoes, peppers, onions, and garlic under the preheated broiler, turning to roast all sides. When the tomatoes and peppers are blistered, blackened, and softened, and the onions and garlic skins are blackened in spots, remove them from the broiler; this usually takes anywhere from 10 to 20 minutes, depending on the age of your vegetables and the strength of your broiler. The garlic will likely need to come out before other vegetables are done, so keep tongs handy.
Set tomatoes, onions, and garlic aside to cool. Place the peppers in a paper bag and roll the top closed tightly; set aside. Peel and chop all of the vegetables as they become cool enough to handle.
Prepare canner, lids, and jars according to the usual method; keep jars hot until needed.
In a large, stainless-steel saucepan, combine reserved chile puree, chopped roasted vegetables, sugar, salt, and vinegar. Bring to a boil over medium-high heat, stirring constantly. Reduce heat and simmer, stirring frequently, until slightly thickened, about 15 minutes.
Ladle hot salsa into hot jars, leaving 1/2-inch headspace. Remove air bubbles and adjust headspace as needed. Wipe rims and center lids on jars; screw band to fingertip-tight.
Place jars in canner, ensuring they are completely submerged. Bring to a boil and process 8-ounce jars for 15 minutes and pint jars for 20 minutes with the canner lid on. When time is complete, remove canner lid and turn off heat; wait 5 minutes, then remove jars. Cool, check for seals, and store in a cool, dark place for up to a year.


