Posted by Anita on 02.19.10 8:02 AM
2010 AEC *All Rights Reserved*") If you’ve ever wanted to try your hand at canning but held back because it seems complicated, consider getting yourself into a pickle.
If you’ve ever wanted to try your hand at canning but held back because it seems complicated, consider getting yourself into a pickle.
Pickles are one of my favorite canning projects, because I am both lazy and messy. When dealing with simple brine — instead of the sticky goo of preserves, or the splattery plop of tomatoes — canning becomes almost too easy. You prep your vegetables, mix the pickling liquid, and put everything into jars. And because of most pickles’ high acidity, the chances that anything bad will happen during storage are practically nil. They’re the perfect beginner’s canning project.
The best part is, you don’t even have to wait until cucumbers are in season. Sure, those dilly spears are America’s favorite pickle, but canning books are jammed full of an international variety of vinegar-preserved vegetables. Even the bleakest winter farmers market usually has a decent assortment of root vegetables, and many of them — especially carrots and dense radish varieties — make excellent pickles.
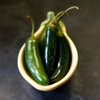
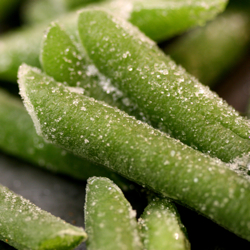
If you’ve ever eaten the Vietnamese heaven-on-baguette sandwich known as banh mi, you’ve almost certainly enjoyed the type of pickle I made for this month’s edition of Tigress’s CanJam. Typically made with little more than carrots, daikon, ginger, vinegar, and salt, the version here adds star anise to give the julienned garnish a mysterious note.
They’re rather on the sweet side, but that makes a nice foil for the meaty, salty goodness of their signature sandwich partner. As the canning gurus at Ball tell us, “The job will go faster if you have a mandoline to julienne the vegetables”. But I managed a half recipe using just a very sharp knife and a lot of patience.
2010 AEC *All Rights Reserved*")
2010 AEC *All Rights Reserved*")
2010 AEC *All Rights Reserved*")
2010 AEC *All Rights Reserved*")
2010 AEC *All Rights Reserved*")
Vietnamese Carrot and Radish Pickle
– from the Ball Complete Book of Home Preserving
3 C white vinegar
3 C filtered water
1-1/2 C sugar
2 tsp grated ginger (microplaned)
2 pounds carrots, 1/8-inch julienne
2 pounds dense radish (such as daikon or watermelon) 1/8-inch julienne
6 whole star anise
Prepare canner, lids, and 6 pint jars according to the usual method.
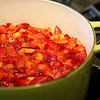
 In a large non-reactive saucepan, combine vinegar, water, sugar, and ginger. Bring to a boil over medium-high heat, stirring to dissolve sugar. Add carrot and radish; stir for 1 minutes, then remove from heat.
Place a star anise into each hot jar. Using a funnel, pack vegetables into hot jars up to just shy of 1/2 inch of the rim. Ladle hot pickling liquid to cover vegetables, leaving 1/2-inch headspace.
Remove air bubbles and adjust headspace; wipe rims and apply lids and rings.
Place jars in canner, ensuring they are completely submerged. Bring to a boil and process covered for 10 minutes. Remove canner lid; wait 5 minutes, then remove jars. Cool, check for seals, and store in a cool, dark place for up to a year.
CanJam, preserving & infusing, recipes
6 Comments »


Posted by Anita on 01.18.10 6:23 AM
2010 AEC *All Rights Reserved*") I don’t think anyone would be surprised to hear that I love to can. Most years, I get started on the preservation kick at the height cherry season (when I make my annual batch of cocktail garnishes), and don’t put away the canner until after the last tomato harvest. So when I heard about a new, year-round canning challenge — one that has participants putting up a different type of produce every month — I knew I had to jump on in and join Tigress’s Can Jam.
I don’t think anyone would be surprised to hear that I love to can. Most years, I get started on the preservation kick at the height cherry season (when I make my annual batch of cocktail garnishes), and don’t put away the canner until after the last tomato harvest. So when I heard about a new, year-round canning challenge — one that has participants putting up a different type of produce every month — I knew I had to jump on in and join Tigress’s Can Jam.
January’s Can Jam theme is citrus, a particularly apt topic here in the Bay Area where farmers markets and backyard trees are bursting with the best oranges, lemons, and grapefruits of the year. I always like canning with a friend to help share the work (and the resulting bounty), so I asked Laura from (not so) Urban Hennery if she’d like to can together when she visited San Francisco last weekend; she happily agreed. I flagged a bunch of citrus recipes in my favorite canning books, thinking I’d let Laura decide which sounded the most appealing. A girl after my own heart, she suggested that we make them all!
The first, a Meyer lemon curd, wasn’t technically eligible for the Can Jam, because it needs to be pressure canned to be shelf-stable. (The challenge requires all recipes to be suited to a standard boiling-water canner.) But we made it anyway, and oh am I glad we did. With the orange yolks from Laura’s hennery eggs — yes, she brought them down in her checked baggage! — and the deep yellow zest from Meyer lemons we bought from Hamada Farms, the end product turned an eye-searing yellow. If I saw a bottle of curd that yellow in the store, I’d walk away, thinking it must be filled with artificial everything.
Our second recipe — which used June Taylor‘s three-fruit marmalade as a starting point — featured a quadruple-dose of citrus: Moro blood oranges, lemons, golden grapefruit, and one giant bergamot from our backyard tree. We ended up with 9 half-pint jars of a deep crimson preserve, clear enough to see the different-shaped bits of peel suspended evenly throughout its jewel-like base. It’s pleasantly bitter, and (at least at this stage) you can pick out the flavor of each of the citrus varieties as you make your way through a spoonful… er, I mean, a slice of toast.
The last recipe turned out to be our hands-down favorite. Its simplicity — both of ingredients and of preparation — belies its gorgeous looks and uniquely delicious taste. Combining lemons, sugar, and water, this one’s good enough that Laura and I were already plotting how to get our hands on more Meyer lemons before the week was out.
2010 AEC *All Rights Reserved*")
2010 AEC *All Rights Reserved*")
2010 AEC *All Rights Reserved*")
2010 AEC *All Rights Reserved*")
2010 AEC *All Rights Reserved*")
Meyer Lemon Marmalade
– adapted from Catherine Plagemann’s Fine Preserving
3 perfect, very fresh Meyer lemons
1 more lemon, for juice
sugar (about 4 cups)
Sterilize canning jars and prepare lids according to manufacturer’s directions.
Peel the three lemons, removing just the yellow and none of the pith. Slice the peel into very fine, thin strips and set aside. Cut each peeled lemon in half, lengthwise. Remove as many seeds as possible plus the center strings. On a cutting board with a lip, slice the lemon halves, including the white rind, paper thin. Remove any remaining seeds. In a glass measure, combine the zest, lemon pulp, any juices from the pulp, and the juice of one more lemon. You should have about 1 cup of prepared lemon and juices.
Cover the prepared lemon with about a cup of cold water; it should be just enough to submerge all of the lemon. Let soak for 3 hours, to soften the zest. After soaking, combine the soaked lemon and zest in a wide Dutch oven along with an equal amount of sugar by volume. Bring to a simmer over medium-high heat, and simmer (do not boil) until the marmalade jells.
Keep a close eye on the cooking marmalade. It will go from liquid to jelled more quickly than you would expect. Don’t go by eye in the pan; the mixture will still look much more wet than a typically set marmalade. Use the saucer test or watch for the liquid to sheet off the edge of a metal spoon.
Ladle into hot, sterilized half-pint jars, leaving 1/4-inch headspace. Wipe rims of jars with a damp, clean towel; adjust canning lids and process in a boiling-water canner for 5 minutes. Turn off the heat and leave processed jars in the canner for 5 minutes more, then remove and cool on a thick towel or a wire rack for 12 hours. When jars are completely cooled, check for proper seal. Remove rings from sealed jars, and put any unsealed jars in the refrigerator to use first.
If you can bear it, it’s best to let this marmalade cure for at least a week before eating, otherwise the zest is a bit tough.
Yields three 8oz jars
CanJam, locavore, preserving & infusing, recipes
15 Comments »
Posted by Anita on 01.03.10 11:40 PM
2010 AEC *All Rights Reserved*") If it’s New Year’s week, it must be time for cassoulet at our house. For this week’s Dark Days Challenge meal, we used the same streamlined recipe we’ve been making for the last couple of years. But this year, we went back to the classic preparation, and made our own duck confit.
If it’s New Year’s week, it must be time for cassoulet at our house. For this week’s Dark Days Challenge meal, we used the same streamlined recipe we’ve been making for the last couple of years. But this year, we went back to the classic preparation, and made our own duck confit.
We were lucky enough, last fall, to buy one of the Pekin ducks that Massa Organics was using for pest control in their rice fields. We parted out the bird, setting aside the breasts for searing, making stock out of the carcass, rendering down the fat and skin, and preserving the legs in the rendered fat.
One of my new year’s resolutions is to eat more food grown by people I know in 2010. We already do a pretty good job of finding local sources, but it’s always that much sweeter when we know the families behind our dinner. This cassoulet was a pretty good first step — we’re friends with three of the producers: Steve Sando from Rancho Gordo, Taylor Boetticher from Fatted Calf, and Greg Massa of Massa Organics. We know many of our other farmers by sight from our market trips, but in the next year we’re going to try and become even more familiar with the people who put food on our plates.
The recipe below may seem long, but trust me when I say that it’s a gross simplification of Judy Rogers’s original recipe, which runs to 6 full pages. Just like her Mock Porchetta (and pretty much every other Zuni recipe), the length isn’t so much an indicator of complexity or difficulty, but rather a mix of thoughtful hints, step-by-step signposts, and thought-provoking commentary. In the book, Rogers details how various duck breeds adapt to the master recipe, recounts her laborious process to find the best variety of salt for curing, offers ideas on how to get enough fat to cover your meat, makes suggestions for adapting the recipe to duck breasts or gizzards, and provides a number of serving ideas. It’s a treatise on duck confit in all its glory, and I highly recommend you read it at least once in its entirety. (If you don’t already own a copy, it’s well worth picking up. You don’t have to take my word for it: Eat Me Daily named it one of their top cookbooks of the past decade.)
2010 AEC *All Rights Reserved*")
2010 AEC *All Rights Reserved*")
2010 AEC *All Rights Reserved*")
2010 AEC *All Rights Reserved*")
2010 AEC *All Rights Reserved*")
Duck Confit
– adapted and condensed from The Zuni Cafe Cookbook
4 whole duck legs (legs and thighs attached)
1/3 oz (approximately 2 tsp) sea salt per pound of meat
rendered duck fat, sufficient to cover the legs
– (approximately 2 cups fat per pound of meat) plus a little extra for insurance
Rinse the legs well and pat dry, trimming off any ragged edges of skin or fat. Working on a sheet of parchment, salt the legs all over, a little more on the thick parts and less on the bony legs and ankles. Roll the legs in the salt left on the parchment. Arrange the legs in a single layer in a wide glass, ceramic, or stainless container, skin side down. Refrigerate for 18 to 24 hours, depending on the size and meatiness of the legs.
Rinse the legs well, one at a time, under cold running water; do not soak or you will end up with waterlogged meat. The flesh should feel firm, but knead the excess salt out of any areas that feel especially hard. Dry the rinsed legs on a clean towel and pat dry. Test for saltiness by trimming off a bit of meat and simmering it in duck fat for 5 minutes. If it tastes too salty, rinse and dry each leg again. (Rogers says it should be reminiscent of well-seasoned sausage, and not to worry if it’s tough at this stage.) Place the legs on a very clean plate and rest at room temperature for an hour, or overnight in the refrigerator, covered with plastic wrap.
Heat the fat until warm but not bubbling, then add the duck legs to the warm fat. Choose the smallest pot that will fit your duck, to reduce the amount of fat you’ll need. Unlike most recipes, it’s fine — in fact, it’s desirable — to crowd the pieces into the pan, but do not stack more than 2 layers deep. If needed, add more fat to submerge the legs completely. Heat the fat and legs to just below a simmer (200°F is a good target, if you have a deep-frying thermometer), skimming off any foam.
Stand by to adjust the heat, maintaining a steady temperature to avoid toughening the meat. Cook for an hour, then begin testing for doneness every 10 minutes. (Large legs often take 90 minutes to 2 hours; small legs, like those on the Massa ducks, are done just after an hour.) The meat should yield to a firm prodding in the pot; when it does, remove a piece from the fat, and slice off a bit. Allow the sample to cool; fully cooked meat will be tender when just cooled enough to hold with your bare hands.
When the meat is done, remove the pot from the heat and allow to sit undisturbed for 20 to 30 minutes. Skim the surface of the fat, removing any stray bits. Using tongs, gently move the legs to a sterilized glass or ceramic container, trying not to tear the skin or to disturb the liquid on the bottom of the pot beneath the fat. Skim the fat again, and ladle it through a fine-mesh strainer over the meat, again taking care not to disturb the gel at the bottom of the pot. Cover the meat completely — depending on the size of your storage container, you may need to melt more fat — and cool to room temperature. Cover the container well, then refrigerate for three days to a week before using. For longer storage, I prefer the freezer; the fat protects the meat from drying, and the deeper chill prevents any off flavors.
Farmers and food artisans who created the ingredients for this week’s meal: 
Rancho Gordo, Napa: flageolet beans
Fatted Calf, Napa: Toulouse sausage and ham trimmings
Massa Organics, Hamilton City: duck
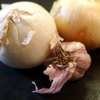
Catalán Family Farm, Hollister: onions
Guisto’s Vita-Grain, South San Francisco: sea salt
…and our own homegrown thyme and crumbs from homemade bread
Dark Days challenge, locavore, meat, preserving & infusing, recipes
5 Comments »
Posted by Anita on 05.01.09 8:14 AM
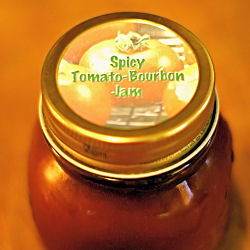 Thanks to Sandy Gluck from Martha Stewart Living Radio‘s Everyday Food. She gave her listeners a shout-out to our Tomato-Bourbon Jam. We use it as a homemade replacement for ketchup, or as the secret ingredient in wintertime BLTs.
It’s still a little early for tomatoes, but if you’ve got hothouse tomatoes at your farmers market, as we do, this is one place where they do pretty well.
preserving & infusing
5 Comments »
Posted by Anita on 11.10.08 12:35 PM
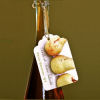
 We’re no strangers to homemade cocktail ingredients. We’ve been making limoncello (and other citrus liqueurs) for ages, along with nocino, alkermes, plum brandy, and plenty of other infusions. We’ve simmered up our own grenadine, brewed a batch or two of ginger beer, steeped jar after jar of cocktail cherries, and infused more flavored syrups than any reasonable person’s fridge can hold.
Last summer, we hit upon a new favorite: infused brandy using the excess pears from our friends’ tree. Since it’s an infusion, rather than distilled pear cider, our homemade drink is closer to a pear-brandy liqueur — like Belle de Brillet — than to a potent poire william eau de vie or the grappa-style Clear Creek pear brandy. We’ve mostly sipped it neat or mixed into bubbly, with or without a little simple syrup. But there’s no reason why it wouldn’t be a great mixing ingredient… especially as it doesn’t really improve with age, and in fact deteriorates fairly quickly after the initial infusion.
 There aren’t many cocktails that call for pear spirits, but there are plenty that use calvados and applejack to great effect. One such drink, the Jack Rose, dates to the pre-Prohibition era, and was especially popular in the Northeast where applejack was distilled in great quantity. Many theories abound as to the drink’s name origins, but it seems pretty likely that it’s Jack from booze and Rose from the color, as opposed to any gangster or bartender-nickname references.
The usual recipes for the Jack Rose are split fairly well between lemon and lime juice. When using applejack, I think either option is pleasant, though I will admit a small preference for lime when mixing the stronger Laird’s Bonded. But if you’re making the switch to pear brandy, definitely go with lemons — and Meyer lemons, if you can find them — as the subtler pear flavors are lost amidst lime’s extra tartness.
With a slight change to the more-Frenchified pear brandy, we christen our variation the Jacques Rose. It’s made with all home-made or home-grown ingredients, in honor of Mixology Monday “Made From Scratch,” hosted by The Pegu Blog.


Jacques Rose
2-1/2 oz pear brandy (or substitute 1-1/2 oz brandy + 1 oz poire william)
3/4 oz lemon juice
2-3 dashes grenadine
Shake with ice, and strain into a chilled cocktail glass. Garnish with a lemon twist.
drinks, Mixology Monday, other blogs, preserving & infusing, recipes
3 Comments »
Posted by Anita on 11.03.08 11:00 PM
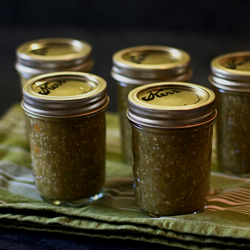 Last year, I found myself green with envy — if you’ll pardon the pun — over Dylan’s stores of tomatillo salsa. By the time I cleared some space on the canning calendar, though, all the Ferry Plaza farmers who normally sell tomatillos (which isn’t a long list to begin with) had finished their harvest for the season.
So when I saw the saw the first basket of tomatillos early this summer, I pounced. After a long winter without a steady supply of chili verde, green posole, or even a simple tomatillo salsa, I was long overdue. But I put off making salsa again, for reasons I can’t quite explain.
Luckily, the tomato and tomatillo season this year seems to be going on forever, and despite my folly, was able to score a big 5-pound bag at Catalán Family Farm‘s market stand on Saturday, and put up a full batch of liquid green love on Sunday afternoon.
I feel more relaxed already, I tell ya.
To my palate, the best, most flavorful tomatillos — especially in salsas, where their flavor is so distinct — are the small, purple-tinted milperos. Ranging in size from cherry-tomato-ish to itty-bitty pea-sized, out of the husks milperos look like a bag of marbles. Most are green, a few are white, some are deep purple, but the beauties of the crop are almost pearlescent, with swirls of lavender and sage. Alas, the colors turn to a uniform green as soon as they’re heated, but their intense flavor lingers on. Even their husks are pretty; the veins are purplish against a khaki-colored lace.
We celebrated Dia de los Muertos yesterday by eating Primavera green-chile tamales with our fresh batch of homemade tomatillo salsa and a dollop of rich organic, local sour cream. Yum.


This salsa smells impossibly sour while you’re cooking it down, but fret not… all will be well when the simmering is done. Don’t be tempted to skimp on the acids; they’re necessary for safely preserving this naturally low-acid food.
Tomatillo Salsa
makes 6 half-pint jars
3 pounds tomatillos, chopped (weight after husking and washing)
1-1/2 cup chopped onion
5 serrano chiles, minced (not seeded or deveined, unless you want a milder salsa)
1 medium fresno or red jalapeño, minced (not seeded or deveined)
6 cloves garlic, minced
1T ground cumin
3/4 tsp salt
1/4 cup cider vinegar
1/4 cup lime juice
Prepare a boiling-water canner: Fill it half full of water and heat to a simmer. Keep canning jars and lids warm in simmering water.
Combine all salsa ingredients in a large saucepan. Bring to a boil, then reduce heat and simmer 10 minutes. Pass the simmered salsa through a food mill fitted with the largest disc.* Return the milled salsa to pan and bring back to a simmer. Adjust salt and seasoning as needed.
Ladle hot salsa into clean, hot jars, leaving 1/2-inch headspace; remove air bubbles and wipe rim. Center hot lid on jar; apply band and adjust until fit is fingertip tight.
Place the filled jars in the canner, and bring to a rolling boil. Process at a full boil, uncovered, for 15 minutes. At the end of processing time, turn off heat and raise the canning rack to the upper level and let jars sit above the water for ~5 minutes to gradually stop boiling. Remove jars to a cooling rack, and leave undisturbed until thoroughly cool. Check lids for seal after 24 hours. Lid should not flex up and down when center is pressed.
* Note: You don’t want to use a food processor in place of the food mill, as it will whip air into the salsa, which could end up trapped as trapped bubbles during canning. If you don’t have a food mill, just be sure to chop everything very fine before cooking and enjoy the chunkier texture of your salsa.
Mexican, preserving & infusing, recipes
12 Comments »
Posted by Cameron on 07.28.08 10:01 PM
 Sweet spirits of niter, did we get plums this year or what? Last year, our little whip of a tree served up a double dozen of the sweetest, tartest, juiciest globes that we could have ever hoped for. This year, that little whip filled out and buried us under an avalanche of purple fruit.
We saw Plumapalooza coming when we had to prop up one of the tree’s lower branches. The load of ripening plums bent it into a wicked arch, forcing the tip down so far that it touched the ground. However, it’s one thing to gaze admiringly at branchloads of red and purple glory. The reality of harvest is another thing entirely.
Toward the end of June, the very first volunteers hit the ground. Every day, we would gather the fallen and tug gently at likely followers still hanging on the branch. Five a day turned into ten and in a week’s time, we were gathering up between fifteen and twenty plums every morning and every night. By the time it was all over, we figured that we reaped 30-40 pounds of fruit.
Which naturally begged the question of precisely what the hell we were going to do with 40 pounds of plums. Finding a solution seemed especially pressing in the early stages of the deluge as we carefully picked yard bark out of drops and sorted the fruit into piles of Perfect, Not-so-perfect and We-love-you-anyway on the countertop. Ultimately, we knew that we would have to turn to preserves or some other solution that involved canning, but we weren’t ready to go there just yet.
As I stood in the kitchen one weekend, chain-eating plums and staring at the latest load, Anita reminded me that I had talked about making pâte de fruits before the plums started thumping down. Brilliant! Why didn’t I think of that? I checked around and found a few recipes, most of which called for pectin, but Anita sussed out a recipe in the San Francisco Ferry Plaza Farmers Market Cookbook that was nothing but plums, a little lemon juice, and a *lot* of sugar.
My first go at being a candy maker turned out pretty well, but there were some bumps along the road, mostly related to the fact that the recipe instructions about how long to cook the plum/sugar mixture before pouring it into a pan to set didn’t match up with my real-world experience: “Cook over low heat, stirring constantly, until the fruit reduces and thickens and begins to hold together as a mass, 20 to 30 minutes.”
Obvious, right? Easy? Not for this knucklehead. I stood in front of the stove stirring that pot nonstop for THREE FREAKING HOURS while the contents went from a thin purple soup to a bubbling syrup that I — exhausted and convinced that I had made a fatal error somewhere — finally abandoned to the tender mercies of the candy pan.
On behalf of my fellow kitchen idjits, let’s diagnose the sentence that was my nemesis. Cook over a low heat? My friends, it’s probably possible to boil a pot of coffee with a Bic lighter, but it’s going to take a long damn time, and when you’re trying to evaporate a quart or so of liquid, you need something a bit more brisk than low heat. Next time, I’ll be less tender with the flame during the early proceedings.
Second lesson: use a comfortable spoon. For reasons that are now unclear to me, I chose a metal spoon for my stirring utensil (Something to do with not staining the wooden spoons? Maybe? I don’t know. Leave me alone.). All I know is that after several hours of making like the witches in Macbeth, the unforgiving handle had given me a blister.
Last point: I don’t know about you, but when I think of something “holding together as a mass,” I expect to be able to haul out a serious hunk of glop when I raise up the spoon. Au contraire, mon frere. My pot full of plum sweetitude thickened to a syrupy consistency and then stopped. I kept at it, though, stirring away like Jamie Oliver on Quaaludes until I smelled the sugar caramelizing and thought to myself, “Self, if you keep going, you’re going to end up with plum-flavored Jolly Ranchers. If it ain’t done now, it ain’t gonna be done.”
It was done. After setting, cooling, cutting, and dusting with sugar, the final product was chewy, tart, and had the unmistakable twang of sugar that’s had a comfortable and extended acquaintance with the flame. It was good, and the piles of plum candy disappeared more quickly than I would have believed possible, especially when paired in gift bags with Anita’s homemade marshmallows.


Plum Candy
– adapted from the San Francisco Ferry Plaza Farmers Market Cookbook
4 pounds plums, pitted and chopped
2 T water
Juice of 1/2 lemon
About 4 cups sugar
In a large, heavy enameled cast-iron or other nonreactive pot, combine the plums, water, and lemon juice. Place over low heat and cook until the fruit is very soft, about 20 minutes.
Remove from the heat. Puree the plum mixture by forcing it through a fine-mesh sieve or food mill fitted with a fine screen held over a bowl. Measure the puree, return it to the pan, and stir in an equal amount of sugar. Cook over low heat (ha!), stirring constantly (ow!), until the fruit reduces and thickens and begins to hold together as a mass, 20 to 30 minutes (bullshit. see above.).
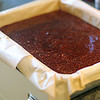
Line a 9-by-12 inch rimmed baking sheet with parchment (the original recipe says plastic wrap, but I was afraid that it would melt) overlapping the edges. Pour the plum paste onto the lined pan and spread into an even sheet with a rubber spatula. Let cool, cover, and allow to stand at room temperature for 48 hours. The paste will become firm.
Invert the pan onto a cutting board, peel off the parchment, and cut the paste into about 36 small squares. Arrange in layers on waxed paper and store in an airtight plastic container at room temperature.
dessert, garden, locavore, preserving & infusing, recipes
23 Comments »
Posted by a Special Guest on 03.28.08 7:03 AM
 Editor’s note: Our pal Sean returns once again to Drink of the Week guest-bartender duties with a delicious, prettily pink cocktail inspired by the fabulous girl in his life.
—-
Last week, we celebrated one lunar year with our daughter dog, Reese. Like proper San Franciscans, we simply had to throw a cocktail party to, um, mark the occasion. But what to serve? Salty dog? Perhaps. Bark-tini? Ugh, no. Greyhound? Now we’re talking.
Nothing more than vodka and grapefruit juice, the Greyhound can be lovely with brunch, but it’s maybe not the most interesting option for cocktail hour. Luckily, we had just finished our inaugural batch of pompelmocello, and so we decided to sub that in for some of the vodka. And being cunning linguists as we are, we dubbed our newfound concoction the Italian Greyhound.
The name was apt, for when we were researching breeds while ‘shopping’ for a dog, Italian Greyhounds were front-runners in our consideration. Apartment-sized, trainable and loving, they seemed like a good match for us. The one deterrent was that they have a tendency to burrow under blankets and pillows, and if you accidentally and unknowingly sit on one in its ersatz lair, you can kill it. Maybe, we thought, we wanted something a little sturdier. In the end, we got our Manchester Terrier mix pound puppy, who at 17 pounds swaggers with the attitude of a dog many times her size.
Alas, there already exists a cocktail called the Italian Greyhound, basically your standard Greyhound with a float of Campari on top. It’s just as well, for in tinkering with the recipe further, I decided vodka wasn’t really the way to go anyhow. In order to convert the greyhound into something worthy of a cocktail glass, I had to bump up the booze-to-juice ratio, and vodka just wasn’t bringing anything to the party. Gin, on the other hand, offered enough complexity to offset the acidity of the juice.
All that remained from the original inspiration was grapefruit juice, and smaller amounts of it, but I still wanted to honor its provenance. Anita suggested dubbing it the Levriero — Italian for greyhound — and so a new cocktail was fledged.


Levriero
1 oz limoncello (or pompelmocello)
1 oz gin
2 oz red grapefruit juice
Shake with ice and strain into a chilled cocktail glass. Garnish with mint sprig or a twist.
Drink of the Week, drinks, holidays & occasions, preserving & infusing
6 Comments »
Posted by Anita on 03.09.08 3:48 PM
 Our main fridge in the kitchen is a counter-depth, side-by-side model. Its narrow, shallow freezer doesn’t hold a lot, volume-wise, but picking a bigger fridge would have meant a lot of kitchen remodel trade-offs that we weren’t willing to make. The ancient fridge we inherited from the previous owners was wheezing and leaking by the time we started our remodel, so we killed two birds with one stone by buying an old-school (but brand-new and EnergyStar compliant) over/under fridge for the basement.
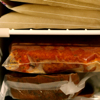
The plain-Jane newbie was a perfect stopgap for us to use until we moved back upstairs, and now we fill the basement fridge with all those goofy condiments we only need twice a year (cooking Thai food will do that to you) and extra beer. When fiesta time rolls around, the beer gets moved up to a cooler on the back porch, and the downstairs fridge gets filled with all the party mise en place. And, of course, the second fridge’s freezer is our storage vault for things like summer veggies, pasta sauce, make-ahead meals, and other frozen staples. We keep one or two packets of each thing in the main fridge, and the back-stock downstairs — a bit of it’s an oddball system, but it works for us.
At least 90% of the time it does. But when you’re prone to making megabatches of chicken stock, things can go south pretty quickly.
Last week, I innocently opened the freezer door in search of some chile verde, and a tectonic shift sent plastic-encased projectiles plummeting toward the floor. Thank goodness I had my clogs on, or I might’ve lost a toe! I’d stacked food cubes like a giant game of Tetris — or maybe more like Jenga — and I’d paid the price. Clearly, my version of Fibber McGee’s closet needed a clean sweep. I took everything out of the freezer (note to self: wear gloves next time!) and reconfigured it all in a less-precarious arrangement. Still, though, the tiny compartment was pretty close to capacity.
To try and eat down our storage problem, I put us on a strict diet: Every dinner we ate at home had to have at least one frozen element… at least until there was enough room to store another batch of Bolognese sauce. (It’s nice to have problems that can be solved by eating.) With spring on the horizon, it seemed safe to start really digging into our local-food stash. After all, we’ll start seeing roaster/fryer chickens at the market again next month, and we’ve got plenty of canned tomatoes to last us through to the new season — the hothouse Early Girls are already coming in, much to my shock.
Due to a combination of Presidents’ Day weekend festivities and long nights at the office, we only managed 5 dinners at home during the last half of February — all of them, of course, at least partially from the freezer. We’ll keep plugging away at our hoard over the next few weeks, but now there’s enough breathing room in the freezer that I don’t feel bad eating the occasional freshly prepared supper.
In fact, the downstairs freezer is looking downright breezy at the moment… A phenomenon that should last until we start getting 9 pounds a month of sustainable, local beef, pork, and lamb from Marin Sun Farms’ new meat CSA.
Hmm, do you think a third fridge would be excessive?


Dark Days Ticker — February 15 to 29
– Dark Days dinners at home: 5 dinners
– Locavore dining-out: O Izakaya Lounge, Primavera, Tacubaya
– Freezer fodder: Short-rib ragu, Cornish pasties, rigatoni bolognese, turkey meatballs, chicken pot-pie
New local items in the pantry:
– Scharffen Berger cocoa powder (Berkeley, 13 miles)
– Marin Sun Farms pastured eggs (Point Reyes Station , 44 miles)
– Katz champagne vinegar (Napa, 57 miles)
Dark Days challenge, locavore, preserving & infusing
16 Comments »
Posted by Anita on 10.04.07 7:42 PM
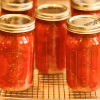
 As summer fades into fall, I’m taking great comfort in our pantry full of canned tomatoes. Sometimes I just stand there with the doors open, gazing in at the luxury of summer’s bounty — more than 40 quarts in all — hedged against the privations of winter’s mealy produce. Bought from a local organic farmer at a seriously good price, these tomatoes were picked at their peak of ripeness and processed within 48 hours. Row upon row of jars sit in the cool larder, bright red orbs shining out of the darkness.
Gag-inducing, isn’t it? But I must confess that the road all this unseemly self-congratulation was paved with dismal failure.
A few weekends ago, Cameron and I blanched and peeled 40 pounds of Mariquita Farms San Marzano tomatoes. Later in the day, Tea popped over to help us fill cases of quart-sized canning jars with our haul. Seven quarts at a time, we arranged our bounty into the shiny-new pressure canner, sealed the lid, and waited.
We’ve put up jams and preserves for many years, and pickles for at least the last five. But our first foray into the tomato realm was a rather limited success. Almost a third of the jars didn’t develop a proper seal. Of those that did, half lost so much liquid that we feared they would spoil. (Reputable books tell us not to worry: the contents may darken, but they’re safe to eat.) We toyed with the idea of re-processing the unsealed jars, but with no clue as to what had gone wrong and exhausted from a day on our feet, we decided that we’d had enough.
But the next morning, in what can only be described as a “when life gives you lemons” moment, I realized that we had everything on hand that we needed to make a giant batch of pasta sauce. I set the ingredients in a large kettle to simmer, and by bedtime we had dozens of quart-sized bags ready for the freezer. Surplus sauce will not be a problem. We eat our bastardized version of pasta Bolognese every Friday night, as it’s the kind of meal that makes its way to the table with a minimum of fuss. Cameron can whip up a simple salad and a side of garlic bread while the pasta boils, while I pore over my recipe files to plan the next week’s menu.
Determined to correct our mistakes (and unable to resist the siren song of ripe ‘maters), we bought another three crates. That’s 60 more pounds to make 100 pounds in all, for those of you keeping score at home. Guessing that our slightly lackadaisical jar-filling approach had been our undoing, we used a sterilized metal ruler to gauge the gap between the top of the tomatoes and the lip of each jar, ensuring that a half-inch of headspace — and not a millimeter more or less — remained.
Our measuring mania paid off: Not a failed seal in the batch, and a lot less liquid-loss, too. Now that we’ve got our technique dialed in, I can’t wait until next summer to try it again. In the meantime, even our failures yielded some nice side benefits: Our freezer’s overflowing with spaghetti sauce… probably just enough to last us through to next year’s Early Girls.


Not-Really-Bolognese Pasta Sauce
2 to 2-1/2 pounds ground meat*
3 cups chopped onion
4 to 6 cloves garlic, minced
12 oz white mushrooms, sliced
1T olive oil
3 quarts home-canned whole tomatoes, undrained (or 3 cans Muir Glen whole peeled tomatoes, with their juice, cut into chunks with kitchen shears)
2 cups tomato sauce
6 oz tomato paste (1 small can)
1 bottle (750 ml) red wine
1T kosher salt
2T dried Italian herbs (we use a combination of 2 parts thyme, 1 part rosemary and 1 part oregano from our garden; if using fresh herbs, triple the amount)
3/4 cup finely chopped flat-leaf parsley
Fry the meat in a large stockpot, breaking up into very small pieces. Add the onion and sweat until soft. Meanwhile, sautee the sliced mushrooms with the olive oil in a separate pan over medium heat until liquid evaporates; do not add salt. When onion is soft, add the garlic to the meat and cook 2 minutes. Drain off most of the fat from the meat and add the mushrooms, tomatoes, salt, herbs, tomato sauce, and tomato paste. Rinse out the tomato cans or jars with the wine, and add to the pot.
Cook for 2 to 3 hours (depending on the amount of liquid in your tomatoes), or until thickened to a dense sauce-like consistency. Add the chopped parsley and remove from the heat. Chill over an ice-water bath to room temperature, then chill overnight if desired. Package in 2-cup quantities in quart-sized freezer bags, and freeze flat.
Each bag will contain enough sauce to coat a half-pound of cooked dried pasta in the American style, to serve 2 to 3. After reheating, we like to add a bit of the pasta water and/or a touch of cream to the sauce before tossing with the pasta, to help the texture recover from the freeze-thaw cycle.
* Our ratio is usually something like 1-1/2 pound ground chuck, 1/2 pound ground pork, and 2 Italian sausages.
Italian, locavore, preserving & infusing, recipes
7 Comments »
