Posted by Anita on 09.10.07 1:04 PM
 It’s been a gazpacho-filled summer for us. In addition to the traditional Spanish soup’s regular appearances on our warm-weather menus, we kicked off tomato season with Cookie’s gloriously deconstructed version, and were lucky enough to sample Sean’s gorgeous white Andalucian gazpacho, too.
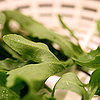
Now, I love me a straight-ahead gazpacho as much as the next tomato fanatic — that magical combination of cucumber, pepper, tomato, and vinegar is nearly unbeatable when it’s too hot to cook. But with two show-stopping variations fresh in my mind, I craved something equally appealing for Tami’s second Super Soup Challenge.
Rummaging through my library copy of Mitchell Davis’s Kitchen Sense, I spied a likely candidate. Much like the watermelon salad we brought to DPaul’s party last month, this fruit-based gazpacho is actually a savory appetizer, not a dessert. But it’s still easy as pie.
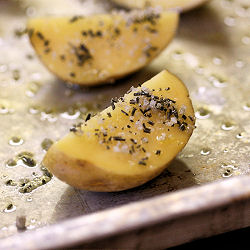
After rough-chopping all the veggies — all of which are in season and readily available from local farmers markets — you simply whiz them all together with a few simple seasonings, strain out any remaining bits, and chill for an hour in the fridge. At serving time, a pair of salty garnishes teams up with your best olive oil to add a touch of contrast. Drizzling the olive oil off the edge of a spoon gives the sparkle of beautiful small droplets.
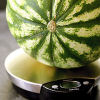
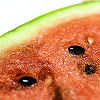
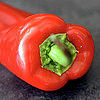
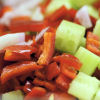

Watermelon Gazpacho
– adapted from Kitchen Sense
1 6-pound ‘icebox’ watermelon, red-fleshed
2 Kirby cucumbers or 1 hothouse cucumber, peeled (seeded, if necessary) and chopped
1 fresno chile or other medium-hot red chile, chopped
1/4 large red pepper, cored, seeded, and chopped
1/2 medium red onion, chopped
2/3 cup tomato juice
1/4 extra-virgin olive oil
1/4 cup sherry vinegar
1/2 tsp kosher salt
fresh-ground black pepper
—–
2 oz feta cheese, crumbled
3 T finely chopped Kalamata olives
your best olive oil, for drizzling
Remove the rind from the watermelon. Cut the flesh into chunks and remove the seeds, if necessary; you should have about 6 cups of melon. Using a stick blender, traditional blender, or food processor, blend all soup ingredients (except the garnishes) until well liquified — about 1 to 2 minutes. Strain the puree through a large-mesh strainer to remove any lingering seeds or other bits, pushing the pulp through with a spatula. Adjust seasonings as needed, and chill for at least an hour. Serve garnished with the feta and olives, and a drizzle of olive oil.
Serves 6 as an appetizer
cookbooks, cooking, farmers markets, locavore, other blogs, recipes
10 Comments »


Posted by Anita on 08.23.07 12:10 PM
 All the cool kids are taking blog-sabbaticals this summer. Oh, how I wish that were the reason why we’ve been so blissfully post-free. Truth is, we’ve got plenty of inspiration, and we’re cooking up a storm. We’ve had a week of meals lined up, shopped for, and planned to a fare-thee-well. But – sadly, right in the heart of the best-eating time of the year – we’re more than a little off our game.
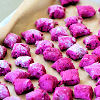
First there were the gnocchi.
As any sane cook will tell you, gnocchi are fraught with peril, even in the best of circumstances. Attempting to devise gnocchi that are somehow simultaneously delicious, gorgeous, and interesting enough to write about adds a serious degree of difficulty. While I am sure there will be plenty of entries in this month’s exciting episode of Hay Hay, It’s Donna Day, my Day-Glo fuschia beet-ricotta gnocchi will not be among them. Fussy, dumpy, and not terribly tasty… it’s not too strong to call this an outright failure.
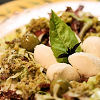
Then there was the antipasto salad. I think it’s safe to say that Nancy Silverton is decidedly not targeting my demographic with her latest book, A Twist of the Wrist. It’s a cool, heartfelt attempt at legitimizing the semi-homemade trend, streamlining weeknight dinners with the judicious application of store-bought gourmet goods. Like tapenade.
Oh, the tapenade.
Trust me, kids, it was all I could do to fight the urge to just buy some good olives and slap them in the Cuisinart with a splash of olive oil and a spoonful of capers – completely eliminating the book’s time-saving charm. So I didn’t; I bought a nice-looking bottle of chunky green-olive paste and added it to my pile of lettuce, salami, and herbs.
You know where this is going, eh?
Salty, metallic and otherwise irredeemably bad, the store-bought ‘tapenade’ overpowered all of the other ingredients – and I’d only used half what the recipe called for. I don’t think we actually tossed it all down the drain, but it was a near thing; there was a lot of picking good salami and cheese out of the hyper-salinated salad.
Returning to familiar territory, we pulled out a tried-and-true recipe for Thai shrimp-cakes from Dancing Shrimp. Our makrut lime tree is finally bearing fruit, and these savory morsels seemed the perfect way to showcase our harvest for Andrea’s “Grow Your Own” roundup. As I pulled all of the ingredients out of the fridge, I caught a whiff of the ‘fresh’ shrimp we’d bought at Whole Foods: It had spoiled overnight. (That will teach me to sleep in and skip the market. This would not happen at Shogun.)
Feeling defeated, we cannibalized a meal we’d planned to eat later in the week: Rib-eye steak and rosemary salt-roasted potatoes. It was fine, I guess, although we both picked through the definitely-not-Prather-quality meat and the too-sweet supermarket spuds.
Last night, in need of a sure thing, we hoofed it all the way down the peninsula to our favorite Mexican restaurant. We’ve eaten there for more than 10 years now, always bragging that we’d only ever had one bad meal there. Well, now we can say we’ve had two: Unmelted cheese, blown-out rice, tortillas heated to the point of hand-scorching rubberiness, and a squeaky-dry chicken tostada. At least the margaritas were good.
With the exception of a lovely dinner at Oliveto on Monday, I can honestly say that there were exactly two meals over the last week that I truly enjoyed: a fluffy Denver omelette I made from piperade leftovers, and a bowl of Rancho Gordo’s giant lima beans simmered with onions that had been sautéed in bacon drippings.
Amid an overwhelming collection of intricate disasters and well-planned flops, these simple, graceful plates stand out as a steady reminder: Sometimes even the best-laid plans are no match for kitchen kismet, and sometimes less is more.

Denver Omelette
3 large eggs
1 T half-and-half, or cream
2 T butter
1/2 cup diced onion
1/2 cup diced bell pepper
1/2 cup small ham cubes
1/4 to 1/2 cup shredded cheddar cheese
In an 8-inch skillet, melt the butter over medium heat. Saute the onions until they just begin to soften. Add the pepper, and saute until vegetables are well softened but not browned. Add the ham cubes and saute until heated through. Remove sauteed ingredients to a plate and keep warm. Return the skillet to the fire.
In a medium bowl, scramble the eggs and the half-and-half until well blended and a little frothy. Add the beaten eggs to the hot pan, and let sit for 15 seconds; stir gently with a wooden spatula, pulling the curds toward the center of the pan and encouraging liquid to fill in the gaps. When a little liquid remains, use the spatula to gently even out the thickness of the curds in the pan, and reduce the heat to low. Spread the cheese all over the soft-set eggs, then evenly top one side of the omelette with the filling. Cover the pan and let sit for a few minutes until cheese melts. (If the underside of the egg browns too much, turn off the heat entirely; the pan will be hot enough if you leave the lid on. Unlike a French omelet, you do want some color and crispness, but you don’t want leathery eggs.)
When cheese is melted, fold the unfilled side of the omelette over the filling. Slide onto a warmed plate, glazing the top with a bit more butter, if desired.
Serves 2 with salad as a light supper, or a very satisfying breakfast for one hungry soul.
breakfast, cookbooks, cooking, other blogs, recipes
8 Comments »
Posted by Anita on 08.08.07 4:25 PM
 It’s good to have friends among the landed gentry. In the warm suburbs beyond the fog-wrapped City limits, we’re on friendly terms with plenty of folks who find themselves rolling in a bumper harvest of astonishing variety, looking for creative ways to eat everything before it goes off. Meanwhile, we slickers sit on our decks and wonder if the tomatoes are ever going to ripen, if the basil will survive another week, if the mint might yield enough leaves to make a couple of cocktails before the summer ends.
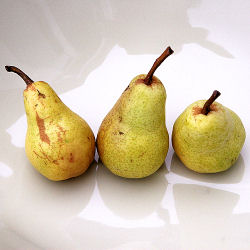
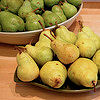
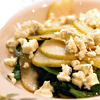
One of my favorite new friends calls herself a “tomato-ranchin’ bum.” Really, she’s more like a pear-wrangler these days, burdened under so much fruit that she’s resorted to using her harvest as dog toys and paperweights. The poor dear. Of course, we’re green and yellow with envy: Cookie gets more fruit off her newly inherited pear tree in one day than we coaxed from our plum during in its entire (and entirely too short) season.
Knowing that we’re suckers for home-grown fruit, Cookie loaded us up with a jar of eye-rollingly delicious homemade pear butter and an entire grocery bag full of her surplus pears. Not that I am complaining, mind you… not in the least. When we got home, we separated the as-yet-unripe specimens into their own bowl, to help preserve our bounty as long as possible. The ripest of the already-yellow bunch got scrubbed, split, cored, and cubed, then plunked into brandy. By the end of the second night, I could tell we’ll have a winning tipple on our hands in short order. (It’s not going to put Belle de Brillet out of business, but it definitely qualifies as Majestique de Marin already.)
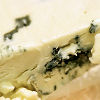
Meanwhile, we’re stuffing ourselves with a warm-weather riff on the salad we ate all last winter: Slivered pears — ripe but still crisp — tossed with spicy arugula (also from CookieCrumb Acres), some flavorful olive oil, and a touch of mild vinegar. Crumble a little Point Reyes Blue on top, ’cause we love it even if the cool kids don’t. Crack a little pepper over the top, and there you have it: A perfect summer salad for those nights when you just can’t bear another caprese.
Anyone else out there with surplus gourmet edibles? Call me — let’s talk.

cooking, other blogs
7 Comments »
Posted by Anita on 07.25.07 9:21 PM
 Otto von Bismarck reportedly quipped that “The less the people know about how sausages and laws are made, the better they sleep at night.” Although the ol’ Prussian was undoubtedly right about legislation, when it comes to wurst, I’d beg to differ. Not only is sausage-making entertaining and educational, it’s also much easier than you might think.
It can even be fun, especially if you divvy up the work among a crew of like-minded friends. One recent Sunday, we rounded up Sean and DPaul plus our new pals Jon and Karen, classmates from Kasma’s Thai cooking series. Everyone brought a dish to share and a five-pound pork shoulder; Cameron and I provided the recipes, the seasonings, the casings, and other miscellaneous bits. In a matter of hours, the six of us created a spectacular assortment of sausages to stock our freezers.
Between us, we amassed four KitchenAid mixers, three meat grinder attachments, two pairs of sausage-stuffing tubes, and one very porky kitchen. All told, we ended up cranking out more than 25 pounds of sausage. We stuffed a French-style garlic saucisse — courtesy of Michael Ruhlman’s acclaimed Charcuterie — into stout links, curled Kasma’s recipe for spicy sai oa into a hog-casing spiral, squeezed delectable Kentucky-style breakfast sausage into petite sheep casings (plus a few patties), and parceled out our spicy Mexican chorizo in bulk. Even after a hearty sampling, everyone went home with a bit more than a pound of each flavor, with no more effort than making a single batch on their own.
Although we had a blast with the grind-and-stuff method, don’t let a lack of specialized equipment hold you back from making great sausage. Most good butchers will grind any roast to order. Choose a nice, fatty pork shoulder — also known as a Boston butt or simply pork butt, even though it comes from nowhere near the hind end of the pig — and ask for a coarse grind. Mix the ground pork with your seasonings, shape into patties, and voilá: You’ve just made sausage.
Folks were pretty evenly divided about which of our creations they loved best. For me, the winner of the day was the Kentucky breakfast sausage. There’s no stronger compliment that I can pay it than it just tasted right… something like your Southern grandmaw would have made, if you’d been so blessed.
Go on, don’t be shy: Be your own Southern grandmaw. It’s much easier than getting a bill through Congress, I promise.


Kentucky Breakfast Sausage
– adapted from Bruce Aidells’ Complete Sausage Book
4 pounds well-marbled pork shoulder, cubed
1-2 pounds pork back fat, cubed
— quantity varies depending on the fattiness of the meat
2 T kosher salt
4 tsp freshly ground black pepper
1/4 cup ground, dry sage
2 tsp ground cayenne pepper
2 tsp ground coriander seeds
1 tsp freshly grated nutmeg
1 cup water
sheep casings (optional)
Cut the pork and fatback into cubes. Place in a metal bowl in the freezer for 30 minutes to chill well, along with the grinder parts. When thoroughly chilled, grind the pork and 1 pound of fatback through the coarse plate of the grinder.
In a large bowl, mix all the ingredients (except casings), kneading and squeezing until well blended. Fry a test patty and taste for seasonings and fat content; adjust as needed.
For links, stuff the sausage into casings and tie or twist at three-finger-width intervals. If making patties, shape the meat into large rolls, 2 inches in diameter. Wrap them in waxed paper, and refrigerate until ready to use; slice into patties as needed.
(Sausage keeps refrigerated for 3 days, or frozen for 2 to 3 months.)
cookbooks, cooking, equipment, meat, recipes
14 Comments »
Posted by Anita on 07.10.07 1:14 PM
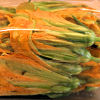
 Every summer, I walk by baskets of squash blossoms at the farmers market, longing to find a use for them. Stuffing fragile flowers seemed like a tedious task for a weeknight meal, so I’d always given them a pass. But once I saw Jen’s fritters — which were in turn inspired by a course at Derrick and Melissa’s much-discussed dinner party — I knew I couldn’t put it off any longer.
The basic idea seemed simple enough: Stuff the blossoms with cheese, dredge them in dairy and starch, and fry until golden. But I wanted to dress them up a bit — make them nice enough to serve as a light supper, alongside a simple salad — so I turned to my new favorite cookbook, Big Small Plates. The text of this popular title is written by Cindy Pawlcyn (of Mustards Grill fame) but the recipes themselves are largely the work of her two partners: Pablo Jacinto, the chef at Cindy’s Backstreet Kitchen, and his brother Erasto, who holds the same title at Mustards.
The book’s tapas-style approach draws inspiration from around the globe. There are plenty of straight-up California-American preparations, and Asia is well represented: A Vietnamese mini-burger salad we tried was especially delicious. But — and here I must admit to being biased — it’s the book’s Latin-influenced dishes that really shine. We’ve tackled a glorious mole casera, two batches of perfectly wonderful empanadas, and a handful of other Mexican-tinged dishes that hit the mark both in taste and in appearance.
The book’s a delight to use, aside from a few scale issues: the empanada recipe yields twice as much filling as wrappers to enclose it, and the original squash-blossom dredge made easily three times as much as I needed (I’ve corrected the proportions below). Most of the recipes serve six as an appetizer course or side dish, but many can serve as two or even four entree-size portions. Some dishes involve prepping multiple sub-recipes, but the auxiliary instructions usually revolve around simple garnishes like the lime-infused crema here. Ingredient lists can seem daunting, but the end results come together with minimal fuss. And they look as good on the plate as they do in the photos — no small compliment in the realm of chef-written cookbooks.
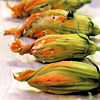
But back to those blossoms. I was worried that I’d waited too long between market day and making the dish: The flowers had started to wilt and the petals were sticking together. But despite their tissue-thinness, and warnings in nearly every recipe I read about the perils of tearing the flowers, the squash blossoms proved surprisingly resilient. Pulling two petals apart at the seam between them, I could split the blossom (much like you would when making a chile relleno) to remove the pollen and stuff the interior. The petal’s own natural moisture combined with the stickiness of the filling meant that I could patch the petals back together after stuffing; the batter held in any remaining leaks during frying.
It was a fiddly process, to be sure, but a highly rewarding one. Once the blossoms are stuffed, you can hold them in the fridge for a few hours. The dredging and frying comes along quite quickly after that, and if your garnishes are prepped and waiting, you’re 90 percent done with a spectacular summer appetizer. (Or one very decadent supper.)

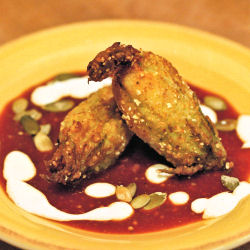
Crisp-Fried Squash Blossoms
adapted from Big Small Plates
2 ears fresh corn
1 tsp olive oil
1/2 cup grated Monterey Jack cheese
1/2 cup fresh ricotta
2 T minced cilantro leaves
—
1/4 cup cornstarch
1/4 cup cornmeal
1/4 cup all-purpose flour
1/2 tsp salt
1/4 tsp freshly ground black pepper
1/4 tsp cayenne pepper
—-
1/2 cup buttermilk
vegetable or canola oil, for frying
—
12 to 18 very fresh squash blossoms
1/4 cup toasted pumpkin seeds
1/4 cup sour cream, mixed with the juice and zest of 1/2 lime
1 cup tomatillo red-chile salsa (homemade or a good store-bought brand), warmed
Cut the kernels off the cobs. Heat the olive oil in a skillet over medium-high heat and saute the corn 2 to 3 minutes. Set aside and allow to cool, then combine with the Jack cheese, ricotta, cilantro.
Open each blossom as gently as possible, and remove the stamen. Stuff each blossom with a spoonful of the cheese-corn mixture; the amount will vary with the size of your blossoms, but don’t be afraid to stuff them well. The flowers seem delicate, but they’re surprisingly resilient. If you need more room to work, peel the flower apart at one of the ‘seams’ between the petals; you’ll be able to pinch everything back together (within reason) using the filling as glue. Leave enough room to twist each blossom shut.
Set the stuffed blossoms on a wax-paper-lined cookie sheet and place in the fridge to set. Meanwhile, combine the cornmeal, cornstarch, flour, and seasonings in a shallow bowl; put the buttermilk in another shallow bowl. Dredge each stuffed blossom, first in the buttermilk, then in the flour mixture, shaking off the excess at each step. Return them to the wax paper, then refrigerate again briefly.
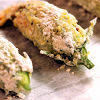
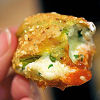
Set up a cooling rack topped with two layers of paper towels next to the frying area. Add oil to a shallow skillet to a depth at least half as high as the average stuffed blossom. (I used 2 cups in a 10-inch pan.) Heat oil to 375 degrees. Slowly lower the blossoms into the pan, four or so at a time to prevent crowding, turning each over as soon as the bottom side is golden brown. It will go rather fast, but if the coating turns dark brown immediately, back off on the heat a bit; you need enough time to melt the cheese. With a spider or slotted spoon, remove the crispy blossoms to the paper towels. Repeat until all blossoms are fried.
Spoon a bit of the warmed salsa on each plate, then top with 2 or 3 blossoms. Drizzle with the lime crema, and scatter toasted pumpkin seeds for garnish.
cookbooks, cooking, farmers markets, Mexican, other blogs, recipes
6 Comments »
Posted by Anita on 07.02.07 12:18 PM
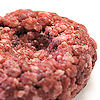
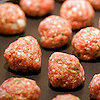
 Frankly, I don’t know how I ever survived without my KitchenAid mixer’s meat-grinder attachment. Sure, it’s great for the occasional sausage-making session, but its real appeal lies in its ability to turn a worthy chuck roast into the world’s juiciest, tastiest hamburger in nothing flat.
When we were living in the basement, I resorted to store-ground meat a few times, and got a taste of what I’d been missing: Even when we bought good Prather Ranch ground beef, the pre-processed meat morphed into chewy, dry-ish, and lackluster patties — a pale shadow of the glorious burgers made the same beef, freshly ground.
Fortunately, grinding your own burgers is so simple it’s easy enough for a weeknight: Cube your chuck roast, run it through the grinder’s coarse plate, season the ground meat, and measure out 5 to 6 ounces per patty. Ever-so-gently, pat each portion into a thick disk, then make an indentation in the center to keep the patties flat when cooked. Grill or broil to your desired doneness, and serve on a good, lightly toasted bun — we like the pain de mie buns from Acme.
Cleanup’s a snap, too: All the grinder parts go right in the dishwasher. Even taking into account setting up the mixer — which takes all of 2 minutes — the process isn’t drastically more troublesome than opening a cellophane-covered styrofoam pack.
And in this age of mad cows, it’s comforting to know that our hamburgers contain only the parts that I put through the grinder. But even if it weren’t a safer alternative, the taste of home-ground meat alone would win me over. And if you aren’t feeding a crowd, you can make more patties and freeze them for later, although I find they lose a bit of the charm in the freeze-thaw cycle — I usually turn my leftover ground chuck into meatballs.
Whatever you do with your home-ground beef, I promise you’ll taste the difference.

cooking, equipment, meat
17 Comments »
Posted by Anita on 05.31.07 2:04 PM
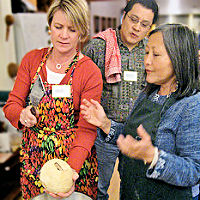 I teased you last week with a glimpse into my Tuesday-night classes with Thai cooking maven Kasma Loha-unchit. This most-recent set of classes was the fourth 4-week series I’ve attended; I started with the beginning series nearly 10 years ago, followed up with the intermediate course a few years later, and then — after travelling with Kasma through central and northern Thailand in January 2006 — picked up again with the advanced series last spring.
In the beginning series, you master popular curries, simple stir-fries, spicy soups and salads, and authentic (ketchup-free!) pad thai noodles. Even if you think you know a lot about Thai food, you’re sure to learn a lot: You’ll taste-test multiple brands of coconut milk, learn about the best places to buy ingredients, hear the lowdown on the top brands, and get plenty of practice balancing sweet, salty, sour, and hot flavors under Kasma’s watchful eye.
Intermediate classes move on to more labor-intensive preparations, and a larger assortment of ingredients. By the time you reach this level, you’ll have a thorough understanding of flavors and techniques — pounding curry pastes, balancing flavors, frying ingredients in coconut cream — that will put you in good stead for the advanced courses. A total of six advanced series walk students through regional specialties, intricate preparations, and adventurous foodstuffs. Many students work their way through the entire curriculum and then start again — it’s just that much fun to cook alongside other students who are experienced and passionate about Thai food.
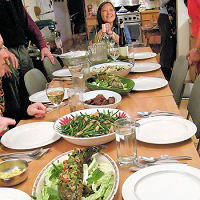 The real joy of learning to cook Thai with Kasma is that she makes Thai cooking accessible without dumbing it down. I hope you won’t think I’m immodest when I say that — even after just the basic courses — I could make Thai food better than what we find at local restaurants. The setup of Kasma’s classes allows for plenty of hands-on work, and lots of time to talk, taste, and learn. Each session starts with a snack while Kasma explains the four to six dishes of the day. Students team up for prep, then gather round as each dish is completed. When the cooking is done, you sit down with Kasma and her charming husband Michael to enjoy the feast you’ve prepared. I promise: You won’t leave hungry.
Kasma also sells specialized tools and hard-to-find items to her students. Years ago, when I first took the beginning series, her dining-room table was one of the few places to find Thai coffee filters and decent papaya graters. Her offerings have blossomed into a veritable general store of favorite brands and equipment, a useful one-stop-shop when stocking your Asian pantry. Students can also buy from a dwindling stock of Kasma’s award-winning (but out-of-print) cookbooks — Dancing Shrimp and It Rains Fishes — at their original retail price … a big savings over the $40-plus prices you’ll see on Amazon for used copies.
And speaking of bargains: You won’t find a better deal on cooking classes anywhere. Each four-class series costs $160 — just $40 per class, less than you’d probably spend for dinner at your favorite Thai restaurant. Kasma’s house is located close to Oakland’s MacArthur BART station (a quick bus ride or a leisurely half-hour stroll gets you the rest of the way there), making it easy for visitors and bridge-averse City-dwellers to attend. If you live outside the Bay Area, you’re not completely out of luck: Kasma offers week-long intensive sessions each summer for a stunning price: $550. You spend five full days covering territory similar to the beginning and intermediate series, or an assortment of advanced recipes in the later intensives.
Now that I have you salivating, let me disappoint you: You’ll have to be patient. All of Kasma’s classes, especially the beginning series, are perennially booked — and the mention she got in this month’s San Francisco Magazine (alongside Shuna Lydon and June Taylor, among others) will only make matters worse. To finagle a spot, join Kasma’s announcement-only Yahoo group, and be the first to hear about next spring’s offerings.


The Art of Thai Cooking
near Piedmont and Grand Avenues
Oakland, CA
510 655-8900
thaifoodandtravel.com
classes, cookbooks, cooking, East Bay, Thai
8 Comments »
Posted by Anita on 05.27.07 5:51 PM
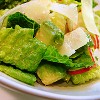
 Although it’s a mainstay of American restaurants — one might even say it’s a cliché in eateries of a certain sort — the original Caesar salad was created in Mexico. The classic combination of romaine lettuce, croutons, Parmesan cheese, and a garlic-laden, egg-emulsified dressing has remained popular since its invention in the 1920s, enduring more than its share of variations throughout the years.
Such are the indignities that this venerable ensalada has suffered that pretty much any creamy, romaine-based salad can be called a Caesar nowadays. On the other end of the spectrum, there are purists who hold that an anchovy-free Caesar isn’t a Caesar at all (although Caesar himself used Worcestershire sauce, no little fishies at all). Adding some bacon or grilled chicken makes a Caesar suitable for a light lunch or simple supper… and that’s just the beginning of all the ways you can tinker with this highly adaptable recipe.
No doubt that sort of flexibility was what Katie at Other People’s Food had in mind when she selected Caesar salad for this month’s ‘Hay, Hay It’s Donna Day’ celebration. She even mentions Caesar wraps and Caesar pizzas — Ay, Dios mÃo, what would Señor Cardini make of that?
I set to thinking about a way to honor the salad’s historical birthplace, without going too far over into caricature — no multicolored tortilla confetti or salsa-spiked dressing, please. I played around with the basic method, adding a few south-of-the-border notes: A little chile, some avocado cubes, and a few sliced radishes in place of the croutons’ crunch.
This recipe yields a fair bit of dressing — certainly more than we ever need for just the two of us. It keeps for at least a week in the fridge, and if you prep a whole head of romaine on the night you make the dressing, the remaining lettuce will keep as long, provided you treat it right.
Here’s a trick we picked up from Alton Brown: Cut (or better yet, tear) the romaine into bite-sized pieces. Rinse and briefly soak the lettuce pieces in cold water in a salad spinner, then lift up the basket and dump out the water. Replace the basket and spin the lettuce in the usual fashion. Put half of the spun lettuce in the salad bowl, and set aside. Roll out a length of paper towels on the countertop, and sprinkle the lettuce along its length, keeping a single layer as much as possible. When you’ve laid out all the lettuce, roll up the paper towels loosely, and slide the roll into a plastic produce bag. Put the bag gently into your crisper drawer, but do not close the bag.
It’s a pretty neat trick: The paper towel wicks moisture away from the lettuce, but keeps the bag relatively humid. I’m not saying the romaine will be as good as new a week later, but it sure beats the pants off of those overpriced, half-wilted “salad in a bag” thingies.
Señor Caesar
4 cloves of garlic, unpeeled
1/2 fresh jalapeno pepper
1/4 tsp. anchovy paste, or a few dashes Worcestershire sauce
1 egg yolk
3/4 cup mild olive oil
1/4 cup lemon juice
salt & pepper to taste
—
1/2 head romaine lettuce
6 to 8 radishes
2 oz Dry Jack (or other hard cheese, such as Parmesan)
1 small, ripe avocado
Roast the garlic and chile in a small, dry skillet, turning frequently until soft and blistered. Cool briefly, then peel the garlic, and roughly chop both the chile and garlic. (Split and seed the chile before chopping, if you prefer a milder heat.) Place the chopped garlic and chiles in the mini-bowl of a food processor with the anchovy paste (or Worcestershire), and process until smooth, adding as much of the oil as needed to form a paste. Add the lemon juice and the egg yolk to the paste, and process briefly to combine. Then slowly add the remaining oil, with the processor running, until combined. Be careful not to overprocess, or you’ll get mayonnaise. Taste, and season with salt and freshly-ground black pepper.
(Alternately, you can crush the solids with a mortar and pestle and then whisk with the remaining ingredients in a medium bowl, or use an immersion blender. Either way, be sure to follow the same steps; don’t just dump everything in together or you’ll end up with a broken mess.)
Tear or cut the romaine into bite-sized pieces; wash and dry. Slice the radishes into thin rounds, discarding the stem and end pieces. Shave the cheese with a vegetable peeler into wide, thin strips. Halve the avocado, and remove the pit. With the skin on, score the avocado flesh at 1/2-inch intervals in both directions, all the way down to the skin. With a soup spoon, scoop the avocado flesh from the skin; it should separate into neat cubes.
In a large serving bowl, toss the lettuce with a few tablespoons of dressing, until just coated. Toss in the radishes, half the avocado cubes, and half the cheese. Add more dressing if needed, but be careful not to overdress. Serve on chilled salad plates, garnished with the remaining avocado and cheese.


cooking, Mexican, other blogs, recipes
6 Comments »
Posted by Anita on 05.24.07 10:13 PM
 Sometimes, we just don’t post because we’re not eating anything interesting, and there’s just nothing to talk about. But I can assure you, that has NOT been the case these last couple of weeks. We’ve been eating our way around the bay, scheduled to the breaking point: Out of the last 11 evenings, we’ve had nine social engagements. No wonder I’m exhausted!
Our little foodie death march all started back on Tuesday the 15th, with my second of four sessions in Kasma Loha-unchit’s Thai cooking classes. I’ll post a complete wrap up at the end of the series, but suffice to say that if you’re looking to learn more about Thai cooking, look no further.
Then that Wednesday, we met up with DPaul and Sean to say farewell to our mutual friend Matt (who’s taking a sabbatical from San Francisco for a while) over a sangria-soaked supper at Piqueo’s, Bernal Heights’ new Peruvian cevicheria and small-plates joint. Although the impossibly long menu was nearly entirely different from our first visit a month or so ago, we enjoyed almost everything we’ve tried there so far.
Thursday of the same week found us stuck in traffic on the Bay Bridge approach, on our way to The Blue Door at Berkeley Rep. A car-snarl from hell — more than an hour from SoMa to the Bridge, thanks — meant we missed our Downtown reservations by more than an hour (we called!) and our consolation snack at North Beach Pizza was grim in every way possible. Truly, we were expecting mediocre but fast, and ended up with slow and barely edible.
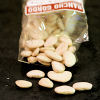
Saturday we hit the Ferry Building market in the morning, running into Tea at the Rancho Gordo stand. Farmer Steve’s sure the popular boy these days, with dozens of folks stopping by to congratulate him on his much-publicized (and bilingual!) defense against Carlo Petrini’s ill-mannered slagging of the FPFM’s farmers and customers alike. Everyone must’ve bought a bag or three of beans as they stopped by to say “Good on yeh!” to Mr. Sando — many varieties were already sold out by the time we strolled up.
That same afternoon, we hosted two sets of friends and their 2-year-olds for a summer supper of bacon-cheeseburgers, mac salad, and red cabbage slaw, with complete strawberry crisp for dessert. The junior guests had as much fun as their mommies and daddies: Little Toby rocked out on guitar with Cameron, and Miss Martha endeared herself to everyone with sweet hugs and adorable curiosity.
 Monday night, an impromptu get-together chez nous. Tea was in town for the week, so we invited her, plus DPaul and Sean (are they sick of us yet?) — and their sweetie-pie girl Reese — over for dinner. We snacked on pencil-thin asparagus dipped in homemade aioli while we tried out yet another recipe for grilled pizza. I’m still not convinced we’ve found a keeper in the pizza department, but the season’s first peach cobbler proved a hit all around. And when we saw Tea later in the week, she declared that the chopped salad we served with the pizza had earned a slot on the menu of foods she expects to find in heaven. (Flattery like that will get you invited back!)
Tuesday was Thai cooking class again, and Wednesday another dinner to-do: Cameron’s cousins and their 2-year-old (we’re toddler magnets!) were in town from Houston, on their way to Yosemite for the long weekend. Little Camden gobbled a Prather Ranch hot dog while the grownups feasted on tri-tip grilled up Santa Maria style (rubbed with an equal mixture of salt, pepper, and garlic powder moistened with oil), sliced thin and served with guacamole on Rancho Gordo tortillas, with a side of beans a la charra. And yes, another quickie dessert: Pear-rosemary crumble, and vanilla ice cream.
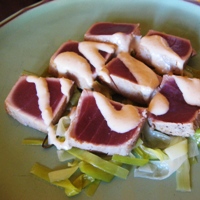 Tonight we met up with a gaggle of cool food bloggers from SF, the East Bay and beyond for dinner at Berkeley’s stalwart O Chame. We loved every appetizer we shared — especially the seared ahi cubes and their lovely horseradish drizzle, the grilled shiitake mushrooms with fresh asparagus, and the snackalicious green-onion pancake blocks. Our soba and udon bowls were so-so (flavorful broth, but overdone noodles) but scoops of balsamic vinegar caramel ice cream were hauntingly good… and rapidly gone.
A short stroll down 4th Street led us to Cody’s Books, where we listened to the charming Clotilde speak about her progression from software developer to food blogger to published cookbook author. She gave us all a chuckle when she spoke of the oddness of being a Frenchwoman writing an English-language food blog — to the consternation of some of her compatriots, she confessed — and her passion for ‘dangerous’ recipes like souffles and gougeres, where a cook never knows whether she’s destined for dinner or disaster. (Clotilde’s signing books Saturday afternoon in San Francisco, in case you’d like to meet her and get a copy of her lovely new book.)
Tomorrow? Ugh. I’m more than a little bit sick of cooking, and yet I don’t think I could bear the pressure of going out somewhere new, or even someplace fancy. So… we have reservations at Range, our delightful standby, where they know us just well enough that we can all relax, but not so well that we have to be social. I’m liking that idea a lot. I wouldn’t have missed a single night of the last 2 weeks, but I am sure glad that it’s done.
I’m half hoping that the bounty of the farmers market on Saturday snaps me out of my apathy, but I won’t be surprised (or even too sad) to find that I’ve burned out on planning, prepping, and putting food on the table… at least for a while. We’ve got a freezer full of incredible leftovers from the last six weeks of new-kitchen cooking frenzy, so it’s not like we’ll go hungry.
As we slow down a bit, I’m aiming to do a better job posting here on a more-regular basis. I’ve got a backlog — five posts’ worth and counting — of recipes, photos and stories that should last through a week of diminished cooking capacity. In the meantime, I’ll tide you over with a recipe for an simple (but apparently impressive) salad that’s quick enough for everyday, but with a just enough company-class touches for a weeknight dinner party on the fly. You can vary the vinegar, the cheese, the herbs, and even the olives to complement your main course.
Heavenly Chopped Salad
(adapted from Food & Wine, September 2006)
2 T mild vinegar (such as cider, champagne or sherry)
1 tsp. fresh lemon juice
1 small shallot, chopped fine
1/4 cup extra-virgin olive oil
Salt and freshly ground pepper
—–
2 cups chopped lettuce or baby greens
4-5 small Belgian endive (preferably red) halved, cored and coarsely chopped
1 English or Japanese cucumber, peeled and cut into 1/2-inch dice
1 pint grape tomatoes, halved
2T to 1/4 cup coarsely chopped chives (or other herbs, as you prefer)
3/4 cup pitted kalamata olives, halved (or other olives)
1/2 pound feta (or bleu) cheese, crumbled
Whisk the vinegar, lemon juice, and shallot in a medium bowl. Whisk in the oil until emulsified, and season the dressing with salt and pepper.
Combine the remaining ingredients together in a large bowl. Add half of the dressing, season to taste with salt and pepper, and toss. Add the remaining dressing (or less, to taste) toss again, and serve.
serves 6
Bernal, cookbooks, cooking, East Bay, entertaining, other blogs, restaurants, Thai
3 Comments »
Posted by Anita on 05.07.07 5:41 PM
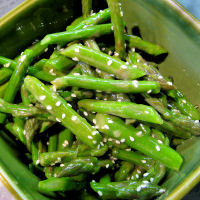 I’m slightly obsessed with my tattered copy of Big Bowl Noodles and Rice by Asian food guru Bruce Cost. It’s my first choice when I need a comforting stir-fry or noodle dish, especially when I’m in the mood for Eastern flavors without a lot of fuss. But last week, while staring down a bunch of asparagus and looking for a suitable stir-fry side-dish, I came across one recipe that, shockingly, I’d never tried.
Like so many Big Bowl recipes, this salad manages to achieve a completely authentic flavor without any oddball ingredients. (Don’t get me wrong: I love the bottom shelf of my pantry, stocked with goodies from Uwajimaya and 99 Ranch, but sometimes even adventurous cooks don’t want another sticky bottle of imported exotica.) The simple dressing allows the natural beauty of perfectly fresh asparagus — one of my true springtime delights — to shine through, complementing and highlighting the fresh crispness without muddying flavors with overwhelming ingredients.
Asparagus Salad with Sesame Seeds
1 T sesame seeds
1 bunch (approximately 1 pound) fresh asparagus
2 tsp. rice-wine vinegar
3/4 tsp. red-wine vinegar
3/4 tsp. soy sauce or fish sauce
3/4 tsp. sugar
3/4 tsp. Dijon mustard
1 T fine peanut oil
2 tsp. sesame oil
In a small skillet, toast the sesame seeds until golden, shaking the pan so they don’t burn.
 Remove any woody ends of the asparagus, cut the stalks into 2-inch lengths. Parboil them in 6 cups of heavily salted water for 2 to 3 minutes, depending on their thickness. Drain and run under cold water to stop cooking. Dry thoroughly. (Once perfectly dry, the asparagus may be chilled, overnight, in a loosely covered container. If you leave any moisture, it will make the spears mushy.)
Mix together the vinegars, soy or fish sauce, sugar, and mustard. Whisk in the oils, as you would for a vinaigrette. Toss the dressing with the asparagus, and sprinkle with the toasted sesame seeds.
cookbooks, cooking, other blogs, recipes
3 Comments »
