Posted by Anita on 05.07.10 6:55 AM
This post is the first of 12 installments in the Dinner on a Deadline series, a project designed to help you get thoughtful meals on the table quickly without resorting to processed convenience foods. Each week features homework to help you put the lessons into action, plus a sample recipe to show how we use the week’s tips in real life.
2010 AEC *All Rights Reserved*")
Chances are, if you’re reading this blog, you like to cook. But there’s some evil alchemy that happens on a weeknight, after a long day of work; even avid cooks lose their mojo when dinner starts to feel like drudgery. Although I’m not a planner by nature (really, I swear — stop snickering!), I’ve developed a routine that helps me fend off kitchen ennui. By mapping out our weeknight meals in advance, and making sure I have everything I need to keep things moving, I feel less harried and enjoy cooking more.
In the same way that it’s always easier to cook when you’ve done your mise en place first, it’s always easier to tackle menu planning when you’ve done a little legwork in advance. During the week, make a file of recipes that catch your eye as you’re reading magazines, blogs, and cookbooks. Then, figure out a way to get yourself at least a half an hour when you won’t be interrupted, so you can focus on your task. Clear off your desk or the table, then sit down with your calendar and your cookbooks, magazine clippings, and bookmarks. At our house, I work on menu planning on Fridays, the night before our favorite farmers market. To free up my time, Cameron fixes a garden salad and his choice of pasta — using pantry staples and homemade sauces from the freezer — while I plan dinners for the coming week.
To make menu planning less daunting, I have a few stock meals slotted into in the schedule. In addition to our regular Friday pasta night, on Tuesdays — when Cameron has band rehearsal — we usually reheat something from the freezer, like sloppy joes, chili, or a hearty soup. Plugging those standbys into my schedule, I have 2/7 of the week taken care of, right off the bat. Next, I block off any nights where we won’t need to cook: Wednesdays are rough days for us, so we often treat ourselves by going out for dinner or grabbing takeout sushi on the way home. We also frequently have some sort of outing during the week — theater tickets, dinner parties, and the like — so I note those, too. Saturdays we typically have plenty of time to spend in the kitchen, so I schedule the most time-consuming meal there, along with any kitchen projects like making big batches of chicken stock, pasta sauces, and other freezer staples. By this point, the week’s filling up nicely, and it’s just a matter of shuffling a mix of old favorites, new ideas, and seasonal inspirations from my clipping file into the remaining days.
It also helps to know what foods are in season in your area, both to minimize shopping hassles, and to keep your budget under control. Many farmers markets feature seasonality calendars on their sites (and yes, there’s an app for that). If you’re worried that your plan includes items that won’t be available, hedge your bets and know what your fallback recipe requires. If I’m planning, say, a fennel salad during a time when I don’t know whether there will be fennel at the market, I’ll make a note on the list of an alternative ingredient (like frisée) that I’m positive I can find.
If this seems like too much work, you can just head to the farmers market or grocery store and buy what looks good, but you’ll want to make sure to browse with a plan in mind. A lot of my friends do this, shopping with a list of categories like “vegetables for 2 dinners, fruit for 4 lunches” rather than an entire menu plan, then deciding when they get home how it all goes together. (I will confess that whenever I shop this way, I inevitably end up missing some key ingredient; I think my friends are better organized than I am!) If you’re not already adept at building meals from the pantry and cooking without recipes, though, you could find yourself with too much of one sort of thing, like tempting-but-perishable vegetables, and not enough of something critical, like meats or starches.

Speaking of surpluses: Meal planning can help prevent food waste and the motivation-sapping guilt that goes with it. I start my planning with a quick fridge inventory. With a list of what’s in the crisper, I can plan the next week’s meals to use up stragglers before they turn to compost.
As funny as it sounds, one of my menu planning secrets is to leave room for a little spontaneity. I always keep at least one night open, allowing us to accept impromptu dinner invitations, indulge a craving, or polish off leftovers.
Just as every cook has a different style, your planning will be different than mine. There’s a universe of software, sites, even iPhone apps designed to help you plan meals; the good ones will create a shopping list automatically as you add recipes to the menu. I find that a little too complicated for my taste; my system involves nothing more than a word-processing document in GoogleDocs with a shopping list down one side and menus down the other. I keep it online so both of us can reference it from anywhere — home, work, the grocery store — in case we need to add to it or shop from it. It doesn’t really matter what system you use, but it needs to work for you.
Have I scared you off yet? If the thought of planning for the whole week seems overwhelming, start with just a couple of planned meals and see how it goes. I think if you plan at least a few meals every week, you’ll begin to see how much easier it is to get dinner on the table without a lot of drama. The more you plan, the less likely you are to push the panic button and find yourself dialing for pizza.
This week’s homework
Novice planners: Plan out at least 2 meals for the coming week. Make a shopping list for your planned meals. Print out the recipes you’ll be using (or flag them in books) so you can find them easily when you hit the kitchen. If the meal you’re planning takes more than 30 minutes of prep, see if you can figure out a way to break it into manageable chunks by prepping parts of the recipe in advance the night before or the morning of.
Extra for experts: If you’re already planning meals ahead of time, this one’s for you: Make at least one full meal this week from what you already have on hand in your fridge, freezer, or pantry, without shopping for anything new. Bonus points for dessert.
2010 AEC *All Rights Reserved*")
2010 AEC *All Rights Reserved*")

2010 AEC *All Rights Reserved*")
2010 AEC *All Rights Reserved*")
This week’s recipe
When my friend Jen and I went to dinner recently at Range, I ordered an appetizer that epitomized spring comfort foods for me. I’m a sucker for anything with an egg on top; the buttery leeks were indulgent, and the Parmesan broth was silky and rich. Looking at the various components, I had a hunch that I could re-create this combination at home.
As I started planning this meal, I was excited to realize I could make it entirely from things I already had on hand, although you certainly could buy them from any good grocery store. (Quinoa, by the way, can often be found in the bulk bins; feel free to substitute brown rice, lentils, or any other small, quick-cooking grain or legume.) With a little reheating and a quick bit of actual cooking, our dinner — a credible duplicate of a dish served at a Michelin-starred restaurant — was on the table in less than 20 minutes.
In the coming weeks, I’ll talk more about stocking your larder so that you can improvise, too. In the meantime, you should be able to make all the components from start to finish in less than an hour, even quicker if you’ve got a helper. If you’d rather do some of the prep work in advance — a topic we’ll discuss in more depth later in the series — I’ve noted how far out you can make that happen. Add a simple salad and a glass of wine, and you’ve got a meal that you’d be proud to serve to anyone.
Melted Leeks and Quinoa with a Poached Farm Egg and Parmesan Broth
– inspired by a first course at Range
For each serving — multiply as needed:
1/3 cup melted leeks
1/2 cup cooked quinoa
1/2 cup simmering chicken stock
a handful of Parmesan cheese, grated as finely as possible (about 1/2oz by weight)
1 extra-large egg
minced chives, for garnish
salt, as needed
Up to a week in advance:
– Make the melted leeks
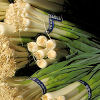
- Slice the leeks in half lengthwise, then slice the white and light-green parts into half-rings about 1/4- to 1/8-inch thick. Rinse leek slices well in a bowl of running water. Melt butter in heavy skillet over medium-low heat. Add leeks and a couple of tablespoons of water. Simmer slowly until leeks are tender and almost all water evaporates, adding more water if needed to further soften the leeks. Season well with salt. If using immediately, remove pan from the heat and set aside. Otherwise, cool to room temperature and store for up to a week in the fridge. (2 cups sliced raw leeks + 4T butter makes about 2/3 cup cooked, enough for 2 servings.)
Up to 24 hours in advance:
- Thaw the stock in the fridge, if frozen.
- Grate the Parmesan cheese with your finest grater, and refrigerate. (We use a Microplane zester so the cheese melts almost instantly when it hits the broth.)
When you’re ready for dinner:
- Cook the quinoa. (1.5x water to 1x quinoa, slow-simmered about 20 minutes or until all water evaporates. 1/2 cup quinoa + 3/4 cup water makes 1-1/4 cups cooked, a little more than enough for 2 servings.)Â
- Warm the leeks in a skillet with just a splash of added water.
- Mince the chives.
- Bring the chicken broth to a lively simmer and whisk in the Parmesan.
- Just before you’re ready to serve, soft-poach the eggs.
- While the eggs are cooking, divide the melted leeks among individual bowls, spreading to cover about 2/3 of the bottom of the bowl. Scoop the quinoa over the leeks, and top each serving with a soft-poached egg. Sprinkle with chives, and pour the Parmesan broth around the edges of the bowl.
Plan-ahead ideas that made this meal easier:
– Having chives in the windowbox
– Stocking interesting stuff in our larder (quinoa, Parmesan, farm eggs, homemade stock)
– Breaking prep tasks across multiple days (pre-cooking leeks, pre-grating cheese, etc.)
Melted Leeks and Quinoa with a Poached Farm Egg and Parmesan Broth
– inspired by a first course at Range
For each serving — multiply as needed:
1/3 cup melted leeks
1/2 cup cooked quinoa
1/2 cup simmering chicken stock
a handful of Parmesan, grated as finely as possible (about 1/2oz by weight)
1 extra-large egg
minced chives, for garnish
salt, as needed
Up to a week in advance:
- Make the melted leeks
Slice the leeks in half lengthwise, then slice the white and light-green parts into half-rings about 1/4- to 1/8-inch thick. Rinse leek slices well in a bowl of running water. [LM: you can also rinse the leeks after slicing in half lengthwise and before slicing. It’s easier to do than rinsing the slices if you leave them connected at the top. Then you can just shake off before slicing] [AC: I agree with JenH; I’ve tried it both ways. Plus, the extra water isn’t an issue here.] Melt butter in heavy skillet over medium-low heat. Add leeks and a couple of tablespoons of water. Simmer slowly until leeks are tender and almost all water evaporates, adding more water if needed to further soften the leeks. Season well with salt. If using immediately, remove pan from the heat and set aside. Otherwise, cool to room temperature and store for up to a week in the fridge. (2 cups sliced raw leeks + 4T butter makes about 2/3 cup cooked, enough for 2 servings.)
Up to 24 hours in advance:
- Thaw the stock in the fridge, if frozen.
- Grate the Parmesan cheese with your finest grater, and refrigerate. (We use a Microplane, so it melts almost instantly.) [ST: Do you really? Does it not affect the texture and flavor too much to grate it that far in advance?] [AC: I don’t grate the whole wedge, but if I’m using it within the day I don’t notice a difference.]
When you’re ready for dinner:
- Cook the quinoa. (1.5x water to 1x quinoa, slow-simmered about 20 minutes or until all water evaporates. 1/2 cup quinoa + 3/4 cup water makes 1-1/4 cups cooked, a little more than enough for 2 servings.) [ST: This is something I might put in the make-ahead category. If I’m making any kind of grain, I make more than I need, and use it over a few meals. Quinoa holds up well.][AC: I actually find premade quinoa to be gluier than I like, but I’d love it if you could add your experience in the comments once the post goes up.]
- Warm the leeks in a skillet with just a splash of added water.
- Mince the chives.
- Bring the chicken broth to a lively simmer and whisk in the Parmesan.
- Just before you’re ready to serve, soft-poach the eggs.
- While the eggs are cooking, divide the melted leeks among individual bowls, spreading to cover about 2/3 of the bottom of the bowl. Scoop the quinoa over the leeks, and top each serving with a soft-poached egg. Sprinkle with chives, and pour the Parmesan broth around the edges of the bowl.
Plan-ahead ideas that made this meal easier:
– Having chives in the windowbox
– Stocking interesting stuff in our larder (quinoa, Parmesan cheese, farm eggs, homemade stock)
– Breaking prep tasks across multiple days (pre-cooking the melted leeks, pre-grating the cheese, etc.)
cooking, Dinner on a Deadline, meatless, recipes
29 Comments »


Posted by Anita on 11.22.09 11:31 AM
2009 AEC - All Rights Reserved") Possibly the only thing I love more than food is travel. I just don’t feel right unless there’s at least one trip on the horizon, preferably two. We’ve been lucky enough lately to spend three of the last four weekends on the road — on a spontaneous trip to Los Angeles, then back down to Long Beach for Matt’s photography class, and then up to Sea Ranch to celebrate Sean’s 40th birthday.
Possibly the only thing I love more than food is travel. I just don’t feel right unless there’s at least one trip on the horizon, preferably two. We’ve been lucky enough lately to spend three of the last four weekends on the road — on a spontaneous trip to Los Angeles, then back down to Long Beach for Matt’s photography class, and then up to Sea Ranch to celebrate Sean’s 40th birthday.
But all this gallivanting around — especially over the weekends, when our biggest and best farmers markets are held — makes it rough to eat local. We’re lucky enough to have a shop or two in San Francisco that really pays attention to the issues of local eating, but when summer comes to an end, even their 100-mile offerings can make it hard to shop on a whim.
Our chicken-and-egg CSA keeps us stocked with a relatively painless source of fallback protein, and we’re pretty good at freezing, canning, and otherwise putting up food for just these sorts of circumstances. In a regular post-travel week, we’d probably have pasta bolognese one night, chili or sloppy joes for another dinner, and maybe chicken soup for a third. But this week marks the start of the 3rd Annual Dark Days Eat Local Challenge, so I wanted to have a photo- and post-worthy recipe to share.
We’re still pulling carrots and a small handful of beans out of our garden, so our first side-dish was a simple combination of quick-braised vegetables. And since we’ve got local sources for rice, not being able to get to the farmers market for local potatoes or other starches was no hardship. I knew we had some chicken in the freezer from our last CSA delivery, so I just had to find a new way to prepare it. (After four years of blogging and three years in this particular challenge, I’ve pretty much used up my stash of tried-and-true recipes!)
Because we’ve been up to our ears in tomatoes from the garden, I wanted to avoid most of the Italian-style recipes that would take us back in a tomato-y direction. And since it’s finally feeling like autumn around here, I craved a recipe with a heartier presence, one that would give us a good dose of internal warmth for the cool evening. This traditional Alsatian dish fit the bill quite nicely: Simple enough to whip together on a weeknight from easily-sourced local ingredients, but pretty and delicious enough to share with you. A simple snack of baguette, cheese, and radishes from our garden kept us happy while the chicken braised, and dinner was on the table in just about an hour.
2009 AEC ** All rights reserved **")
2009 AEC ** All Rights Reserved **")
2009 AEC ** All Rights Reserved **")
2009 AEC **All Rights Reserved**")
2009 AEC ** All Rights Reserved **")
Poulet au Riesling
– adapted from Jean-Georges Vongerichten in Food & Wine
5T unsalted butter, at room temperature
a 3-1/2-pound chicken, quartered
1 large shallot, minced
2T brandy
1 cup dry Riesling or other spicy/fruity dry wine
6 ounces white or brown mushrooms, sliced 1/4 inch thick
1T flour
1/3 cup cream
Rinse and dry the chicken parts, and season with salt and pepper. Melt 2T of the butter in a large skillet; add the chicken and cook over medium heat until lightly browned, turning to brown all sides.
Add the shallot to the pan and saute for 1 minute. Add the brandy — flambé it for added flavor, if you like — then add the wine. Cover and simmer over medium-low heat until the chicken breasts are just cooked through. Transfer the breasts to a plate and cover. Continue to simmer the legs about 10 minutes longer, then remove them to the same plate with the breasts.
While the chicken simmers, melt 2T of the butter in a second skillet. Add the mushrooms and cook over low heat until the liquid evaporates. Season with salt and pepper, then increase the heat to medium and saute until browned.
Make beurre manié with the remaining butter and the flour. Stir the cream into the skillet with the chicken, and bring to a simmer. Gradually whisk the beurre manié into the cooking liquid and simmer while whisking, at least 3 minutes. Add the mushrooms and adjust seasoning to taste. Return the chicken to the skillet and briefly reheat. Serve with rice or noodles.
Farmers and food artisans who created the ingredients for this week’s meal:
Soul Food Farm, Vacaville: chicken
Dirty Girl Produce, Santa Cruz: shallot
Spring Hill Cheese Company, Petaluma: butter
Korbel, Geyserville: brandy
Handley Cellars, Philo: Gewürztraminer
Far West Fungi, Moss Landing: cremini mushrooms
Guisto’s Vita-Grain, South San Francisco: flour
Clover Organic, Petaluma: cream
Massa Organics, Hamilton City: rice
Semifreddi’s, Alameda: sweet baguette
Andante Dairy, Petaluma: Picolo triple-cream cheese
…and our own homegrown radishes, carrots, and beans
Dark Days challenge, locavore, meat, recipes
4 Comments »
Posted by Anita on 03.11.09 11:49 AM
 Two weekends ago, I nearly lost a toe.
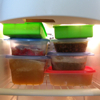
I’d been rooting around in the upstairs freezer (yes, we have two — doesn’t everyone?), looking for some mysterious recipe ingredient, when the Jenga pile that is the meat shelf gave way. Luckily, I jumped back just in time to avoid an avalanche of frozen bricks, but it was a near thing.
With no time to spare, I shoved everything back in as neatly as I could, and added “re-organize the freezer” to my to-do list. It took me a while to get there, but one cold and cloudy morning, I tackled this long-overdue task. I took everything out of both freezers, inventoried the contents, and put it all back in the least-precarious and most-logical way possible. Admiring my newly tidy spaces, I felt so virtuous.
But as I surveyed the inventory list, that virtuous feeling vanished. How in the world had we managed to squirrel away enough food to fill two standard freezers? Just the list of our frozen fodder filled an entire letter-size page!
Happily, this is one embarrassing problem we can literally eat our way out of.
 I sat down and quickly mapped out 14 meals we could easily make by combining two or more components of the freezer. (Beef plus chorizo plus buns equals Sloppy Joes. Beans plus pork plus sausage equals Cassoulet.) And that wasn’t even counting the dozen or so ready-to-eat meals — like beef stew, coq au vin, and chili — that we’d set aside. I quickly realized we could go for weeks, eating very well without buying anything but fresh vegetables.
So, just in time for Lent — which we don’t celebrate, but definitely respect — I floated a new house rule: No new meat until we eat down our glut. Which, if we’re diligent, I predict will happen right about Easter Sunday. Cameron happily agreed, with one exception: Bacon. There will be bacon. Because it’s just not the weekend without everyone’s favorite cured meat.
So far, I have to say that our experiment’s been a wild success. We’re clearing out the freezers — I can see shelves! — while we save time and money, which are never abundant, but seem to be in even shorter supply this month. The oldest thing we’ve eaten so far? A bag of Rick Bayless’s ancho beef chili dated 6/07, which tasted surprisingly fine.
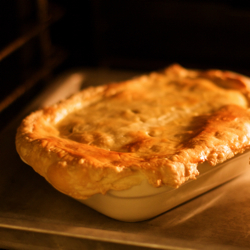
One of the winningest put-togethers so far is a new variation on an old favorite: chicken pot-pie. With a bag of pie-crust scraps begging to be used, we decided to take a break from our usual biscuit-topped recipe. I’m glad we did, because the rich, warm flavor of the sherry and the savory pop of mushrooms in this version make it a worthy variation.


Chicken Pot Pie
— adapted from Kitchen Sense
3-1/2 cups cubed cooked chicken (a generous pound by weight)
1/2 cup (1 stick) unsalted butter
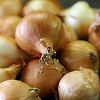
1 medium onion, chopped
1 medium carrot, sliced
1 celery stalk, chopped
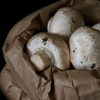
6oz small mushrooms, quartered
1 tsp thyme leaves (stripped from the stem)
1/3 cup peas (not in season yet, so we omitted)
freshly ground black pepper
1/2 cup sherry or dry white wine
5T all-purpose flour
2 cups poultry stock
1 bay leaf
1T chopped flat-leaf parsley
1/2 recipe of your favorite pie crust (enough to cover a 9-inch pie pan)
1 small egg, beaten with 1 T cold water
Preheat the oven to 425°F.
Melt 3T of the butter in a large skillet over medium heat. Saute the onion until soft, the add the carrot and celery and continue cooking for another 3 to 5 minutes, until soft. Add the mushrooms and thyme and cook until the mushrooms give up their liquid. Add the peas, 1 tsp of salt, and pepper to taste; stir and cook for a couple of minutes. Deglaze the pan with half of the sherry; remove the cooked vegetables and their juices to a bowl and set aside.
Melt the remaining butter in the skillet, then whisk in the flour to make a roux. Cook for 3 to 5 minutes until the paste takes on a blonde color, Whisk in the stock and the remaining sherry, then add the bay leaf, thyme, 1 tsp salt, and pepper to taste. Simmer until thickened.
Add the cooked chicken and sauteed vegetables to the sauce. Transfer the mixture to a 1-1/2 quart baking dish (such as a deep-dish pie pan) and set aside in a warm spot near the oven.
Roll out the pie dough about 1 inch larger than the diameter of the baking dish and about 1/4-inch thick. Place the dough atop the pie filling, and press the overlap to the outside of the dish. Place the filled and covered pie on top of a rimmed baking sheet. Brush with the beaten egg, then make a few slits to allow steam to escape.
Bake for 20 minutes at 425°F until the crust has risen and begun to take on color. Reduce the heat to 350°F and bake for another 15 to 20 minutes, until the crust is a deep golden brown. Remove from the oven and serve.
Dark Days challenge, locavore, recipes
16 Comments »
Posted by Anita on 12.14.08 10:39 AM
 Between finishing up our Christmas shopping, getting our prize basket ready for Menu for Hope V, dealing with a rather scary veterinary emergency, and nailing down a few last details for our upcoming vacation, things have been a little chaotic around here. This morning as I sat down to write, I looked up in panic and realized that I had only photographed a single meal this week.
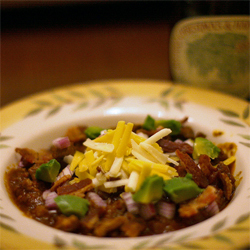
Luckily, it was our favorite chili, which — even though we eat it pretty much all the time — I’ve never blogged about. We love it because, unlike other chili recipes that we’ve been known to make, this one’s highly adaptable. Like our bolognese sauce and sloppy joes, it’s another one of the recipes that we make in giant batches and freeze for weeknight dinners. If we’re using it to make chilidogs — which we often do — we’ll leave the beans out and simmer it down until it’s all meaty and thick. If we’re eating it on its own, we’ll add some Rancho Gordo beans, and thin it down a little with a few cubes of frozen chicken stock.
We almost always garnish it with cheese, sour cream, and chopped onions, but if you happen to be lucky enough to have a strip of crispy bacon or a late-season avocado lurking in your fridge, either one makes a tasty and pretty addition. But this chili’s equally delicious when served all on its own, preferably with a pan of homemade cornbread and sweet butter. (We just discovered that Giustos, the local outfit that makes the all-purpose flour we buy, also sells locally milled cornmeal and polenta, which increases our Dark Days meal options significantly.)
Adaptable Chili
– loosely inspired by ‘Venison Chile with Red Beans’
from Staff Meals at Chanterelle
3 pounds stew meat, cut into 1/2-in inch cubes
(or substitute coarse-ground beef)
1 medium onion, diced
2 large cloves garlic, minces
1 tsp ground ancho chile
1 tsp ground pasilla chile
1 tsp Rancho Gordo ground red chile
1 tsp ground cumin
1 tsp ground cinnamon
1 tsp cayenne pepper
1/2 tsp black pepper
1/2 tsp dried thyme
1/2 tsp dried oregano
1/2 tsp cocoa powder
2 bay leaves
4 cups chicken stock or unsalted broth
1/2 cup tomato puree
2 cups cooked heirloom beans, drained (see note)
shredded cheese, sour cream, chopped onion, bacon, and/or diced avocado, for garnish
Pour vegetable oil to a depth of 1/8 inch into a large heavy Dutch oven set over medium-high heat. When the oil just begins to smoke, add only enough meat to cover the bottom of the pan without crowding. Brown well on all sides, turning with tongs. As the pieces brown, transfer to a bowl and continue with more meat in batches.
When meat is all browned, reduce heat to medium-low. Drain the accumulated oil from the bowl back into the pan; add the onion and garlic, and sweat until transluscent. Return the browned meat to the pan, then add the chile powders and spices. Stir well to coat the mat, then add the stock, tomato, and salt to taste. Bring to a boil, then reduce heat to low and simmer, uncovered, until the meat is tender — 2 to 2-1/2 hours — stirring occasionally. Stir in the beans, if using, and cook until heated through, about 5 minutes. Taste and adjust seasonings.
Note: If freezing for later use, the chili takes up less space without the beans, which you can always add the night you plan to serve it.
Dark Days challenge, locavore, recipes
8 Comments »
Posted by Anita on 10.19.08 1:05 PM
 It’s more than a little embarrassing to admit that we’re on Day 19 of this year’s month-long Eat Local Challenge, and I haven’t even gotten our initial post up yet. Here’s the short version: We’re following the same guidelines we used for last winter’s Dark Days Eat Local Challenge, attempting to stick to them for every meal for the entire month of October. Of course, we do this pretty much all the time nowadays, with a few notable exceptions: Specialty ingredients for Thai and Chinese food, and the occasional non-locavore restaurant meal. But this month, we’re going for 100%, or as close to it as possible.
Suffice to say that life has gotten interesting over here — mostly in good ways — and that blogging was lower down on the totem pole than many other end-of-summer activities. We’ve enjoyed three weeks full of fun, including visits from good friends and trip to one of our favorite food cities in the world. We also spent a magical afternoon under the dappled sun at a picnic in the Santa Cruz Mountains, where the guest of honor was a whole roast pig accompanied by a beautiful buffet of side dishes, wines, and desserts (which were all way too good to call ‘potluck’).
During the week, we’ve been working like a pair of crazy people, but that doesn’t mean we haven’t been eating an amazing assortment of locally sourced meals. I won’t bore you with all the details, but I’m feeling incredibly blessed that we have locavore-friendly Range, Nopa, SPQR, and Beretta within easy shouting distance of home. And, of course, a freezer full of pasta sauce, sloppy joes, and other planned leftovers keep us fed when we’re too busy to cook.
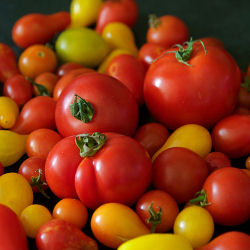
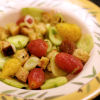
 You might be surprised to hear that, amid all this culinary chaos, there’s one dish I’ve loved so much that I’ve made it not just once but three times. When I first spotted this gazpacho salad in a magazine that I’d brought along in my carry-on luggage, I couldn’t wait to get home and try it. Luckily, even though the season for larger heirloom varieties is winding down here, it’s still pretty easy to find cherry tomatoes at the market. I soon discovered that although blanching and peeling a whole pint of cherry tomatoes may sound too fussy for everyday meals, it’s actually a surprisingly quick process that’s well worth the effort.
I’ve made a few changes to the original recipe — I’ve gone more savory than sweet in the tomato brine. Unable to source local sea beans (which I’ve since discovered at Far West Funghi in the Ferry Building), I substituted the tiniest haricots verts I could find. The next time, I left the beans out entirely, and it was equally delicious.
For my first attempt, I used a combination of baby tomatoes, including Sweet 100s, tiny Yellow Pears, and Sungolds. But plain-old cherry tomatoes — as the original recipe specifies — are a better choice. They’re far easier to peel, they all blanch at the same rate, and you don’t end up with yellow varieties muddied by the pulp from their red and orange pals. And, the larger size of the cherry tomatoes gives you a better chance to enjoy the salty, spicy burst of flavor you get with each one.


Gazpacho Salad
— adapted from Andy Nusser’s recipe, Food & Wine
– Brined tomatoes
1 pint cherry tomatoes
1 cup water
1 T sugar
1 T kosher salt
1 T red pepper flakes
1 (2 1/2-inch) cinnamon stick [Note: We use the softer, mellower Mexican canela]
– Salad
3 1/2-inch piece of baguette, cut into 1/2-inch dice (about 1 1/2 cups)
2 T plus 2 tsp extra-virgin olive oil
Salt and pepper
1/4 pound sea beans, or tiny haricots verts (optional)
1 cucumber, seeded (if necessary) and sliced 1/8-inch thick
2 scallions, thinly sliced
1 T sherry vinegar
To brine the tomatoes, bring a saucepan full of salted water to a boil. Prepare an ice-water bath and set near the stove.
Trim and blanch the beans or sea beans until just tender, and remove them with tongs or a strainer to the ice water bath. Remove and set aside on a towel to dry.
Blanch the tomatoes until the skins just begin to burst (15 to 30 seconds), and quickly remove them to the water bath to chill. Discard the blanching water.
In the same saucepan, simmer 1 cup of water, sugar, salt, red pepper, and cinnamon until the salt and sugar dissolves.
Drain and peel the tomatoes, and place them in a heat-proof bowl or Pyrex measuring cup. Strain the brine over the tomatoes. Brine the tomatoes until cool, about 40 minutes.
Meanwhile, preheat the oven to 350°. Cut the baguette into 1/2-inch cubes, and toss with 2 tsp of olive oil. Season with salt and pepper, and bake for 5-10 minutes, until lightly toasted.
In a medium bowl, toss the tomatoes, croutons, beans or sea beans, cucumber, scallions, vinegar and the remaining 2 T of olive oil. Season to taste, and serve.
Eat Local Challenge, locavore, recipes
10 Comments »
Posted by Anita on 06.30.08 8:23 AM
 One day last week, the temperature hit a high of 87° — the kind of heat-wave that sends San Franciscans screaming from our un-air-conditioned homes straight to the nearest mall or cinema. Just two days later, the overnight low was 49°; close the windows, crank up the furnace.
Combine the wacky weather with the unsettling haze from dozens of wildfires, and you’ve got a recipe for doldrums. We cooked at home 4 nights last week, but it felt like work every time. The meal we’d planned as our One Local Summer supper — glazed lamb spareribs — turned out odd and ugly, completely unworthy of photographs, much less a post.
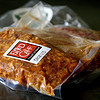
Luckily, we had an ace in the hole planned for mid-week. Our meat CSA has given us a surplus of ground beef. Throw it in a skillet with a hunk of Fatted Calf chorizo, a couple of the season’s first peppers from Happy Quail, a jar of homemade tomato sauce, and some local onions and garlic: Voilá, instant Sloppy Joes. Paired with a side of bacon-lashed coleslaw, we had ourselves a perfectly fabulous — and 100%-local — quick summer meal. Not glamorous, but definitely delicious.


San Francisco Sloppy Joes
1 pound Mexican-style chorizo
1 pound lean ground beef
1 onion, diced
3 cloves garlic, minced
2 whole Anaheim chiles, fresh or canned (or other mild green chiles)
2 cups tomato sauce
1 T ground red chile, or more to taste
salt and pepper
hamburger buns
shredded cheddar cheese and diced raw onion for garnish, if desired
 If using fresh chiles, roast over an open flame or under the broiler, turning to cook all sides until black and blistered. Place charred chiles in a paper bag and roll the top tightly to steam; set aside. If using canned chiles, drain and rinse two large whole chiles and set aside.
Saute the chorizo in a large skillet over medium heat until browned. Remove the meat from the pan to a large bowl with a slotted spoon, leaving the rendered fat in the skillet. Saute the beef in the chorizo fat, breaking up large chunks. When mostly cooked, add the onion and garlic and cook a minute or two until translucent. Return the beef to the pan, and add the tomato sauce and red chile. Reduce heat to medium-low and simmer.
If using fresh chiles, peel the charred skins off the steamed chiles; do not rinse. Cut the chiles (canned or roasted) into 1/2-inch pieces, and stir into the simmering meat mixture. Cook, stirring occasionally, until sauce is reduced to a spoonable thickness.
Serve over toasted hamburger buns, garnished with shredded cheese and/or raw onions.
cooking, locavore, meat, One Local Summer
17 Comments »
Posted by Cameron on 08.06.06 7:01 PM
 Hash is one of those dishes for which there is both one recipe and a million recipes. Most folks will nod along for the first couple of ingredients (cooked meat and cooked potatoes) and the method (cut up together and fried in oil). But after that, you’re on your own and buddy, you can call that pile in the pan whatever you want but it ain’t hash back where I come from.
The keen-eyed will notice that first picture is actually not hash. It’s summer succotash, graced with a skewer full of Prather Ranch pork. The hash of which I am about to speak came from the leftover pork and potatoes that accompanied the succotash.
When I’m making hash, I start with roughly equal amounts of onion, meat, and potato, all diced medium. Corned beef is my favorite, but any leftover meat will do. Onion goes in pan with salt and fat, which could be a butter and olive oil combo or bacon fat, depending on my mood. Saute until translucent and a bit soft, but don’t brown ’em (a little on the edges is okay) or they’ll burn later. I don’t bother with herbs if I have corned beef, but a little thyme here is good with plain pork. Black pepper also works.
Add the potato and meat, stir it up and get it warm, then add enough heavy cream to bring it all together. Don’t go overboard. You’re making hash, not sloppy joes. Taste and add more salt if necessary. Press the hash into a single layer and cook until the bottom is brown and crisp: 10 or 15 minutes depending on the stove, the pan, and the ingredients. Here’s where you’re going to get in trouble if you really browned your onions. In any event, go easy on the flame and watch carefully, because there are few things sadder in the morning than burned hash.
 At this point, most recipes will breezily say something like, “Flip the hash over and brown the other side.” But I’m not like them and I’m not going to lie to you. You can try the flip thing and if you manage it then you’re a better man than I am. I usually just scrape it all up, give it a mix, and then pat it flat again. Cook until crispy, and serve with eggs, poached if you’re feeling orthodox.
breakfast, cooking, meat
7 Comments »

