Posted by Anita on 08.31.07 7:02 AM
 Unless you’re a certified cocktail obsessive, you’ve probably never even heard of the gin-based cocktail known as the Blue Moon. Originally, the drink was close kin to the better-known Aviation: a heavy dose of gin with a splash of lemon, tinted a pale blue with Creme Yvette, a long-lost violet liqueur lashed with vanilla and other spices. The family resemblance doesn’t stop there: Cocktail historians tell us that the original Aviation contained both Creme Yvette and Maraschino liqueurs, and its name’s a nod to its original wild-blue-yonder tint.
After the Yvette disappeared, bartenders substituted other less-complex brands of creme de violette to create this once-popular violet cocktail. But soon, even the substitute became nearly impossible to find. Cocktail geeks would rummage through French liquor stores during their vacations, looking for hard-to-find bottles of a version made by Benoit Serres. Those with an unlimited cocktail budget might order a bottle of Suntory’s Hermes Violet from one of the eBay sellers based in Japan. But, without going to extraordinary lengths, it simply wasn’t possible to make anything close to a proper Blue Moon; the drink all but disappeared, and its cousin the Aviation lost its sky-blue hue.
All that changed last month when Haus Alpenz — best known as the importers of the cult-fave Zirbenz stone-pine liqueur — rolled out its 2007 line. In addition to another formerly-defunct ingredient, Batavia Arrack, Alpenz also brought out the first violet liqueur available in the US in recent memory: Rothman & Winter Crème de Violette.
Tasting all three violettes — the Hermes, the Rothman, and the Serres — recently with friends, we found the three brands to be about as different as violet-scented liqueurs could be. Colors ran the gamut from indigo through to deep purple. Sampled on their own, the Serres tasted driest, while the Hermes combined tooth-rattling sweetness with a shocking floral intensity. The Rothman struck a pleasant balance: Violet-hued without being garish, floral without perfumey notes.
Once mixed with other liquors in a cocktail, the brand differences mostly fade away, although the sweetness of the Hermes in particular (and the Rothman, to an extent) means you’ll need a steady hand to achieve the desired blue tint without oversweetening your cocktail. I’m still partial to the Serres, myself, but — especially when factoring in price and availability — the Rothman makes a more-than-acceptable alternative.
But back to the Blue Moon: Recipes vary, but they all start with gin and violette; some stop right there, but most add lemon juice. A few recipes replace the lemon with dry vermouth and a dash of orange bitters for a Martini-esque concoction. Still others add an egg white… although that tweak really does make it a different drink, which used to be known as a Blue Devil. (Confusingly, that name’s been co-opted in modern times by a mixture of gin, lemon, Maraschino, and blue curacao.) All these overlapping ingredients are making my head spin. I think I need a drink…


Blue Moon
2 oz dry gin
3/4 oz lemon juice
1/2 oz creme de violette (quantity varies by brand)
Shake ingredients with ice; strain into a chilled cocktail glass. For an Old Blue Devil, add a tablespoon of egg white before shaking.
Drink of the Week, drinks, recipes
24 Comments »


Posted by Anita on 08.26.07 11:19 PM
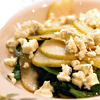
 Although I am a major fan of authentic comida mexicana, I’ll readily admit to an equal fondness for old-fashioned gringo-style ‘Mexican’ food, a love I come by honestly courtesy of my Southern California roots. So when our favorite Marin-dwellers invited us up for more pear-pickin’ fun — this time under the guise of a 1960s-theme potluck — I had a treasure trove of retro recipes to choose from already in my files.
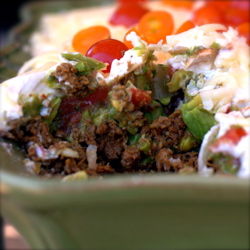
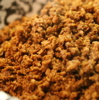
Most recipes for Seven-Layer Dip feature a storebought fiesta of canned beans, taco mix, shredded cheese, and pre-made guacamole in a tub. But this party’s guest list included some of the area‘s best loved and most popular food bloggers — there’s no way I’d serve them anything from a can.
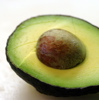
Taking things a little bit over the top (shocker!), I wondered if I could make the entire recipe using local ingredients. By ditching the usual topping of canned black olives in favor of multi-colored baby tomatoes, it was a slam dunk: Rancho Gordo red nightfall beans, homemade chorizo — made at our SausageFest from Prather Ranch pork shoulder — plus Will’s excellent avocados, Dirty Girl tomatoes, and local dairy products… even the chips were made in Napa.
Locavore -and- retro? Hell yeah.


Seven-Layer Dip, food-blogger style
1/2 pound ripe tomatoes, diced
1/2 to 1 jalapeno or serrano chile, minced
1/2 white onion, diced
1/4 cup chopped cilantro
salt, to taste
1 pound Mexican-style chorizo
1/2 onion, chopped
1 pound Rancho Gordo beans, cooked in the approved fashion
1 tsp Mexican oregano
1/2 pound cheddar cheese, shredded
1/2 pound Jack cheese, shredded
3 large Haas avocados
1/2 jalapeno or serrano chile
1/2 onion, minced
2 small tomatoes, diced
pinch of ground cumin, or to taste
1 large container sour cream
1/2 pint Sweet 100 tomatoes, halved
2 bags good tortilla chips
Mix up the tomatoes, jalapeno, onion, cilantro, and salt in a medium bowl, and set aside to allow the flavors to combine.
Saute the chorizo in a large skillet until cooked, breaking up any chunks as you go. When fully browned but still juicy, remove the sausage to a bowl or plate with a slotted spoon, leaving the fat in the skillet.
In the same skillet, saute the onions in the chorizo fat until browned and soft. Add the beans and some of their cooking liquid, smashing with a potato masher until mostly smooth; add additional bean liquid or warm water to get to a smooth consistency. Add the Mexican oregano, and stir to combine. Spread the beans in the bottom of a 13×9 casserole; top with the browned sausage, then half of the shredded cheese; set aside.
Halve the avocados and remove the pits. Score each avocado half at 1/2- to 3/4-inch intervals, cutting down to — but not through — the skin. Scoop out the avocado chunks with a soup spoon and place them in a large bowl. Add the pepper, onion, tomatoes, and cumin, mixing just until combined; you want plenty of texture. Carefully smooth the guacamole over the cheese-topped chorizo, then top with the salsa, the sour cream, the remaining shredded cheese, and the Sweet 100 tomatoes. Serve with tortilla chips for dipping.
Note: If you’re serving the dip immediately, it’s more attractive to use the guacamole as the last layer before the tomatoes; this isn’t very practical when you’re taking the dish (chilled, please!) to a party in another county, unless your friends like brown avocado.
—–
Top photo ©Sam Breach / Becks & Posh; used with permission
entertaining, locavore, other blogs, recipes
17 Comments »
Posted by Anita on 08.24.07 7:02 AM
 Passing time waiting for a table at Range, I noticed some of my favorite bottles clustered together along the bar: Chartreuse, St-Germain, and No. 209 gin.
“Are those all for the same drink?” I asked Brooke, the bartender.
“Yes they are — our nightly special.”
“Sold,” I said, closing the menu unread.
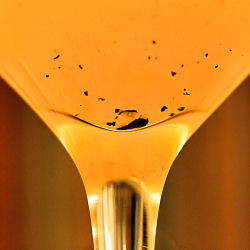
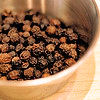
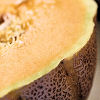
She set to muddling black peppercorns in a mixing glass along with some cantaloupe chunks. Ugh, I thought to myself, that looks nasty. No fan of the muskmelon, the mere idea of a cantaloupe cocktail made me gag.
And then she added the St-Germain and the Chartreuse to the muddled mixture, and I realized that was my drink in her hands. Oh god…
But really, I should have known better than to fret. The crew at Range, while adventurous, rarely steer me wrong. This drink was no exception. Somehow it all worked — the Chartreuse brings out the melon’s herbal overtones, and the St-Germain accentuates its floral notes. A splash of lemon juice keeps things in balance, and a good long shake opens it all up. The black pepper’s heat isn’t immediately apparent; it works like an internal garnish that becomes more obvious as the drink warms, a great counterpoint to the increasing sweetness as the chill fades.
Range christens its creation the Can-Can, a clever nod to the cantaloupe base, the two French liqueurs, and the pepper’s kick. We’ll just overlook the fact that there are at least two other cocktails with the same name — a surprising oversight from the upstanding mixological minds behind Range’s bar.


Can-Can a la Range
3/4 tsp black peppercorns
1/2 cup cubes of ripe cantaloupe (4-5 chunks)
2 oz dry gin (Range alternates between Plymouth and No. 209)
1 tsp Chartreuse
1/2 oz St-Germain elderflower liqueur
juice of 1/2 lemon
In a heavy-bottomed pint glass, muddle the peppercorns with half the melon until cracked. Add the rest of the cantaloupe cubes and continue to muddle until juicy and soft. Add the remaining ingredients, then shake well and strain into a well-chilled cocktail glass.
Drink of the Week, drinks, recipes, restaurants
12 Comments »
Posted by Anita on 08.23.07 12:10 PM
 All the cool kids are taking blog-sabbaticals this summer. Oh, how I wish that were the reason why we’ve been so blissfully post-free. Truth is, we’ve got plenty of inspiration, and we’re cooking up a storm. We’ve had a week of meals lined up, shopped for, and planned to a fare-thee-well. But – sadly, right in the heart of the best-eating time of the year – we’re more than a little off our game.
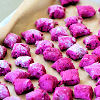
First there were the gnocchi.
As any sane cook will tell you, gnocchi are fraught with peril, even in the best of circumstances. Attempting to devise gnocchi that are somehow simultaneously delicious, gorgeous, and interesting enough to write about adds a serious degree of difficulty. While I am sure there will be plenty of entries in this month’s exciting episode of Hay Hay, It’s Donna Day, my Day-Glo fuschia beet-ricotta gnocchi will not be among them. Fussy, dumpy, and not terribly tasty… it’s not too strong to call this an outright failure.
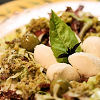
Then there was the antipasto salad. I think it’s safe to say that Nancy Silverton is decidedly not targeting my demographic with her latest book, A Twist of the Wrist. It’s a cool, heartfelt attempt at legitimizing the semi-homemade trend, streamlining weeknight dinners with the judicious application of store-bought gourmet goods. Like tapenade.
Oh, the tapenade.
Trust me, kids, it was all I could do to fight the urge to just buy some good olives and slap them in the Cuisinart with a splash of olive oil and a spoonful of capers – completely eliminating the book’s time-saving charm. So I didn’t; I bought a nice-looking bottle of chunky green-olive paste and added it to my pile of lettuce, salami, and herbs.
You know where this is going, eh?
Salty, metallic and otherwise irredeemably bad, the store-bought ‘tapenade’ overpowered all of the other ingredients – and I’d only used half what the recipe called for. I don’t think we actually tossed it all down the drain, but it was a near thing; there was a lot of picking good salami and cheese out of the hyper-salinated salad.
Returning to familiar territory, we pulled out a tried-and-true recipe for Thai shrimp-cakes from Dancing Shrimp. Our makrut lime tree is finally bearing fruit, and these savory morsels seemed the perfect way to showcase our harvest for Andrea’s “Grow Your Own†roundup. As I pulled all of the ingredients out of the fridge, I caught a whiff of the ‘fresh’ shrimp we’d bought at Whole Foods: It had spoiled overnight. (That will teach me to sleep in and skip the market. This would not happen at Shogun.)
Feeling defeated, we cannibalized a meal we’d planned to eat later in the week: Rib-eye steak and rosemary salt-roasted potatoes. It was fine, I guess, although we both picked through the definitely-not-Prather-quality meat and the too-sweet supermarket spuds.
Last night, in need of a sure thing, we hoofed it all the way down the peninsula to our favorite Mexican restaurant. We’ve eaten there for more than 10 years now, always bragging that we’d only ever had one bad meal there. Well, now we can say we’ve had two: Unmelted cheese, blown-out rice, tortillas heated to the point of hand-scorching rubberiness, and a squeaky-dry chicken tostada. At least the margaritas were good.
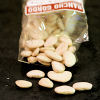
With the exception of a lovely dinner at Oliveto on Monday, I can honestly say that there were exactly two meals over the last week that I truly enjoyed: a fluffy Denver omelette I made from piperade leftovers, and a bowl of Rancho Gordo’s giant lima beans simmered with onions that had been sautéed in bacon drippings.
Amid an overwhelming collection of intricate disasters and well-planned flops, these simple, graceful plates stand out as a steady reminder: Sometimes even the best-laid plans are no match for kitchen kismet, and sometimes less is more.

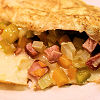
Denver Omelette
3 large eggs
1 T half-and-half, or cream
2 T butter
1/2 cup diced onion
1/2 cup diced bell pepper
1/2 cup small ham cubes
1/4 to 1/2 cup shredded cheddar cheese
In an 8-inch skillet, melt the butter over medium heat. Saute the onions until they just begin to soften. Add the pepper, and saute until vegetables are well softened but not browned. Add the ham cubes and saute until heated through. Remove sauteed ingredients to a plate and keep warm. Return the skillet to the fire.
In a medium bowl, scramble the eggs and the half-and-half until well blended and a little frothy. Add the beaten eggs to the hot pan, and let sit for 15 seconds; stir gently with a wooden spatula, pulling the curds toward the center of the pan and encouraging liquid to fill in the gaps. When a little liquid remains, use the spatula to gently even out the thickness of the curds in the pan, and reduce the heat to low. Spread the cheese all over the soft-set eggs, then evenly top one side of the omelette with the filling. Cover the pan and let sit for a few minutes until cheese melts. (If the underside of the egg browns too much, turn off the heat entirely; the pan will be hot enough if you leave the lid on. Unlike a French omelet, you do want some color and crispness, but you don’t want leathery eggs.)
When cheese is melted, fold the unfilled side of the omelette over the filling. Slide onto a warmed plate, glazing the top with a bit more butter, if desired.
Serves 2 with salad as a light supper, or a very satisfying breakfast for one hungry soul.
breakfast, cookbooks, cooking, other blogs, recipes
8 Comments »
Posted by Anita on 08.17.07 7:03 AM
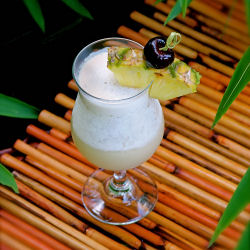 The piña colada enjoyed its 15 minutes of fame in 1979, long before the idea of cocktails really entered my brain. The reason: A pop song by one-hit-wonder Rupert Holmes called “Escape”… better known as “The Piña Colada Song“.
Unfortunately, just like the song, most piña coladas are saccharine-sweet and filled with all kinds of nasty things you’d rather not think about. The list of ingredients on your average can of coconut creme — hydrogenated soybean oil? polysorbate 80? — is almost as gag-inducing as the idea of a married couple cruising the personals and accidentally answering one another’s ads.
But, in the name of retro authenticity, we went ahead and tried it the usual way, with Coco Lopez and store-bought pineapple juice. We got one sip into our drinks before deciding that all we could taste was chemicals and cans, and dumping them down the drain.
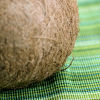
We bought a coconut and briefly toyed with the idea of making our own cream. But, realistically, if we’re not willing to go to such lengths to make a curry, why the hell would we do it for a cocktail? Thinking along these lines, we cracked a can of Thai coconut milk and skimmed off the cream, adding a little simple syrup for sweetness. Good idea, terrible outcome: The homemade version was unpalatably greasy, even after a spin in the blender. We gave up the idea and moved on to other drinks.
But when one of our favorite cocktail blogs decided to host a tiki cocktail contest, our thoughts returned to the unfinished experiment: the piña colada that we knew just had to be possible. We hunted high and low for chemical-free recipes, but every last one seemed to be in thrall to Señor Lopez and his additive-addled faux de coco.
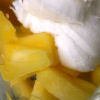
During a stop at Trader Joe’s last weekend, we stumbled on the perfect antidote right there in the freezer: An all-natural coconut sorbet. After a little research, we discovered that a handful of brands offer similar products, most with few adulterating ingredients beyond coconut and water and sugar. We tinkered with Gary Reagan‘s blended piña colada recipe to adjust for the natural products’ sweetness or lack thereof. Different sorbets (not to mention different pineapples) will require your own good judgment, so think of the measurements below as a blueprint more than a hard-and-fast recipe.
Whatever your final mix, though, please promise me you’ll steer clear of the personals.


Piña Colada au naturel
— makes two
1/2 pint coconut sorbet
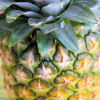
1/2 cup pineapple chunks (fresh or frozen)
1 cup crushed ice
2 oz pineapple juice (preferably fresh or from frozen concentrate)
4 oz dark rum
pineapple (wedge, chunk, or spear), for garnish
maraschino cherries, for garnish
In a blender, combine all the ingredients except the rum, and blend until ice is well blended. Add the rum and pulse until well combined. Pour into two chilled hurricane glasses, and garnish with the pineapple wedge and cherry; paper parasols or plastic monkeys are, of course, optional but highly desired.
Drink of the Week, drinks, other blogs, recipes
11 Comments »
Posted by Anita on 08.15.07 12:31 PM
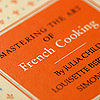
 Julie Powell notwithstanding, most cooks discovering Julia Child’s recipes for the first time seem mysteriously drawn to the most labor-intensive and luxurious among them. Apparently, this isn’t strictly a modern phenomenon: In his entertaining book The United States of Arugula, David Kamp recounts this very same thing happening when Child’s first book debuted, poking gentle fun at those who “deliberately chose the most difficult [recipes] to execute when company was coming.”
Among these over-the-top creations, Kamp makes much of the overwrought dish known as Veau Prince Orloff, “a display piece consumptive of enough time and money to garner status.” I looked up the offending recipe in my own copy of Mastering the Art of French Cooking, and felt a little queasy: The damned thing goes on for three full pages and contains — I kid you not — no less than a dozen sub-recipes.
Luckily for those of us who don’t have days to spend in the kitchen, Julia’s chef d’oeuvre also offers up simple recipes in spades. Scattered among the aspics and the suprêmes and the canard a l’orange lies a wide assortment of bistro classics and a fair number of recipes that rise no higher than the cuisine de bonne femme of everyday French households. Kamp recounts Julia herself choosing the simple potage Parmentier as the book’s first recipe “so that her audience would not be intimdated.”
When I pull out my Grandpa‘s battered copy of Mastering, these are the sorts of recipes I crave: The Provençale garlic soup, the mushroom quiche, the steak au poivre. So when Lisa at Champaign Taste proposed her second-annual blog party to honor the 95th anniversary of Julia’s birth, I knew right away the sort of dish I’d share. Sure, it’s not going to win any beauty contests, but it’s a delicious and satisfying plate full of seasonal flavors with a subtle French flair.
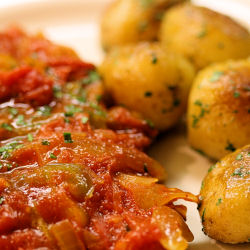
Julia recommends serving this humble “Ham Slices Baked with Tomatoes, Onions and Peppers” alongside her sauteed potatoes — and really, folks, how can you pass that up that kind of good advice? While I prepped the piperade, Cameron peeled a pound of baby spuds and trimmed them to roughly the same size, browned them in butter and oil, then covered them to steam until tender. Along with a bottle of French rosé, they were the perfect foil for the tangy, salty richness of the ham. We raised our glasses to the warbly voiced girl from Pasadena, and counted ourselves truly lucky to have lived in her era.
Jambon en Pipérade
– adapted from Mastering the Art of French Cooking
Cook’s note: Julia simply calls for “peeled, seeded, juiced and sliced” tomatoes; I’ve complicated matters a bit by explaining how you get there. If you dispense with peeling your own tomatoes and opt for good quality whole canned tomatoes — like Muir Glen — you’ll need 2-1/2 cups of tomato pulp plus about 3/4 cup of their juice. Go this route and this simple dish can be on the table in less than 45 minutes.
2 pounds cooked ham, sliced 1/2-inch thick
1 to 2 T bacon fat or olive oil
1 cup sliced yellow onions
1 cup sliced green bell peppers
2 pounds firm, ripe, red tomatoes
2 cloves garlic, mashed
1/8 tsp pepper
pinch of cayenne pepper
1/4 tsp fresh thyme
2 T minced parsley
Preheat the oven to 350°. Meanwhile, bring a saucepan of water to a boil.
While the water heats, prepare an ice-water bath in a large bowl. Peel the tomatoes by scoring an ‘x’ in the bottom of each, then dropping into the boiling water. When the skin begins to peel away from the ‘x’, remove from the pan with a slotted spoon, and drop each tomato in the ice-water bath. When cool enough to handle, remove the tomato and peel off the skin. Proceed with the remaining tomatoes until all are peeled.
Cut each tomato in half, and remove any hard core or stem section. Squeeze the juice and seeds out of the fruit, reserving on the edges of the cutting board (or in a bowl if they become overwhelming). Slice the squeezed tomato flesh into regular pieces. Set aside the tomato flesh and the tomato seeds/juice separately.
Trim any excess fat off the ham, and dry each slice on paper towels. Heat the fat in your largest skillet until it is almost smoking; then brown the ham for a minute or two on each side. Remove ham from skillet and place in a shallow baking dish large enough to hold the ham in one layer. (A slight overlap is fine.)
Lower the heat and stir the onion slices into the fat. Cook over medium-low heat for 5 minutes. Stir in the peppers and cook 5 minutes more, or until the vegetables are soft but not browned.
Place the tomato pulp over the onions and pepper, and continue to cook over medium-low heat. While this is happening, scoop the tomato seeds and juice, along with any seed jelly, into a strainer, and add the strained liquid to the skillet.
Push the solids to one side of the pan, and tilt the skillet to allow the liquids to gather on the now-empty half of the pan. Arrange the skillet off-center on the burner so that the juice side of the pan is directly over the flame, and the vegetables are further away. Simmer until the juices become minimal, stirring everything together and re-dividing every few minutes, to make sure that the juices reduce without overcooking the vegetables.
When the tomato juice has almost evaporated, stir it back into the vegetables and cover the browned ham slices with the mixture. Cover the baking pan with foil, and place in the preheated oven. Cook for 20 to 30 minutes, until the ham is heated through and tender. Baste with juices in the dish, then correct seasoning if necessary. Garnish with chopped parsley, and serve with sauteed potatoes.
cookbooks, holidays & occasions, meat, recipes
7 Comments »
Posted by Cameron on 08.14.07 9:58 PM
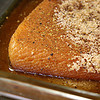
 Sometimes, my palate is a live illustration of the law of unintended consequences. The combination of our sausage-making party and the constant talk about preserving food that comes with summer rattled around in my subconscious for weeks.
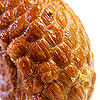
Then, on a Saturday morning as we did our shopping, we passed by Shogun Fish at the market. They were advertising the first local wild salmon of the season and a relay closed somewhere in my head. Suddenly, I wanted gravlax, and I wanted to make it myself.
On the hunt for a recipe, I turned to Tom Douglas’ Seattle Kitchen. Tom is my first stop when I need wisdom about salmon, and his advice mostly lined up with other recipes and random commentary that I found around the InterWebs. I guess. The big differences were the addition of ground juniper berries (possibly traditional) and the absence of dill (definitely untraditional), and the presence of some other spices.
Fennel? Cayenne? Okay, whatever.
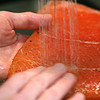
In theory, I knew that the process wasn’t difficult: just a simple salt/sugar cure. But I had no idea how dead-freakin’-easy it would be. Just pack the dry cure over and around the fish, weight the whole pile down with cans or what-have you, refrigerate, wait a few days and POW! Instant gravlax. Seriously, the hardest thing about this whole project was picking the juniper berry flecks out of the finished product. Obsess much? No! Yesssss. (Who said that?)
I love this stuff. I eat it for breakfast — with soft scrambled eggs, yum — for lunch, for a snack, whenever. For my next batch I’m going to try vacuum-sealing and freezing some to see how it holds up.
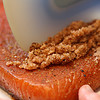

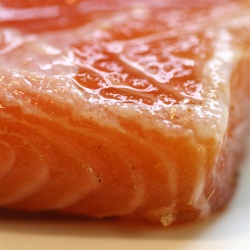
Gravlax
1-1/4 pound salmon fillet, preferably skin on, pin bones removed
Cure
2/3 cup kosher salt
2/3 cup granulated sugar
1/4 cup firmly packed brown sugar
1 1/2 teaspoons paprika
1 teaspoon ground juniper berries
1 teaspoon fennel seeds, ground
1/4 teaspoon cayenne
Combine the cure ingredients in a small bowl. Sprinkle the bottom of a non-reactive baking pan with about 1/2 inch of the cure and place the fish in the pan, skin side down. Blanket the fish with the remaining cure, creating a layer about 1-1/2 inches thick.
Cover the salmon with a piece of wax paper and top with another smaller pan, then weight the top pan down with a few cans. Store in the refrigerator for two to three days until the salmon is quite firm to the touch; the exact amount of time will depend on how thick your piece of salmon is. Remove the wax paper and the cans, and then use a rubber spatula to scape the cure from the salmon. Remove the salmon from the pan and briefly rinse it, then pat it dry with paper towels. To serve, slice the gravlax very thinly on the bias.
Cook’s note: I was not shy at all about rinsing the gravlax under cold running water until the cure was gone, daddy gone.
breakfast, meat, preserving & infusing, recipes
5 Comments »
Posted by Anita on 08.10.07 7:08 AM
 Last year, I put myself on a book diet. Watching my ever-expanding kitchen library take over the countertops, I knew the time had come for serious change. I still allowed myself to purchase cookbooks, but only after thoroughly vetting them first. Usually, this involved borrowing the book from a friend, or from the public library.
Even though it’s been difficult to curb the urge to acquire every buzz-worthy title on the market, the system that I fondly call “the new cruelty” has saved me from buying more than a few turkeys. The number of additions to our library has been small, but every one of them gets used regularly.
My real problem, though, was bar books. I’m the abashed owner of what any normal foodie would consider to be an unseemly quantity of cocktailian tomes. Given the vast amounts of spiritous inspiration lurking around every corner of the Internet, my hoard has proven truly unnecessary. In the strictest sense, most mixology manuals aren’t even all that inspirational — they often lack photos, and they’re typically burdened either by purple prose or too-clinical content. Enough, I said, was enough.
So while everyone else swooned over The Art of the Bar during its debut, I smugly folded my arms and turned my head. I have plenty of drinks books, I told myself. Besides, I’m not even that fond of Absinthe (the authors’ place of employment, that is, not the aperitif).
But one afternoon with some time to kill between mid-day appointments, I found myself in front of a local bookstore. I popped inside and headed down to the cookbook department. Grabbing a few titles and heading to the nearest bench, I was sucked into to The Art of the Bar by beautiful full-page photos, artfully styled but still obviously real. The copy was engaging, and the recipes — I grudgingly admitted — were interesting without being too “out there”. In short, it was the cocktail book I could justify buying.
But still I stood my ground for months, even after discovering that the San Francisco Public Library — quite scandalously — does not own a copy of this widely acclaimed title (all the more amusing because you could almost hit Absinthe with a muddler thrown from the roof of the Main Library). After finally scrounging a copy through interlibrary loan, it didn’t take more than a few test drinks to know that my moratorium would crumble.
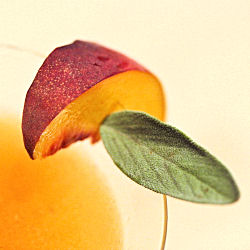
Living with one of the world’s most unrepentant punsters, it’s not surprising that one of the first recipes I flagged was a little number called Peaches & Herb. Stone fruits had just burst into season as my very own copy arrived on our doorstep, and the new sage plant was thriving — truly, my path was clear.
We’ve been mixing up a batch of these beauties almost every week for the last month, trying little variations here and there. You’ll be pleased to know that orange bitters, or even Angostura, can take the place of the requested peach bitters (although the original is undeniably better).
This month’s edition of Mixology Monday asks us to think orange — and the lovely P&H qualifies twice, both by virtue of its sunny color and one of its key ingredients. Even if you’re colorblind you’ll definitely want yellow peaches here; their white siblings clash with sage’s herbal intensity. And although brandy makes for some mighty smooth sipping, I’d be remiss if I didn’t recommend bourbon as a tremendously interesting variation.


Peaches & Herb
– from The Art of the Bar, by Jeff Hollinger & Rob Schwartz
3 to 4 slices of peach, plus 1 slice for garnish
3 to 4 fresh sage leaves, plus 1 leaf for garnish
splash of simple syrup
1-1/2 oz brandy (or bourbon)
1/2 oz Cointreau orange liqueur
2-3 dashes peach bitters
1/4 oz lemon juice
 In a mixing glass (or cocktail shaker), muddle the peach and the sage with the syrup (if needed, depending on the sweetness of the peach), to make a pulp. Top with ice; add the brandy, Cointreau, bitters, and lemon juice. Shake your groove thing until cold, and strain into a chilled cocktail glass; garnish with remaining peach slice and sage leaf.
cookbooks, Drink of the Week, drinks, Mixology Monday, recipes
10 Comments »
Posted by Anita on 08.08.07 4:25 PM
 It’s good to have friends among the landed gentry. In the warm suburbs beyond the fog-wrapped City limits, we’re on friendly terms with plenty of folks who find themselves rolling in a bumper harvest of astonishing variety, looking for creative ways to eat everything before it goes off. Meanwhile, we slickers sit on our decks and wonder if the tomatoes are ever going to ripen, if the basil will survive another week, if the mint might yield enough leaves to make a couple of cocktails before the summer ends.
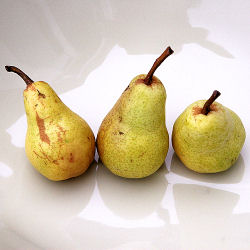
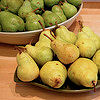
One of my favorite new friends calls herself a “tomato-ranchin’ bum.” Really, she’s more like a pear-wrangler these days, burdened under so much fruit that she’s resorted to using her harvest as dog toys and paperweights. The poor dear. Of course, we’re green and yellow with envy: Cookie gets more fruit off her newly inherited pear tree in one day than we coaxed from our plum during in its entire (and entirely too short) season.
Knowing that we’re suckers for home-grown fruit, Cookie loaded us up with a jar of eye-rollingly delicious homemade pear butter and an entire grocery bag full of her surplus pears. Not that I am complaining, mind you… not in the least. When we got home, we separated the as-yet-unripe specimens into their own bowl, to help preserve our bounty as long as possible. The ripest of the already-yellow bunch got scrubbed, split, cored, and cubed, then plunked into brandy. By the end of the second night, I could tell we’ll have a winning tipple on our hands in short order. (It’s not going to put Belle de Brillet out of business, but it definitely qualifies as Majestique de Marin already.)
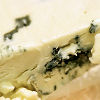
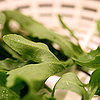
Meanwhile, we’re stuffing ourselves with a warm-weather riff on the salad we ate all last winter: Slivered pears — ripe but still crisp — tossed with spicy arugula (also from CookieCrumb Acres), some flavorful olive oil, and a touch of mild vinegar. Crumble a little Point Reyes Blue on top, ’cause we love it even if the cool kids don’t. Crack a little pepper over the top, and there you have it: A perfect summer salad for those nights when you just can’t bear another caprese.
Anyone else out there with surplus gourmet edibles? Call me — let’s talk.

cooking, other blogs
7 Comments »
Posted by Cameron on 08.06.07 10:28 PM
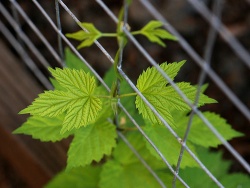 Okay, honest, I never intended for this garden tour to become a summer-long thing. I started in June, figured that I’d post a few times and be done by early July. Now here it is August already. Where do the days go?
For those of you just joining us, this is the third installment of a tour of our backyard, which we reclaimed from ugly ignominy just over a year ago. In our last episode, we braved the Northside Fruit Preserve and the Eastern Wall. What adventures lie ahead?
On the south side of the yard, we see the fence that separates the garden from the dog run. Until mid-June, it was blanketed in passion fruit vines that seemed like a good idea when we planted them. However, “fast-growing and aggressive” does not begin to describe these guys. After only a single year, two plants completely covered a 25-foot fence and needed to be trimmed practically every day. After being grimly and colorfully assured that we hadn’t seen anything yet, we decided to eliminate the vines before they ate one of the dogs.
However, we’re not sure that we haven’t forsaken the frying pan for the fire. In the place of the passion fruit, we installed four Golden hop vines purchased from the farmer’s market. We’ve always wanted to grow hops, but have never had the motivation, garden space, season, and rhizomes come together at the same time. Planted in late June, the hops have already enthusiastically twined through the fence and are waving feelers around above the rail line. But for some reason, I feel more kindly toward these particular fast-growing, aggressive vines than I did the passion fruit.
Theoretically we could use the hop flowers to make beer, but it’s more likely that we’ll take the advice a passerby at the market gave us as we were buying the plants. Apparently, hop-shoot risotto is a done thing in some parts of Italy (and elsewhere?). If you have any recipes, please share!
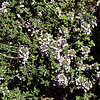
In front of the south fence, we have line of herbs (two thyme plants, one oregano, and one sage plant) that define the most serious, working part of our garden. We’re down there clipping fresh bits for cooking at least once a week. Our herb crew has battled through adversity: the oregano fell prey to a mite infestation last year, and our original variegated sage plant died shortly after it was planted. But the oregano has come bounding back, and we recently replaced the sage. Everything is growing like gangbusters, especially the thyme.
The fact is, “growing like gangbusters” describes everything that we’ve put in — a state of affairs that I attribute to the gentle microclimate that favors our patch. When we originally planned the yard, I chose plants that would produce food, but that wouldn’t require much tending. But now, flushed with success, I’ve found myself contemplating a true vegetable garden. A small one, mind you.
In the meantime, the sun is out, and there’s a chair on the patio near the magnolia with a good book and a tall, cool glass of something refreshing waiting for me.


garden
4 Comments »
