Posted by Anita on 05.26.10 11:28 AM
This post is the third of 12 installments in the Dinner on a Deadline series, a project designed to help you get thoughtful meals on the table quickly without resorting to processed convenience foods. Each week features homework to help you put the lessons into action, plus a sample recipe to show how we use the week’s tips in real life.
2010 AEC *All Rights Reserved*") There are entire books (and at least one blog) devoted to the idea that recipes are the problem, not the solution. Rather than cheerful assistants, the theory goes, recipes can be tyrannical oppressors, stifling creativity and causing culinary heartache.
There are entire books (and at least one blog) devoted to the idea that recipes are the problem, not the solution. Rather than cheerful assistants, the theory goes, recipes can be tyrannical oppressors, stifling creativity and causing culinary heartache.
Though I’d never go that far myself — my cookbooks and recipe binders are a source of wonderful inspiration, and a great resource for those rare days when I have plenty of time to spend in the kitchen — I definitely see the value of dispensing with recipes for many everyday meals.
When it comes to no-recipes meals, there are plenty of old standbys. On Twitter, I asked what readers like to make when they cook without recipes. Nearly everyone named at least one dish that falls into the category our friends Sean and DPaul call leftovers velcro: Omelettes and frittatas filled with bits of cheese and herbs, a chef’s salad with cold roast chicken and a few crumbles of bleu cheese, hearty soups made from stock and the assorted contents of the vegetable bin.
All of these are good, simple meals, and I love them because creative re-use is both easy on the wallet and environmentally fabulous. But cooking without recipes can be much more than just a way to clear out your fridge. It’s a way of thinking about ingredients that gives you basic formulas for easy suppers, and a platform for improvising even as you plan. If you stock your pantry well, you can combine protein, starch, and seasonal vegetables in dozens of ways.
 Here’s one example that makes use of our favorite pasta + pork + greens trinity: Simmer pasta of your choice. Meanwhile, sauté sausage, bacon, ham, or ground pork; remove the cooked meat with a slotted spoon. Using the same skillet, sauté a clove or two of minced garlic in the rendered fat from the meat; add legumes or greens (examples: shredded kale, chopped broccoli raab, sliced sugar-snap peas, cooked cannellini) and sauté until tender, adding a little stock or water to steam the firmer items. When the pasta’s done, toss everything together, adding a splash of stock or cream. Sprinkle with herbs and/or Parmesan cheese and you’re good to go. (Two favorite variations on this theme include Orecchiete with Broccoli di Ciccio and Italian sausage, and Pasta e Fagioli with ‘Nduja.)
This method also works great with international flavors. For an Asian-style meal, sauté a quick-marinated protein (sliced meat, shrimp, or tofu tossed with soy sauce, sherry, sesame oil, and a bit of cornstarch) in peanut oil; remove with a slotted spoon. Sauté garlic and greens (such as long beans, bok choy, spinach) until tender. Stir in a regionally appropriate flavor enhancer (like curry paste, oyster sauce, chili-garlic sauce), then add the meat back into the pan and heat through; serve over rice or noodles. If you prefer a Tex-Mex variation, you can make fajitas: Grill or sauté chicken or steak strips, add sauteed peppers and onions, and serve with tortillas. Once you have the basics down, the variations are only limited by your imagination and the depth of your pantry.
This week’s homework
No-recipe novices: Plan at least two meals for the upcoming week, including at least one no-recipe dinner. Make use of your newly organized pantry staples.
Extra for experts: Take one of your existing no-recipe meals and adapt it into something new. For example: If you usually use pasta as the base, turn it into a stir-fry over rice. Or, add an ethnic twist, use a different protein, or make some other modification that will push your creativity.
2010 AEC *All Rights Reserved*")
2010 AEC *All Rights Reserved*")
2010 AEC *All Rights Reserved*")
2010 AEC *All Rights Reserved*")
2010 AEC *All Rights Reserved*")
This week’s recipe
I realize that this goes entirely against the spirit of the lesson, giving you a real recipe with measurements and timing. But for anyone new to the no-recipes concept, it’s useful to see how it works. After you’ve done it a few times, you’ll be able to come up with your own variations, judging quantities and timing by eye.
We made this dish — a Food 52 category winner — for a midweek supper with our friend Meriko; we liked it so much we had it again this week. (The fact that we’ve got a bumper crop of sugar-snap peas helps, too.) The second time around, we were out of mint and low on cream, so we swapped in some parsley and chicken stock; we liked the fresher end result even better. Feel free to make your own substitutions depending on what you have on hand or what strikes your fancy.
Creamy Pasta with Prosciutto and Snap Peas
– adapted from Food 52
For each 3 servings; multiply as needed
6 to 8oz dry shaped pasta (preferrably shells, orechiette, or other cup-shaped pasta)
2 cloves garlic, minced
1-1/2 T olive oil
2oz prosciutto, lonza, or country ham, thickly sliced (1/4-inch minimum) then minced
2 small shallots, minced
1/2 cup cream
1/2 cup unsalted stock
1/4 cup freshly grated Parmesan, plus more for the table
1/4 pound fresh sugar-snap peas, chopped into 1/2-inch pieces
2T to 1/4 cup minced fresh flat-leaf parsley
salt and freshly ground pepper
In a large saucepan, bring salted pasta water to a boil while prepping the various ingredients. (If it comes to a boil before you’re ready, cover and reduce heat to low.) When everything is ready to go, add the pasta to the boiling water.
In a heavy skillet, heat the olive oil over medium heat. When shimmering, add the garlic and cook until just softened. Add the minced prosciutto and cook for an additional 3 to 4 minutes. Add the shallots; continue cooking until softened. If at any point the garlic or shallots start to brown, add a splash of water and/or turn down the heat. When cooked through, season to taste with salt and freshly ground black pepper. (Amounts will vary greatly depending on how salty your pork is.) If there are more than 3 minutes left on the pasta timer, reduce the skillet heat to low, or remove the pan from heat, depending on how long you have left.
When your pasta is about 3 minutes away from being done, add the peas to the proscuitto mixture and cook for 2 minutes over medium heat, until just tender. With one minute remaining, raise the heat to high; add the cream and stock, and bring to a boil while stirring. Add the Parmesan, stir to combine, and reduce the heat to low.
Drain the pasta, and add to the sauce; toss to coat. If the sauce is loose, simmer over medium-high heat until it coats the pasta. Sprinkle liberally with fresh herbs, and serve with black pepper and extra Parmesan.
cooking, Dinner on a Deadline, recipes
15 Comments »


Posted by Anita on 05.18.10 11:54 AM
This post is the second of 12 installments in the Dinner on a Deadline series, a project designed to help you get thoughtful meals on the table quickly without resorting to processed convenience foods. Each week features homework to help you put the lessons into action, plus a sample recipe to show how we use the week’s tips in real life.
2010 AEC *All Rights Reserved*") So, gang — how’s the menu planning going? From my point of view, the homework looks great! Between the comments on last week’s post and the Twitter stream, I’ve seen some good menu plans, lots of delicious meals made from items already on hand, and many good tips for weeknight dinner prep. So let’s move on with some more ideas for getting food on the table.
So, gang — how’s the menu planning going? From my point of view, the homework looks great! Between the comments on last week’s post and the Twitter stream, I’ve seen some good menu plans, lots of delicious meals made from items already on hand, and many good tips for weeknight dinner prep. So let’s move on with some more ideas for getting food on the table.
One of the most powerful weapons in the weeknight-dinner arsenal is a well-stocked pantry. Now, when I say “pantry”, I hear all the small-kitchen cooks groan. But a pantry doesn’t have to be large or lavish to be effective — even a single, dedicated shelf next to the dishes is better than nothing. No matter whether you have an enormous pantry or a tiny one, keeping staples on hand encourages spontaneous meals and lets you shift gears quickly when your weeknight throws you a curve. And, stocking up is especially important if you’re not a particularly dedicated meal planner.
Once you stock your pantry, keeping it up to date needs to be a continuous process. At our house, we opt for the instant-replacement method: If we use, say, a package of penne, we add penne to the grocery list and buy it on our very next trip to the store. When we get down to the last few ounces of soy sauce, it goes on the list, too. We never wait until we need a staple item to replace it. In the case of items we use a lot, we even keep backups on hand when space permits.
Speaking of space: The elephant in the room here is that most people’s pantries (including mine, until I tidied it up last weekend) look like a disaster area. Once you clear away the clutter, you may find yourself with a lot more storage space than you thought you had. With this in mind, the first real step in stocking the pantry is a thorough clean-up. I know the idea of spending your precious kitchen time tackling a long-postponed chore isn’t terribly appealing, but the payoff is huge. Even the most rudimentary kitchen organization helps make it fun to cook, instead of a hassle. Once you’ve got your kit organized, you won’t have to dig through a mess to find things when you need them quickly. You’ll also have a better idea of what you have, and what you’re missing.
When it comes to quick weeknight dinners, staples are key. There are a few million articles online dedicated to stocking your pantry. (Simple Bites has a good one, with links to many others.) Every site’s list is a little different — and they should be. There’s no one right way to fill your shelves; the important thing is that you figure out the kinds of meals you eat (or want to eat) and stock for them. Personally, I don’t like to rely a lot on the canned soups, commercially frozen vegetables, and other industrial products that some of the lists include. You know your own tastes better than I do; look through a few lists, and use them as a jumping off point.
Here’s what our pantry typically contains:
• In the fridge: Eggs, cheese (something melty plus a hard cheese like Parmesan), bacon, milk, sour cream, kimchi and/or sauerkraut, tortillas, bread, butter, mushrooms, olives, mustard, peanut & almond butters, maple syrup
•Â In the garden: Fresh herbs, lettuce, carrots, radishes, celery, lemons, green onions, one or two seasonal vegetables (peas, tomatoes, etc.)
• In the cupboard: Pastas, rices, polenta, dry beans, posole, coconut milk, chiles (pickled/dry), tomatoes, pressure-canned chicken stock, pickles & preserves, soy sauce & fish sauce, canned tuna, shallots & onions, garlic, ginger, potatoes, crackers, tortilla chips, nuts, salsas, herbs & spices, oils & vinegars, baking supplies
• In the freezer: Precooked beans and grains; pie and pizza doughs; pasta sauces; curry pastes; leftover bread/buns; leftover cooked meat; precooked meatballs; quick-thawing raw proteins (ham cubes, chicken parts, sirloin tips, ground meat, duck confit) in meal-size packs; sausages (Italian, chorizo, breakfast, ‘nduja); pancetta & guanciale; butter; blanched garden veggies; ice cubes of many types: chicken stock, lemon and lime juice, egg whites, tomato sauce/paste, chipotle en adobo, etc.
(I know there’s a a lot of untapped detail in that last bullet item; we’ll talk more about stocking the freezer later in the series.)
Looking at our list, you can probably already see that, even without a recipe, I can get a number of basic dinners on the table using just what we have on hand. This week, I made a simple Asian-style noodle dish using beef from the freezer and a bunch of items from the pantry, plus a few vegetables from our farm box. Pretty much once a week — and more often when we’ve been traveling or otherwise unable to get to the farmers market — we eat this way, “shopping” from the items we’ve put aside for quick weeknight meals.
Once you have a well-stocked larder, you’ll be amazed at how handily you’re able to put together meals, even when you’ve got “nothing” in the house. After just a few weeks of building meals from what you’ve got on hand, you’ll start to develop a repertoire of pantry-based suppers.
In addition to this week’s recipe below, here are a few meals we make using pantry staples and just one or two fresh ingredients:
– Simple chilaquiles
– Fondue mac & cheese
– Weeknight paella
– Korean-style tacos
– Deep-dish pizza
– Pasta carbonara
– Pea and proscuitto risotto
– Pasta with leafy broccoli and sausage
– Sopa Azteca (tortilla soup)
– Ham, chickpea, and orzo salad
– Chorizo, potato, and mushroom tacos
That’s not an exhaustive list, by the way — that’s just the pantry-centric ideas we’ve already blogged about. Once you’ve got your own pantry stocked, you’ll see the possibilities and patterns in your own meals.
This week’s homework
Novice pantry-stockers: Organize your pantry space: Take everything out and put it on the counters, wipe down the shelves, and then put things back in an order than makes sense based on the way you use them. Same thing with the fridge and the freezer — they’re an extension of your pantry, after all. Give away (to the food bank / coworkers / freecycle) anything you don’t want to eat that’s taking up space. Think about the kinds of meals you like to eat, make a list of what’s missing, and stock up as your budget permits. Plan and cook at least two meals, each using a pantry ingredient you already have.
Extra for experts: Tackle the organization project above, plus one of these two options: (1) Write a post about at least 5 items in your pantry, and why they’ve earned a permanent spot on your shelves. (2) Buy yourself one splurge-worthy ingredient (Calabrian chiles, a new kind of rice, heirloom beans, etc.) and cook with it, using at least two existing pantry ingredients that you’ve let languish.
2010 AEC *All Rights Reserved*")
2010 AEC *All Rights Reserved*")
2010 AEC *All Rights Reserved*")
2010 AEC *All Rights Reserved*")
2010 AEC *All Rights Reserved*")
This week’s recipe
I love this recipe — which really is more like a template — because it’s so flexible. Don’t have beef? Use the same quantity of sliced chicken, butterflied shrimp, ground pork, or tofu cubes. You can use pretty much any Asian noodle, too: Fresh, dry, egg, wheat, rice, curly, straight — they all work, so long as you’ve got close to the right quantity going into the wok. Any crunchy vegetables can take the place of the peas; we’ve used boy choy pieces, green beans, and celery cut on the bias; don’t be afraid to experiment.
When it comes to Thai-style curry paste; we like the Mae Ploy brand that comes in a plastic tub (it keeps almost forever in the freezer if you roll up the inside bag tightly); this recipe is especially good with the red and yellow varieties, but it’s flexible enough to use what you’ve got. Heat and saltiness vary widely, though, so if you’re using another brand, start out with less paste; if you find the end result is a little bland, spike it up with some fish sauce and/or chile flakes at the table, and make a note to adjust the recipe the next time. I like to mix it up by using half red curry paste and half peanut butter, which makes an especially tasty combination for little kids or other spice-phobic eaters.
This recipe can be made by one focused cook in less than 30 minutes from start to finish, but to streamline the post-work chaos, I generally do all of the prep the night before, then store all of the measured and cut ingredients in the fridge overnight.
Thai Curry Beef Noodles
– adapted from Big Bowl Noodles and Rice
For two servings — multiply as needed:
4 to 6 oz dry Asian wheat or egg noodles (for substitutions, see end of instructions)
Peanut or vegetable oil
6 oz beef (such as flank steak or sirloin tip) sliced thin across the grain into 2-inch lengths
1-1/2 tsp dark soy sauce (we like Kimlan Super Special)
1 tsp sesame oil
1 tsp cornstarch
1/3 cup homemade chicken stock (or water — canned broth is too salty)
1-2T fish sauce (depending on the saltiness of the curry paste)
1T fresh lime juice
1-1/2 tsp sugar
1/2 to 1 red chile (such as Fresno), julienned
1/4 cup thinly sliced red onion
a handful (12 to 15) snow or snap peas, cut in half on the diagonal
1 to 2T Thai curry paste (depending on how hot you like it; you can use half peanut butter)
1/4 cup peanuts, chopped
a few tablespoons chopped cilantro leaves
Bring 4 to 6 quarts of water to a boil and cook the noodles according to package directions. Drain, run under cold water, drain again, and toss with a teaspoon of peanut oil; set aside.
Mix the beef with the soy sauce, cornstarch, and sesame oil. In a separate bowl, mix the chicken stock with the fish sauce, lime juice, and sugar and whisk to blend. Set both the mixtures aside.
Heat 1/2 cup oil in a wok (or your largest skillet) over high heat until very hot but not smoking; add the beef, stirring to separate the slices. Using a slotted spoon or a spider, remove the meat to a clean plate when still pink in the center. Pour off the oil into a heatproof bowl.
Wipe the wok clean and return it to the burner over high heat. When hot, add 2T of the reserved oil. Add the chiles, onions, and peas; cook, tossing rapidly, until well coated with the oil. Scoot the vegetables to the side of the wok and add the curry paste to the bottom. Stir the paste around briefly in the oil to release the flavor. Add the seasoned stock mixture; bring to a boil, stirring or whisking to distribute the curry paste. Then, add the noodles.
Cook, tossing the noodles until mixed with the sauce and vegetables. Add the beef and toss briefly until everything is heated through and well mixed. Remove the cooked noodles to a platter, sprinkle with peanuts and chopped cilantro, and serve.
—
If you want to substitute other noodles, keep in mind that fresh noodles gain very little mass when cooked, where dry pastas can double or triple in size. You want 8 to 10 oz of cooked noodles for two servings. If you find you’ve prepped too many noodles, they keep for a day or two in the fridge, provided they’re tossed liberally in oil and well covered. They make a great snack or lunch when reheated with a little peanut butter, a splash of water or stock, and a sprinkling of chili flakes.
cooking, Dinner on a Deadline, recipes
17 Comments »
Posted by Anita on 05.11.10 9:11 AM
This is a housekeeping post in the Dinner on a Deadline series, a project designed to help you get thoughtful meals on the table quickly without resorting to processed convenience foods. Each week features homework to help you put the lessons into action, plus a sample recipe to show how we use the week’s tips in real life.
2010 AEC *All Rights Reserved*") How’s the menu planning homework going? We’d love to hear about your successes and your struggles, either here in the comments, or — if you’re blogging — with a trackback to your post. And, if you have any menu planning questions (either from us or other readers), we’ll get them answered.
How’s the menu planning homework going? We’d love to hear about your successes and your struggles, either here in the comments, or — if you’re blogging — with a trackback to your post. And, if you have any menu planning questions (either from us or other readers), we’ll get them answered.
(Oh, and that beautiful weeknight dinner to the left? That’s our riff on Shauna and Dan‘s asparagus and walnut salad, one of the most interesting and hearty salads I’ve enjoyed in a long time. We used thyme and Parmesan in place of their tarragon and mizithra. Sometimes you’ve gotta improvise to get dinner on the table.)
Schedule shift:
I’d originally thought to post new Dinner on a Deadline topics on Fridays, to give people a chance to use the weekend for their homework. But after realizing that most of you are coming here on Mondays and Tuesdays, I’m going to adjust the posting schedule. This way, you’ll have the week to think about homework (and tackle it, if your schedule permits) and then the weekend to kick it into gear before the next post goes up on the following Monday. But don’t let my posting schedule pin you down; you should feel free to tackle each of the projects on your own pace.
Recaps (or not):
A couple of commenters have asked where they should post their homework, which took me (pleasantly) by surprise because I hadn’t really expected participants to post weekly updates — although I am flattered that you would, and I will love to read them all. Please do leave a comment on the appropriate post so that other readers can follow along. I won’t be recapping each week; getting a new Dinner on a Deadline post up each week is about all I can handle at this point. But at the end of the series we’ll have a blog event where I’ll encourage everyone to post their graduation homework — and I will recap those posts in a final roundup.
Tweet tweet:
I’ve got a new Twitter account — @DeadlineDinners — that you can follow if you want to know when each Dinner on a Deadline post is live, or to get midweek updates. Our existing @MarriedWDinner account will stay focused on the usual mix of food and blather.
Dinner on a Deadline
1 Comment »
Posted by Anita on 05.07.10 6:55 AM
This post is the first of 12 installments in the Dinner on a Deadline series, a project designed to help you get thoughtful meals on the table quickly without resorting to processed convenience foods. Each week features homework to help you put the lessons into action, plus a sample recipe to show how we use the week’s tips in real life.
2010 AEC *All Rights Reserved*")
Chances are, if you’re reading this blog, you like to cook. But there’s some evil alchemy that happens on a weeknight, after a long day of work; even avid cooks lose their mojo when dinner starts to feel like drudgery. Although I’m not a planner by nature (really, I swear — stop snickering!), I’ve developed a routine that helps me fend off kitchen ennui. By mapping out our weeknight meals in advance, and making sure I have everything I need to keep things moving, I feel less harried and enjoy cooking more.
In the same way that it’s always easier to cook when you’ve done your mise en place first, it’s always easier to tackle menu planning when you’ve done a little legwork in advance. During the week, make a file of recipes that catch your eye as you’re reading magazines, blogs, and cookbooks. Then, figure out a way to get yourself at least a half an hour when you won’t be interrupted, so you can focus on your task. Clear off your desk or the table, then sit down with your calendar and your cookbooks, magazine clippings, and bookmarks. At our house, I work on menu planning on Fridays, the night before our favorite farmers market. To free up my time, Cameron fixes a garden salad and his choice of pasta — using pantry staples and homemade sauces from the freezer — while I plan dinners for the coming week.
To make menu planning less daunting, I have a few stock meals slotted into in the schedule. In addition to our regular Friday pasta night, on Tuesdays — when Cameron has band rehearsal — we usually reheat something from the freezer, like sloppy joes, chili, or a hearty soup. Plugging those standbys into my schedule, I have 2/7 of the week taken care of, right off the bat. Next, I block off any nights where we won’t need to cook: Wednesdays are rough days for us, so we often treat ourselves by going out for dinner or grabbing takeout sushi on the way home. We also frequently have some sort of outing during the week — theater tickets, dinner parties, and the like — so I note those, too. Saturdays we typically have plenty of time to spend in the kitchen, so I schedule the most time-consuming meal there, along with any kitchen projects like making big batches of chicken stock, pasta sauces, and other freezer staples. By this point, the week’s filling up nicely, and it’s just a matter of shuffling a mix of old favorites, new ideas, and seasonal inspirations from my clipping file into the remaining days.
It also helps to know what foods are in season in your area, both to minimize shopping hassles, and to keep your budget under control. Many farmers markets feature seasonality calendars on their sites (and yes, there’s an app for that). If you’re worried that your plan includes items that won’t be available, hedge your bets and know what your fallback recipe requires. If I’m planning, say, a fennel salad during a time when I don’t know whether there will be fennel at the market, I’ll make a note on the list of an alternative ingredient (like frisée) that I’m positive I can find.
If this seems like too much work, you can just head to the farmers market or grocery store and buy what looks good, but you’ll want to make sure to browse with a plan in mind. A lot of my friends do this, shopping with a list of categories like “vegetables for 2 dinners, fruit for 4 lunches” rather than an entire menu plan, then deciding when they get home how it all goes together. (I will confess that whenever I shop this way, I inevitably end up missing some key ingredient; I think my friends are better organized than I am!) If you’re not already adept at building meals from the pantry and cooking without recipes, though, you could find yourself with too much of one sort of thing, like tempting-but-perishable vegetables, and not enough of something critical, like meats or starches.

Speaking of surpluses: Meal planning can help prevent food waste and the motivation-sapping guilt that goes with it. I start my planning with a quick fridge inventory. With a list of what’s in the crisper, I can plan the next week’s meals to use up stragglers before they turn to compost.
As funny as it sounds, one of my menu planning secrets is to leave room for a little spontaneity. I always keep at least one night open, allowing us to accept impromptu dinner invitations, indulge a craving, or polish off leftovers.
Just as every cook has a different style, your planning will be different than mine. There’s a universe of software, sites, even iPhone apps designed to help you plan meals; the good ones will create a shopping list automatically as you add recipes to the menu. I find that a little too complicated for my taste; my system involves nothing more than a word-processing document in GoogleDocs with a shopping list down one side and menus down the other. I keep it online so both of us can reference it from anywhere — home, work, the grocery store — in case we need to add to it or shop from it. It doesn’t really matter what system you use, but it needs to work for you.
Have I scared you off yet? If the thought of planning for the whole week seems overwhelming, start with just a couple of planned meals and see how it goes. I think if you plan at least a few meals every week, you’ll begin to see how much easier it is to get dinner on the table without a lot of drama. The more you plan, the less likely you are to push the panic button and find yourself dialing for pizza.
This week’s homework
Novice planners: Plan out at least 2 meals for the coming week. Make a shopping list for your planned meals. Print out the recipes you’ll be using (or flag them in books) so you can find them easily when you hit the kitchen. If the meal you’re planning takes more than 30 minutes of prep, see if you can figure out a way to break it into manageable chunks by prepping parts of the recipe in advance the night before or the morning of.
Extra for experts: If you’re already planning meals ahead of time, this one’s for you: Make at least one full meal this week from what you already have on hand in your fridge, freezer, or pantry, without shopping for anything new. Bonus points for dessert.
2010 AEC *All Rights Reserved*")
2010 AEC *All Rights Reserved*")

2010 AEC *All Rights Reserved*")
2010 AEC *All Rights Reserved*")
This week’s recipe
When my friend Jen and I went to dinner recently at Range, I ordered an appetizer that epitomized spring comfort foods for me. I’m a sucker for anything with an egg on top; the buttery leeks were indulgent, and the Parmesan broth was silky and rich. Looking at the various components, I had a hunch that I could re-create this combination at home.
As I started planning this meal, I was excited to realize I could make it entirely from things I already had on hand, although you certainly could buy them from any good grocery store. (Quinoa, by the way, can often be found in the bulk bins; feel free to substitute brown rice, lentils, or any other small, quick-cooking grain or legume.) With a little reheating and a quick bit of actual cooking, our dinner — a credible duplicate of a dish served at a Michelin-starred restaurant — was on the table in less than 20 minutes.
In the coming weeks, I’ll talk more about stocking your larder so that you can improvise, too. In the meantime, you should be able to make all the components from start to finish in less than an hour, even quicker if you’ve got a helper. If you’d rather do some of the prep work in advance — a topic we’ll discuss in more depth later in the series — I’ve noted how far out you can make that happen. Add a simple salad and a glass of wine, and you’ve got a meal that you’d be proud to serve to anyone.
Melted Leeks and Quinoa with a Poached Farm Egg and Parmesan Broth
– inspired by a first course at Range
For each serving — multiply as needed:
1/3 cup melted leeks
1/2 cup cooked quinoa
1/2 cup simmering chicken stock
a handful of Parmesan cheese, grated as finely as possible (about 1/2oz by weight)
1 extra-large egg
minced chives, for garnish
salt, as needed
Up to a week in advance:
– Make the melted leeks
- Slice the leeks in half lengthwise, then slice the white and light-green parts into half-rings about 1/4- to 1/8-inch thick. Rinse leek slices well in a bowl of running water. Melt butter in heavy skillet over medium-low heat. Add leeks and a couple of tablespoons of water. Simmer slowly until leeks are tender and almost all water evaporates, adding more water if needed to further soften the leeks. Season well with salt. If using immediately, remove pan from the heat and set aside. Otherwise, cool to room temperature and store for up to a week in the fridge. (2 cups sliced raw leeks + 4T butter makes about 2/3 cup cooked, enough for 2 servings.)
Up to 24 hours in advance:
- Thaw the stock in the fridge, if frozen.
- Grate the Parmesan cheese with your finest grater, and refrigerate. (We use a Microplane zester so the cheese melts almost instantly when it hits the broth.)
When you’re ready for dinner:
- Cook the quinoa. (1.5x water to 1x quinoa, slow-simmered about 20 minutes or until all water evaporates. 1/2 cup quinoa + 3/4 cup water makes 1-1/4 cups cooked, a little more than enough for 2 servings.)Â
- Warm the leeks in a skillet with just a splash of added water.
- Mince the chives.
- Bring the chicken broth to a lively simmer and whisk in the Parmesan.
- Just before you’re ready to serve, soft-poach the eggs.
- While the eggs are cooking, divide the melted leeks among individual bowls, spreading to cover about 2/3 of the bottom of the bowl. Scoop the quinoa over the leeks, and top each serving with a soft-poached egg. Sprinkle with chives, and pour the Parmesan broth around the edges of the bowl.
Plan-ahead ideas that made this meal easier:
– Having chives in the windowbox
– Stocking interesting stuff in our larder (quinoa, Parmesan, farm eggs, homemade stock)
– Breaking prep tasks across multiple days (pre-cooking leeks, pre-grating cheese, etc.)
Melted Leeks and Quinoa with a Poached Farm Egg and Parmesan Broth
– inspired by a first course at Range
For each serving — multiply as needed:
1/3 cup melted leeks
1/2 cup cooked quinoa
1/2 cup simmering chicken stock
a handful of Parmesan, grated as finely as possible (about 1/2oz by weight)
1 extra-large egg
minced chives, for garnish
salt, as needed
Up to a week in advance:
- Make the melted leeks
Slice the leeks in half lengthwise, then slice the white and light-green parts into half-rings about 1/4- to 1/8-inch thick. Rinse leek slices well in a bowl of running water. [LM: you can also rinse the leeks after slicing in half lengthwise and before slicing. It’s easier to do than rinsing the slices if you leave them connected at the top. Then you can just shake off before slicing] [AC: I agree with JenH; I’ve tried it both ways. Plus, the extra water isn’t an issue here.] Melt butter in heavy skillet over medium-low heat. Add leeks and a couple of tablespoons of water. Simmer slowly until leeks are tender and almost all water evaporates, adding more water if needed to further soften the leeks. Season well with salt. If using immediately, remove pan from the heat and set aside. Otherwise, cool to room temperature and store for up to a week in the fridge. (2 cups sliced raw leeks + 4T butter makes about 2/3 cup cooked, enough for 2 servings.)
Up to 24 hours in advance:
- Thaw the stock in the fridge, if frozen.
- Grate the Parmesan cheese with your finest grater, and refrigerate. (We use a Microplane, so it melts almost instantly.) [ST: Do you really? Does it not affect the texture and flavor too much to grate it that far in advance?] [AC: I don’t grate the whole wedge, but if I’m using it within the day I don’t notice a difference.]
When you’re ready for dinner:
- Cook the quinoa. (1.5x water to 1x quinoa, slow-simmered about 20 minutes or until all water evaporates. 1/2 cup quinoa + 3/4 cup water makes 1-1/4 cups cooked, a little more than enough for 2 servings.) [ST: This is something I might put in the make-ahead category. If I’m making any kind of grain, I make more than I need, and use it over a few meals. Quinoa holds up well.][AC: I actually find premade quinoa to be gluier than I like, but I’d love it if you could add your experience in the comments once the post goes up.]
- Warm the leeks in a skillet with just a splash of added water.
- Mince the chives.
- Bring the chicken broth to a lively simmer and whisk in the Parmesan.
- Just before you’re ready to serve, soft-poach the eggs.
- While the eggs are cooking, divide the melted leeks among individual bowls, spreading to cover about 2/3 of the bottom of the bowl. Scoop the quinoa over the leeks, and top each serving with a soft-poached egg. Sprinkle with chives, and pour the Parmesan broth around the edges of the bowl.
Plan-ahead ideas that made this meal easier:
– Having chives in the windowbox
– Stocking interesting stuff in our larder (quinoa, Parmesan cheese, farm eggs, homemade stock)
– Breaking prep tasks across multiple days (pre-cooking the melted leeks, pre-grating the cheese, etc.)
cooking, Dinner on a Deadline, meatless, recipes
29 Comments »
Posted by Anita on 04.29.10 12:52 PM
2010 AEC *All Rights Reserved*") Michael Ruhlman ruffled a lot feathers when he called bullshit on people who can’t find time to cook. To be sure, there are people out there making poor choices, watching hours of TV yet kvetching they can’t put any energy into feeding themselves or their families. But leaving this (admittedly large) group aside for a moment, I also know there are many smart, thoughtful people who simply can’t spend even an hour every day in the kitchen.
Michael Ruhlman ruffled a lot feathers when he called bullshit on people who can’t find time to cook. To be sure, there are people out there making poor choices, watching hours of TV yet kvetching they can’t put any energy into feeding themselves or their families. But leaving this (admittedly large) group aside for a moment, I also know there are many smart, thoughtful people who simply can’t spend even an hour every day in the kitchen.
Take our household, as one example. I honestly don’t think anyone could question our devotion to good food and home cooking. We go to the farmers market every damned week, even when it’s pouring buckets. We grow a lot of our own produce, though it would be far simpler to buy it. And we preserve both our own harvest and foods we buy in season. We cure our own meats, from time to time. We spend whole days — whole weekends, even — focused on putting real food on our table, and sharing it with people we care about.
But even though I love nothing more than spending hours in the kitchen, the realities of my job and my life mean it’s a luxury that I can’t have all the time.
I know Ruhlman loves to stir the pot — and god love him for that, the world needs more agitators. I also know that his reality is different from mine, and probably yours: This is a man who works at home and devotes his professional life to food. His bread-baking is integrated into his bread-winning in a way that few of us could manage. But for many people, even his simple roast chicken is too much work. Hell, on some particularly craptacular nights, roast chicken is too much work for me. I’m not proud of that. But on the other hand, I don’t beat myself up about it. As Cameron often says: “We eat better at home than most people do in restaurants.” And I think that’s true even when we’re defrosting, reheating, and MacGyvering our way to the table.
We (by which I mean all of us who care about food, and health, and community) need to teach people to make good food in whatever time they have available, not heap scorn on those who think that 30-Minute Meals are the answer. I can make dinner — organic, local, balanced food — in 15 minutes if pressed. It may not be pretty, but it’s real and it’s delicious.
I’ve been cooking since I was old enough to reach the countertop, though, and a lot of what allows me to make those on-the-fly meals happen is the result of hard work at some point days or weeks earlier. Cooking on a daily basis requires planning. It also means relying not necessarily on convenience foods, but convenient food. It’s equal parts planning ahead, stocking your larder, and knowing your limitations — things that can take years to master by trial and error. We shouldn’t expect people to come straight to the kitchen knowing what they need to do.
I realize, as I write all this, that in a way I’ve been part of the problem.
I rarely mention, much less post, our quick-and-dirty weeknight meals. They’re often less-than-photogenic specimens, and they’re usually the sort of food you don’t really need a recipe to make. When I do resort to posting something unglamorous, it’s usually because I’ve signed on for a challenge, and the deadline is looming. I always feel odd, writing about a dinner that isn’t picture perfect, because it feels like I am shortchanging my readers. But on the other hand, I think (hope!) you all realize that we don’t eat beautiful food seven days a week.
So here’s my commitment: Every week, for the next 12 weeks, I’m going to write about a trick I use to get dinner on the table quickly. I’ll also give you a little homework: Something simple enough that you can do it while your partner washes up after dinner, or in an hour or so on the weekend. And each post will include a recipe to show how to use the week’s tip in a real-life setting, usually a tried-and-true supper we actually eat on a regular basis. I’ll answer questions in the comments, and hopefully we can all learn from one another.
When I get to the bottom of my bag of tricks, I’ll throw it open to you. We’ll have a roundup event, where you can either use my tips to create your own weeknight meal, or post a time-saver of your own. By August, you’ll know what I know, and you’ll have put it into practice so you can riff on it yourself.
I may be preaching to the choir here; if you’re reading this blog, you may be doing these things already. On the other hand, a quick straw poll of my food-loving pals tells me there’s value in this exercise, even for the veterans. But fear not: I’ll keep things simple enough that novice cooks will be able to put the tips to use, too.
So, who’s with me: Who wants to play along?
cooking, Dinner on a Deadline
79 Comments »
Posted by Cameron on 01.31.10 8:57 PM
2010 AEC - All Rights Reserved") The display read 101°F when the digital thermometer beeped, which might have been okay if we were proofing yeast. But we were in the bedroom, not the kitchen — and the thermometer was under the tongue of my very achy, very sick wife. “You are not going to work,” I said. “And I am coming home early and making chicken soup.”
The display read 101°F when the digital thermometer beeped, which might have been okay if we were proofing yeast. But we were in the bedroom, not the kitchen — and the thermometer was under the tongue of my very achy, very sick wife. “You are not going to work,” I said. “And I am coming home early and making chicken soup.”
I don’t have an operatic range as a cook, but chicken soup is one of the dishes that I do well. I wish I could say that I follow a Secret Family Recipe steeped in a Romantic Patina of age and memory, written carefully in cursive on an index card that is Stained with Character and Creased with Use.
But the truth is that I found my chicken soup in a cookbook while we were living in Seattle, and I was first drawn to it by the fact that it had a gimmick: You start with a whole chicken and some vegetables, and end up two hours later with soup. The trick is accomplished by cutting the chicken (except for the breast) — bones and all — into very small pieces and sautéeing them before making a super-quick broth. It’s fast, it’s easy, it’s reliable, and it tastes fantastic.
I can modestly admit to having made a few small discoveries and tweaks to the basic recipe. The original calls for a 4-pound chicken, but I discovered that the larger the bird, the more tasty the soup. These days, we’re getting lovely little 3- to 4-pound birds from the Soul Food Farms CSA, so I add some feet, necks, and wings from the stock bag in the freezer to bring the total weight up to five pounds. I also cut my onions as finely as possible instead of the original medium dice, because I like them to melt into the soup.
Finally, the original recipe calls for noodles, but I much prefer dumplings. I make a slightly wetter version of my standard biscuit dough and — when the soup is almost done — float globs of the dough on top, cover the pot with a lid, and steam for about 10 minutes.
2010 AEC *All Rights Reserved*")
2010 AEC *All Rights Reserved*")
2010 AEC *All Rights Reserved*")
2010 AEC - All Rights Reserved")
2010 AEC *All Rights Reserved*")
Hearty Chicken Soup
– adapted from The Perfect Recipe
3 T vegetable oil or chicken fat
2 medium onions, cut into small dice
1 whole chicken (about 5 lbs.; add extra necks and/or wings if your bird is smaller)
2 bay leaves
1 large carrot, sliced 1/4 inch thick
1 celery stalk, sliced 1/4 inch thick
1/2 teaspoon dried thyme leaves
1/4 cup minced fresh parsley leaves
Salt
Dumplings
– adapted from Joy of Cooking
1 3/4 cups all-purpose flour
1/2 tsp salt
3 tsp double-acting baking powder
6 T chilled butter
3/4 cup plus 1 T milk
Cut up the whole chicken as if you were going to cook it in parts, splitting the breast into two pieces, but keeping the meat on the bone. (Cooking for Engineers has a nice post on breaking down a chicken. Alton Brown also does a good tutorial, although he takes the breast meat off the bone.)
Set aside the breasts and use a cleaver or poultry shears to hack the rest of the chicken — including the back, neck, and feet if you have them — into 1- or 2-inch chunks. Cut through the bones!
Heat the oil or fat over medium-high heat in a large soup pot. Add half of the chopped onion and all of the chicken pieces except the breast. Sauté until the chicken is no longer pink (I like to see some brown on the chicken pieces, but that can be tough to do in a crowded pot. Be careful not to burn the onions!). Reduce heat to low, cover, and simmer until the chicken releases its juices, about 20 minutes. Increase the heat to high and add 2 quarts of cold water, along with the chicken breasts, 2 teaspoons of salt, and bay leaves. Bring to a simmer, then cover, reduce heat to low and barely simmer until chicken breast is cooked and the broth is rich and flavorful, about 20 minutes.
Skim the fat from the soup and reserve it, then remove chicken breast from the pot and set aside. Strain the broth into a large bowl and discard the rest of the chicken pieces and bones. When the breast is cool enough to handle, remove the skin, and then remove the meat from the bones, shredding it into bite-sized pieces. Discard the skin and bones.
Return the pot to medium-high heat. Add 2 to 4 tablespoons of the reserved chicken fat, the remaining onion, the carrot and the celery, and a pinch of salt. Sauté until softened, about 5 minutes. Add thyme, broth, and shredded chicken. Simmer until the vegetables are tender and the flavors meld, 10 to 15 minutes.
If you like pasta, you can add two cups of egg noodles and cook until tender. Taste the soup and correct the seasonings — it will almost certainly need more salt. However, be careful with the salt if you’re going to add dumplings, as most dumpling/biscuit dough has salt in it somewhere… and I wouldn’t do both dumplings and noodles.
To make the dumplings, put the flour, salt, and baking powder in a food processor and pulse until well mixed. Add the butter, cut into tablespoon-sized chunks. Pulse until thoroughly mixed. Add the milk and pulse until the dough comes together. Drop globs of dough from a spoon onto the surface of the soup. Cover and simmer until the dumplings are cooked through, approximately 10 minutes.
Sprinkle with the parsley and serve.
Farmers and food artisans who created the ingredients for this week’s meal: 
Spring Hill Cheese Company, Petaluma: butter
Soul Food Farm, Vacaville: chicken
Guisto’s Vita-Grain, South San Francisco: sea salt, flour
Catalán Family Farm, Hollister: onion, celery
Straus Creamery, Petaluma: milk
…and our own homegrown thyme, carrots, bay, and parsley
(Exemption: baking powder)
cookbooks, cooking, Dark Days challenge, locavore, recipes
8 Comments »
Posted by Anita on 06.03.09 6:19 PM
 I first read about ‘nduja — a red-hot Italian meat paste that’s pronounced “en-DOO-ya” — in Saveur magazine, ages ago. Despite being the sort of foodstuff that’s right up my alley (hello, chiles and pork… together?!), I never seemed to be able to put my hands on the stuff. We’d heard rumors of a stall at London’s Borough Market selling ‘nduja, but our travels there never seemed to line up with their production. It seemed we’d have to make a trip to Calabria for the real thing, or go without.
All that changed last month, with the introduction of locally made ‘nduja from Chris Cosentino’s Boccalone Artisan Meats. This spicy, spreadable salami’s quickly become the darling of the Bay Area carnivores, complete with an adorable nickname and mouth-watering coverage in all the hip spots.
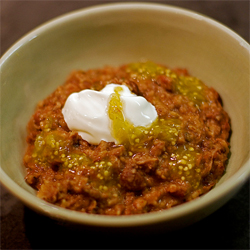
But as delicious as it is when simply spread on a slice of baguette or a cracker, it seemed sacrilegious to snarf down such a long-sough treasure as an appetizer. Searching for other options, I came up with Gina DePalma’s very loose recollection of an ‘nduja-centric pasta dish she whipped up in her Roman kitchen. Despite not being much of a recipe — it lacked both measurements and timing cues — our first attempt at reproducing it turned out incredibly well, if I do say so myself. (You don’t have to take my word for it: Our friend Matthew, a former restaurant critic for the Seattle Times, pronounced it “as good as anything I had in a restaurant” during his visit to San Francisco.)
Now, I’m not sure I’d pick this humble pasta over an evening at SPQR or Contigo, but the dish was far more delicious than the effort it took to whip together. We nearly always have some dried pasta and a frozen container of leftover beans in the freezer; if I just keep a package of ‘nduja around, we’ll never lack a quick, weeknight supper.
The hardest part of the recipe may be getting your hands on the ‘nduja, which isn’t hard at all if you live in or near San Francisco: They sell it at the Boccalone Salumeria at the Ferry Building. For those of you farther afield, there’s always mail order (or a trip to Calabria?). Once you get your hands on the necessary ingredients, free to wing it with the ratios, just as we did. With such flavorful ingredients, I’m sure it’ll be just as good.


Pasta e Fagioli with ‘Nduja
– adapted from Gina DePalma
1 cup dry white beans
1 small onion, diced
olive oil
1 sprig rosemary
1 bay leaf
salt and pepper, to taste
1 carrot, peeled (if needed) and diced
1 stalk celery, chopped
2 cloves garlic, minced coarsely
4 oz (1/2 chub) cured ‘nduja, broken into chunks
8 oz dry small pasta, such as shells or ditalini
more olive oil, for garnish
hard Italian-style grating cheese, such as Pecorino
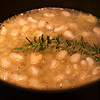
Soak the beans in enough water to cover by double their height, overnight if possible. When beans are soaked, heat a medium saucepan over medium-low heat; saute the onion in a good amount of olive oil until soft but not brown. Add the beans, their soaking liquid, rosemary, and bay. Bring to a hard boil for a few minutes, then reduce heat to a gentle simmer and cook until beans are beginning to become tender, but still firm. (This will take anywhere from 45 minutes to 3 hours, depending on the age of your beans and the length of their soaking.) Add the salt and pepper to taste, and simmer for another 10 to 15 minutes. At this point, you can discard the herbs and cool the beans in their liquid for later use.
When ready to bring the dish together: If you’ve made the beans ahead, gently warm them in their liquid in a small saucepan. Cook the pasta, stopping a minute or two before the cooking time on the package; drain and set aside. Meanwhile, heat a large skillet and add 2T olive oil. Saute the carrots and celery until soft; add the garlic and saute another minute. Add the ‘nduja, pressing to break it up and melt it as it heats. Add the beans and a small amount of their cooking liquid to the ‘nduja pan, along with the cooked pasta. If the mixture is dry, add more bean liquid until it’s wet; simmer a few minutes to allow the flavors to come together.
Divide the pasta into two or three warmed bowls. Drizzle with olive oil and top with shredded cheese.

This recipe is our entry for the inaugural week of
One Local Summer 2009, hosted by
Farm to Philly, with Western Region posts graciously recapped by
Columbus Foodie. Just like
last year, we’ll be exploring and honoring the foods from our local farmers and producers with at least one meal each week made from 100% local ingredients. We’re not declaring any exemptions this time — other than salt and spices — and our radius will be 100 miles.
Farmers and food artisans who created the ingredients for this week’s meal:
Iacopi, Half Moon Bay: Italian butter beans
Catalán Family Farm, Hollister: Onions
Bariani, Sacramento: Olive oil
Star Route, Bolinas: Carrots
Chue’s Farm, Fresno: Celery and garlic
Boccalone, Oakland: ‘Nduja
Eduardo’s, San Francisco: Pasta shells
Joe Matos, Santa Rosa: St. George cheese
….plus rosemary and bay leaf from our garden
cooking, locavore, meat, One Local Summer, recipes
11 Comments »
Posted by Anita on 12.06.08 9:03 AM
 When Cameron and I started blogging a few years ago, we were talking to ourselves. After walking away from the food message boards that had been our online home, we found ourselves adrift. A pair of food-obsessed writers can’t exist in a vacuum for long, so when our pal Sean suggested we should blog, it didn’t take us long to see the wisdom of his plan. We set up an account, bought a domain, and started writing.
An interesting thing happened along the way: People — strangers who we didn’t even know! — started reading the blog. Some of them even left us comments. And then we started visiting their blogs, leaving comments, and becoming intertwined with their lives. We celebrated their joys, cheered on their triumphs, cried at their losses, and consoled them in their grief… and they did the same for us. It’s funny to say this about people who I’ve (mostly) never met in person, but I’m closer with some of my food-blog pals than I am with people I see every day. To an outsider, perhaps this sounds odd, even a little loney… but to me, it’s one of the big blessings in my life, this circle of support and affection that literally crosses the oceans.
The most fabulous things happen in this little world of ours. Last week, I got an email from Bron, telling me that she and Ilva were planning a big surprise for our mutual friend Barbara, who’s been struggling with the side-effects of chemotherapy. Would I help them send a virtual hug to Barbara this weekend, in the form of a recipe? Oh, absolutely!
To me, nothing says love and comfort better than a bowl of soup. I know that bowl full of beef and chile sounds far too spicy and rich for someone struggling with the nausea and unpleasantness of chemo, but in truth this dish is clean, light, and flavorful, with just a hint of sweet spice. The broth base is chicken, not beef, so the flavors of the sprouts and scallions come singing through. Ginger is known to help with nausea, and if you seed the Fresno chile — which is already mild — you’re left with just the clean, fruity flavor and none of the heat. And because the meat is cooked separately and then used as a topping, you can adjust portions for varying appetites. Barbara doesn’t enjoy the taste of cilantro, so we substituted a sprig of flat-leaf parsley for the garnish; it’s mostly just for a splash of color, so feel free to leave it out entirely.
So here’s a hug to Barbara, across the oceans and miles. I wish we could come by and bring you a bowl of soup in person, but for now we’ll slurp a bowl of gingery noodles and keep you in our hearts.


 Ginger Beef Ramen
– adapted from The Wagamama Cookbook
5 oz (150g) mung bean sprouts
9 oz (250g) ramen noodles
12 oz (350g) sirloin steak, 3/4-inch thick
teriyaki or soy sauce, for brushing
4 cups (1l) chicken stock
2T ginger, peeled and slivered, or more to taste
2T ramen sauce (recipe follows), plus more for serving
3 scallions, trimmed and sliced on the diagonal
1 red Fresno chile, trimmed, seeded, and sliced lengthwise
1/2 small red onion, sliced very thin
1 lime, quartered
parsley (or cilantro) sprigs for garnish
Rinse the steak and pat dry. Season with salt and brush with oil; let sit 30 minutes to come to room temperature.
Cook the noodles in a medium pot of boiling water until al dente, about 2 minutes. (I recommend cooking 1 minute less than the package indicates, as the hot soup will continue to cook the noodles later.) Drain and rinse with cold water until cool; drain well and set aside. In the same pot, heat the stock to a simmer; reduce heat to low and cover until ready to use.
Grill, broil, or pan-sear the steak until medium rare. Remove from the heat and immediately brush with teriyaki or soy sauce. Keep warm to rest for at least 5 minutes.
Add slivered ginger and 2T of ramen sauce to the stock, and heat to a rapid simmer; adjust for saltiness with soy sauce or fish sauce, as desired. Meanwhile, divide the noodles among two bowls, and slice the rested steak on the bias. Top the noodles with the beef, sprouts, scallions, chile slivers, onion. Garnish with herb sprigs and serve with lime wedges and additional sauce to add at the table.
Ramen Sauce
1 scant tsp sugar
1T malt vinegar
3T Asian sweet chile sauce (or to taste)
3T fish sauce
Dissolve the sugar in the vinegar, then combine with other ingredients.
cooking, other blogs, recipes
14 Comments »
Posted by Anita on 11.20.08 10:51 PM
 There’s something about the frugal pleasure of creating something out of nothing that appeals to my inner home economist. There’s a touch of puritanical redemption in there, too: Making use of every last scrap atones for the pleasure we take spending chunks of our income on fabulous food.
For the most part I’m not a fan of the usual sort of leftovers, reheating the same old meal for to live another day. (Fret not: I make exception for cold spaghetti, reheated enchiladas, and the glorious day-after-Thanksgiving mishmash). But what I love so dearly is a well-planned, or even well-improvised, creative reuse.
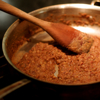
The last few nights, we’ve had dinners built on the skeletons of our weekend feasts. Tuesday night, we sauteed a pile of onions in bacon grease, then added the leftover pancetta-laced beans from Saturday’s supper, mashing them together to make a fabulously porky pan of frijoles refritos. Dressed with a dollop of thick crema and a swirl of homemade tomatillo salsa, they made an ample accompaniment to Prather Ranch skirt-steak tacos. (In an ironic twist, the beans were so filling that we ended up with leftover meat, which in turn became this morning’s steak-and-eggs breakfast.)
Tonight, we transformed the shredded meat left over from Sunday’s roast chicken into a tasty riff on chicken pot pie. Starting with a Barefoot Contessa recipe adapted by Smitten Kitchen, we took many liberties with substitutions: Golden sauteed mushroom chunks in place of pearl onions, simmered-down stock replacing bouillon, and shepherd’s-pie-style mashed potatoes on top in lieu of a pastry crust. We also managed to tidy up the crisper in the process, dispatching some baby carrots and snap peas that were just a touch too feeble for our usual pan-braising method. It was a deliciously decadent meal, and the ingredients were virtually free.


cooking, other stuff
3 Comments »
Posted by Anita on 11.18.08 9:30 PM
 There’s some sort of culinary magic that happens in autumn, when even the homeliest of foods can be made beautiful and delicious. I’m convinced that there’s something in the air at this time of year — every foodie I know looks forward to fall, and it can’t just be because we’re all sick of tomatoes and mozzarella.
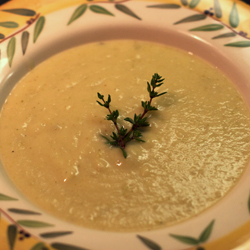
A case in point: We had a half-knob of rather unattractive celeriac left over from an earlier recipe, so we cobbled together a creamy soup by adding a potato, some celery, butter, stock, and thyme. A few shallots, admittedly gorgeous by anyone’s definition, gave the mixture a hint of sweetness.
You might think something this monochrome would taste as bland as it looks, but you’d be mistaken. It’s earthy and herbal, silken and almost meaty. Served in demitasse or small bowls, I think you could even call it pretty enough for company, should the occasion arise. But trust me, you won’t want to share.


Celeriac Bisque
– Serves 4 as a first course
2T unsalted butter
1/3 cup chopped celery (1 medium stalk)
1 medium shallot, minced
12 oz celeriac (also known as celery root), peeled and cut into 1/2-inch dice
1 medium starchy potato, peeled and cut into 1-inch cubes
3 cups unsalted chicken broth or stock (plus more as needed)
2 sprigs fresh thyme
–
2T whipping cream
herbs for garnish
In a heavy, medium-sized saucepan, melt the butter over low heat. Add the celery and cook, covered, until the celery just starts to soften (2 to 3 minutes). Add the shallots and saute, uncovered, 3 minutes more. Stir in celeriac, potato, stock, and thyme sprigs; lightly salt to taste. Bring to a boil, then reduce heat to a bare simmer. Cover and cook until vegetables are very tender, about 40 minutes.
Remove the thyme sprigs and, using a stick blender, puree the soup until smooth. (You can also use a standard blender: cool the soup a bit, work in batches, and then return the puree to the pan). Add additional stock as needed to achieve desired consistency. Stir cream into the soup and adjust seasonings with salt and pepper. Ladle into flat bowls, and garnish with chopped herbs or small tender sprigs, as desired.
cooking, locavore, recipes
4 Comments »
